
You want cupcakes that stop guests mid-conversation — but you're short on time and unsure how to add edible gold to cupcakes for glamorous touch without wrecking the frosting. This guide shows simple, safe steps you can follow right now to add edible gold to cupcakes and get consistent, pin-worthy results.
You’ll learn what materials to buy, how to prepare your cupcakes and frosting, step-by-step techniques for gold leaf, gold dust, and gold sprinkles, plus troubleshooting and storage tips. Let’s make your cupcakes sparkle.
What You'll Need (Ingredients & Tools for Gold Decorating)

- Cupcakes: 12 standard cupcakes, cooled completely.
- Frosting: About 2 cups buttercream, slightly firm for decorating.
- Gold options:
- Edible gold leaf sheets (pure, food-grade)
- Edible gold dust (dry metallic powder)
- Gold sprinkles or pearls
- Tools:
- Clean tweezers
- Soft food-safe brush
- Small scissors or gold leaf applicator
- Parchment squares and a clean tray
- Time: Plan 20–30 minutes for decorating plus baking time.
Tip: Buy gold labeled “edible” not “for decoration only.” Keep hands dry and oil-free.
Preparing Your Cupcakes and Frosting

Start with cupcakes that are fully cooled. If frosting is too soft, chill for 10–15 minutes to firm it up. You want a stable surface so gold leaf doesn’t sink or tear.
- For smooth look: Use an offset spatula to create a flat top.
- For piped swirls: Use a large star tip and pipe evenly. Chill for 5 minutes before gold.
- Make a test cupcake to practice technique before working on the whole batch.
Warning: Do not touch gold leaf with oily fingers. Moisture causes it to clump.
How to Apply Edible Gold (Step-by-Step Technique)
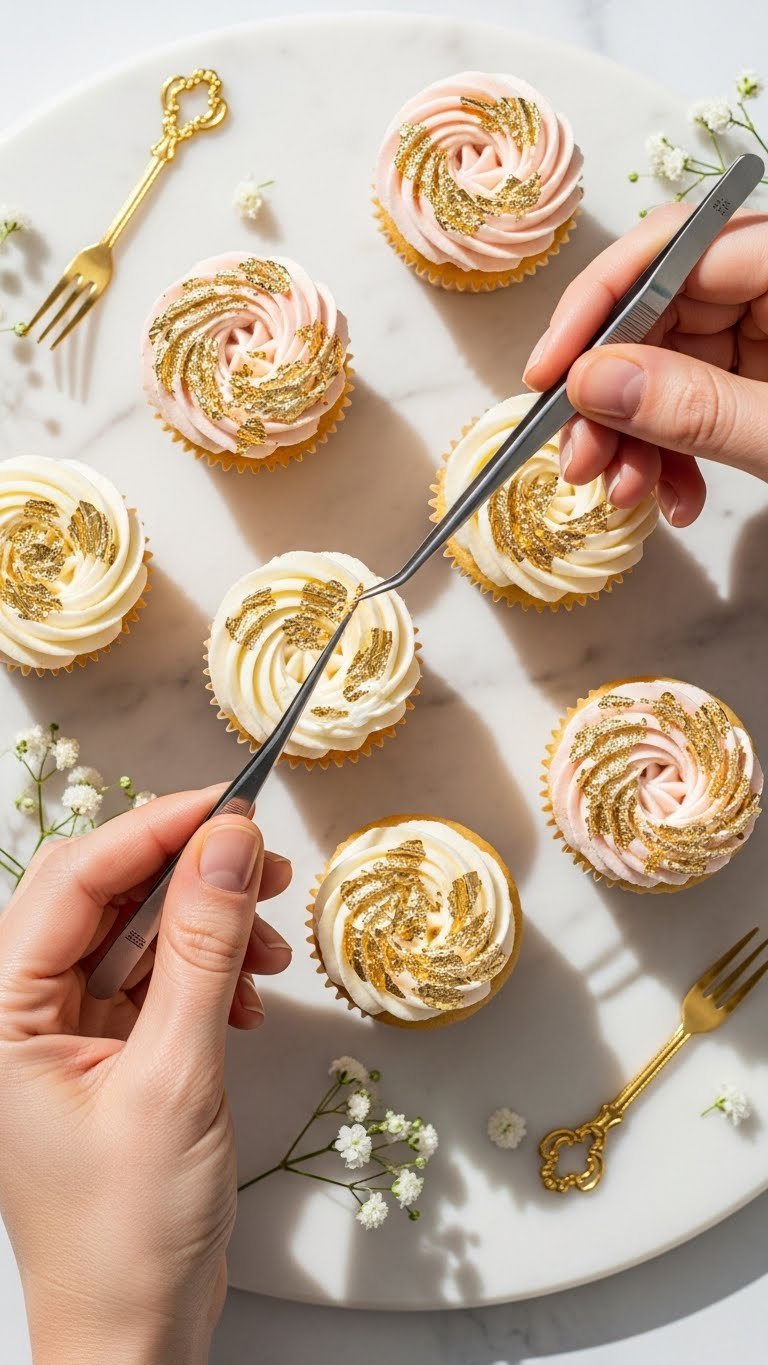
You can add edible gold to cupcakes three ways: leaf, dust, or sprinkles. Follow these numbered steps.
-
Edible Gold Leaf (delicate brilliance)
- Use clean tweezers. Cut a small piece of gold leaf (about 1 inch square).
- Gently lay it over frosting, then press lightly with a soft brush or a fingertip wrapped in parchment.
- For flakes: tear the leaf into tiny shapes with tweezers and scatter.
- Time: 2–3 minutes per cupcake for careful placement.
-
Gold Dust (subtle shimmer)
- Dip a dry brush into edible gold dust (tap excess off).
- Lightly brush over peaks or edges. For a wet metallic paint, mix 1/8 tsp gold dust with a few drops of clear alcohol (vodka) and paint with a fine brush.
- Allow to dry 5 minutes before serving.
-
Gold Sprinkles (fast, bold)
- Sprinkle from a small spoon at a slight angle for control.
- Press a few pearls lightly into frosting so they don’t fall off.
Pro tips:
- Apply gold leaf last, after any fresh flowers or other toppers.
- Work over parchment to catch stray flakes.
- Use a separate brush for gold dust to avoid cross-contamination.
Troubleshooting, Variations, and Storage

Common issues:
- Gold leaf won’t stick: Chill frosting more or press gently with parchment-wrapped fingertip.
- Leaf tears too much: Use larger pieces and trim with scissors.
- Dust looks blotchy: Use a lighter hand; blend with a dry brush.
Variations:
- Drip cupcakes with white chocolate ganache, then add gold flakes along the drip.
- Try rose-gold dust for warmer tone.
- Mix tiny edible flowers with gold for a bridal look.
Storage:
- Store decorated cupcakes in a covered box at room temperature for 1 day.
- For longer storage, refrigerate up to 3 days but bring to room temperature before serving to restore texture.
Which shortcut? Use gold sprinkles for a fast, mess-free finish in under 5 minutes per dozen.
You’ve got a simple roadmap to add edible gold to cupcakes and create elegant, pin-worthy treats. Try one technique on a single cupcake first, then finish the batch when you feel confident. Pin this guide for your next celebration and share it with friends who love pretty desserts. Which gold technique will you try first? Ready to make this happen? Let's do it!