
You want picture-perfect baby boy cookies that look effortless, even if you’ve never piped royal icing before. Learning How to Decorate Baby Boy Cookies with Royal Icing Perfectly gives you repeatable steps, simple tools, and clear timing so your cookies look smooth, crisp, and very giftable.
In this guide you’ll learn what to buy, how to thin and color royal icing, step-by-step piping, and quick fixes. Follow the timing and measurements and you’ll have cookies that photograph beautifully for a baby shower or party.
What You'll Need (Ingredients + Tools)

- Cookies: Use a sturdy sugar cookie recipe, rolled to 1/4 inch and chilled before baking.
- Royal icing base: For about 24 cookies, mix 4 cups powdered sugar + 3 tbsp meringue powder + 4–5 tbsp water.
- Tools: piping bags, couplers, #2 round tip for outlines, #3 for flooding, toothpicks, and a damp towel.
Tips:
- Use gel color—2–3 drops for baby blue, a tiny dash of navy for contrast.
- Make two consistencies: stiff (outline) and flowy (flood).
Getting Started: Mixing, Coloring, and Consistencies
- Whisk meringue powder and powdered sugar in a bowl first.
- Add 3 tbsp water, mix, then add up to 2 tbsp more to reach stiff peak for outlines.
- Transfer about 1 cup to another bowl and thin with water 1/4 tsp at a time until it flows like warm honey for flooding.
Consistency tips:
- Stiff icing holds shape; flood icing spreads.
- Test on a plate: outline holds, flood smooths out in 30–60 seconds.
Coloring tips:
- Add gel color to small bowls, mix thoroughly.
- Keep most icing pale baby blue; reserve a small navy mix for details.
Step-by-Step Instructions (Piping & Flooding)
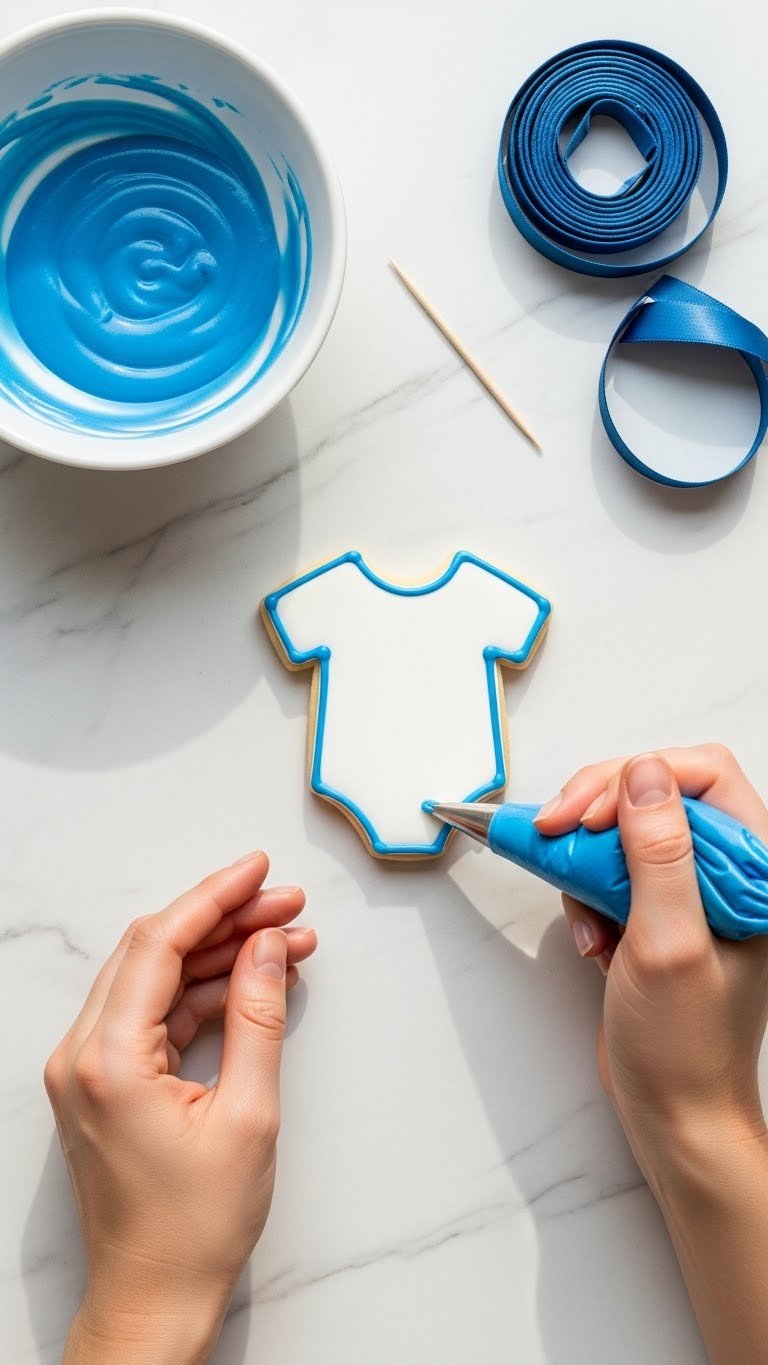
- Outline: Fit a piping bag with #2 tip and pipe a clean outline around each cookie. Work steadily; rest wrist on the table.
- Flood: Switch to flood consistency in a separate bag with a #3 tip. Fill in the outline with steady pressure.
- Spread: Use a toothpick to pop air bubbles and nudge icing into corners. Flood sets in 10–20 minutes to touch; fully dries in 4–6 hours.
- Details: Once dry, add navy details (buttons, stripes, tiny rattle dots) using a stiff navy icing.
Pro tricks:
- Pipe a slightly thicker border to keep flood icing from leaking.
- Keep a damp cloth over unused icing to prevent crusting.
- Work in batches of 8–12 cookies for consistent drying.
Troubleshooting Common Issues & Storage

- Runny icing? Add powdered sugar 1 tbsp at a time until it thickens.
- Cracked surface? You likely over-thinned; patch gently with a thin layer of flood icing.
- Hives or pockmarks? Pop bubbles with a toothpick and smooth quickly.
- Smudged detail? Wait for the base to fully dry (4–6 hours) before adding details.
Storage:
- Store completely dry cookies in an airtight container with parchment between layers.
- Cookies keep up to 7 days at room temperature.
- For make-ahead, freeze baked cookies (un-iced) for 3 months; thaw, then ice.
Quick shortcuts:
- Use disposable piping bags for faster cleanup.
- Pre-mix small jars of navy for consistent accents.
You can now create baby boy cookies that look crisp and camera-ready. Practice the outline and flood rhythm, and you’ll get smoother edges and quicker results. Pin this guide for your next baby shower, save the measurements, and try one new detail style—buttons, stripes, or tiny rattles—on your first batch. Which decoration will you try first? Ready to make this happen? Let's do it!