
You know that moment when the weather turns perfect and you want to bring something more thoughtful than chips and a paper plate? These 15 Elevated Gourmet Picnic Recipes That Impress Guests are here for that exact day. They're picnic-perfect yet feel special, with bright flavors and easy transport.
You’ll find make-ahead salads, handheld tartlets, grilled skewers, and sweet treats you can pack without worry. Each recipe is geared for sharing, simple to plate, and built to impress friends and family on a blanket. Read on for detailed ingredients, step-by-step instructions, and serving tips so your next picnic feels like a small celebration.
1. 15 Elevated Gourmet Picnic Recipes That Impress Guests — Prosciutto, Burrata & Fig Crostini
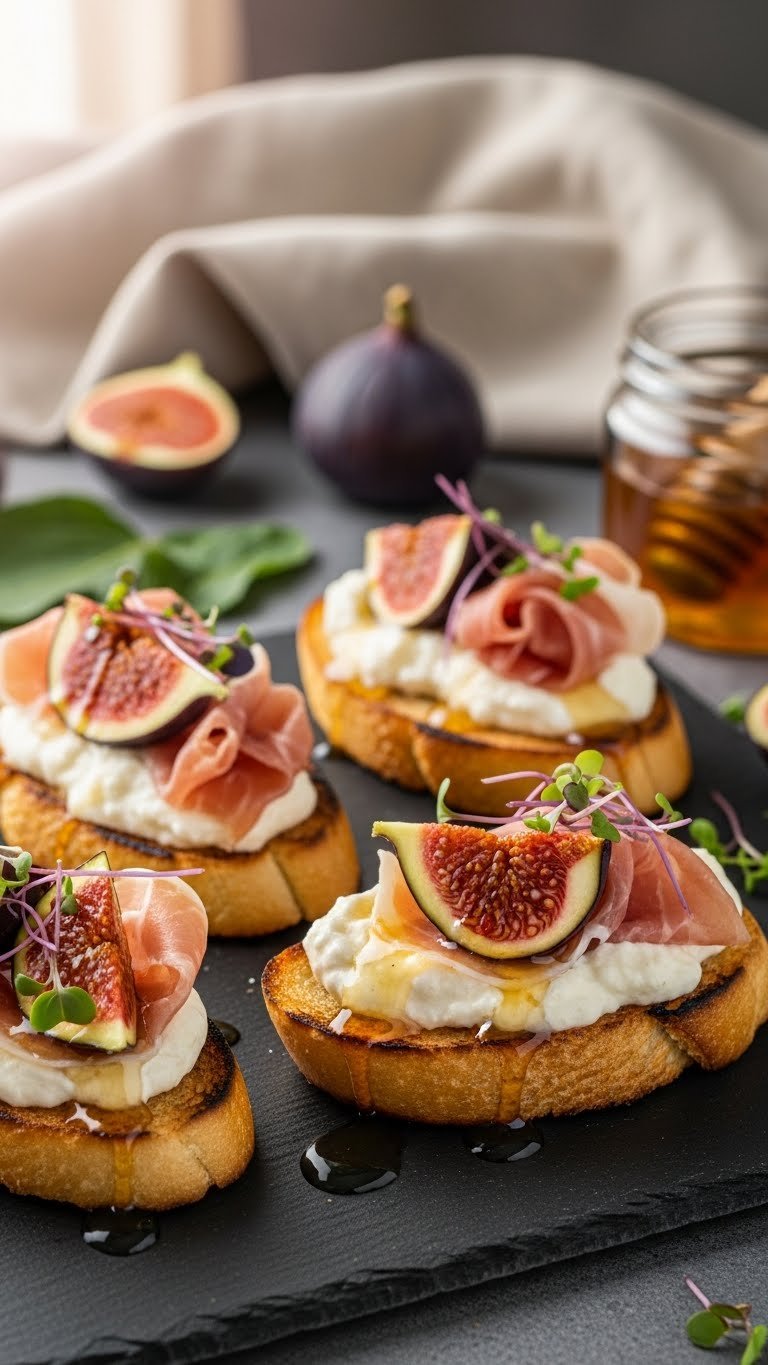
These crostini are a picnic showstopper. Creamy burrata meets salty prosciutto and jewel-like figs. The textures contrast — crunchy toast, silky cheese, tender fruit. It’s simple to build and easy to transport if you assemble last minute. You’ll love the sweet-salty balance and the honey aroma as you open the box. Prep: 15 minutes | Cook: 8 minutes.
Ingredients
- 1 baguette (about 12 oz), sliced 1/2-inch thick
- 3 tbsp olive oil
- 8 oz burrata, chilled
- 6–8 thin slices prosciutto
- 4 fresh figs, quartered
- 2 tbsp honey
- 1 tbsp balsamic reduction (store-bought or homemade)
- Handful fresh arugula
- Freshly cracked black pepper, to taste
- Flaky sea salt, to finish
Instructions
- Preheat oven to 400°F (200°C). Line a baking sheet with parchment.
- Brush both sides of baguette slices with olive oil. Arrange on sheet.
- Toast for 6–8 minutes until edges are golden and crisp. Watch closely to avoid burning.
- Let crostini cool 5 minutes. They should be warm, not steaming.
- Tear burrata into pieces and place on crostini right before serving.
- Top with folded prosciutto, fig quarters, and a small arugula sprig.
- Drizzle 1/2 tsp honey and 1/4 tsp balsamic reduction per crostini.
- Finish with flaky sea salt and cracked black pepper.
- Pack crostini in a shallow airtight container with parchment between layers. Assemble at picnic to keep toast crisp.
How to Serve It
Serve on a wooden board for a rustic look. Add small bowls of extra honey and balsamic reduction. Pair with chilled prosecco or a dry rosé. Store leftover burrata separately and eat within 24 hours. Make crostini and pack components; assemble on-site for best texture. Great for summer evenings and celebratory picnics.
2. Lemon-Herb Focaccia Squares with Rosemary and Sea Salt
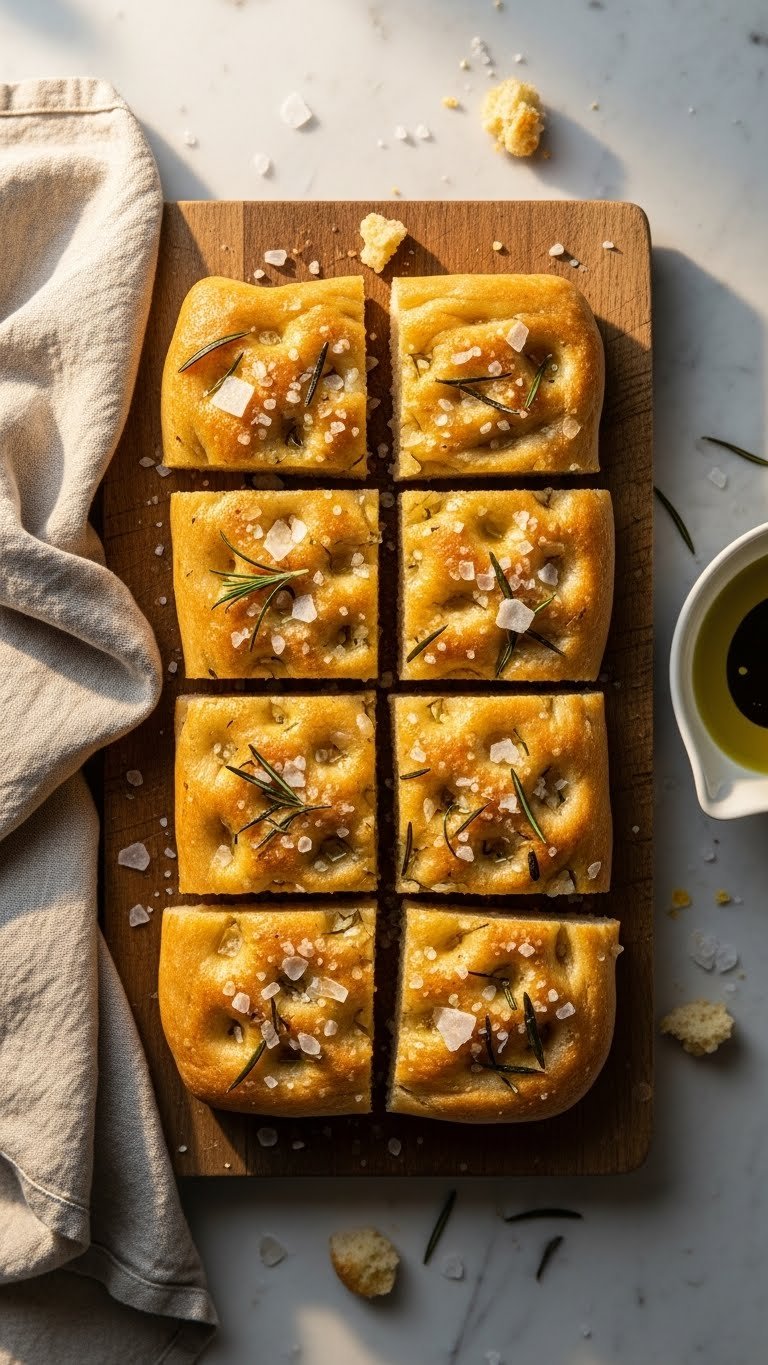
This lemon-herb focaccia is soft, airy, and bright. It has olive oil sheen, little dimples, and fresh rosemary aroma. The lemon zest lifts the dough and makes it picnic-friendly. It’s great for sandwiches or as a side. Prep: 20 minutes (plus rising) | Cook: 25 minutes.
Ingredients
- 3 1/2 cups all-purpose flour
- 1 1/4 cups warm water (100–110°F / 38–43°C)
- 2 1/4 tsp active dry yeast (one 0.25-oz packet)
- 1 tbsp sugar
- 1 tsp fine sea salt
- 1/3 cup extra-virgin olive oil, plus 2 tbsp for drizzling
- Zest of 1 lemon
- 1 tbsp fresh rosemary, chopped, plus sprigs for top
- Flaky sea salt for finishing
- Freshly ground black pepper, optional
Instructions
- In a bowl, whisk warm water, yeast, and sugar. Let bloom 5–7 minutes until foamy.
- In a large bowl, combine flour and salt. Add yeast mixture and 1/3 cup olive oil.
- Stir until a wet dough forms. Add lemon zest and chopped rosemary.
- Turn onto floured surface and knead 5 minutes until smooth, or use a stand mixer with dough hook for 3–4 minutes.
- Place dough in an oiled bowl, cover, and let rise 1 hour until doubled.
- Oil a 9×13-inch pan with 2 tbsp olive oil. Spread dough to pan, dimple with fingertips.
- Let rise again 30 minutes. Preheat oven to 425°F (220°C).
- Drizzle extra olive oil, scatter rosemary sprigs, and sprinkle flaky salt.
- Bake 20–25 minutes until golden and edges sound hollow when tapped.
- Cool 10–15 minutes, then cut into squares. Check interior — crumb should be tender and spring back.
How to Serve It
Serve warm or room temperature on a board. Lightly brush with more olive oil before serving. Cut into sandwich-ready squares or tear with fingers. Pair with charcuterie, marinated olives, or chilled white wine. Store in an airtight container for 2 days or freeze for longer. Make up to a day ahead, reheat briefly before packing.
3. Chilled Pea, Mint & Goat Cheese Soup Shooters (Make-Ahead Picnic Soup)
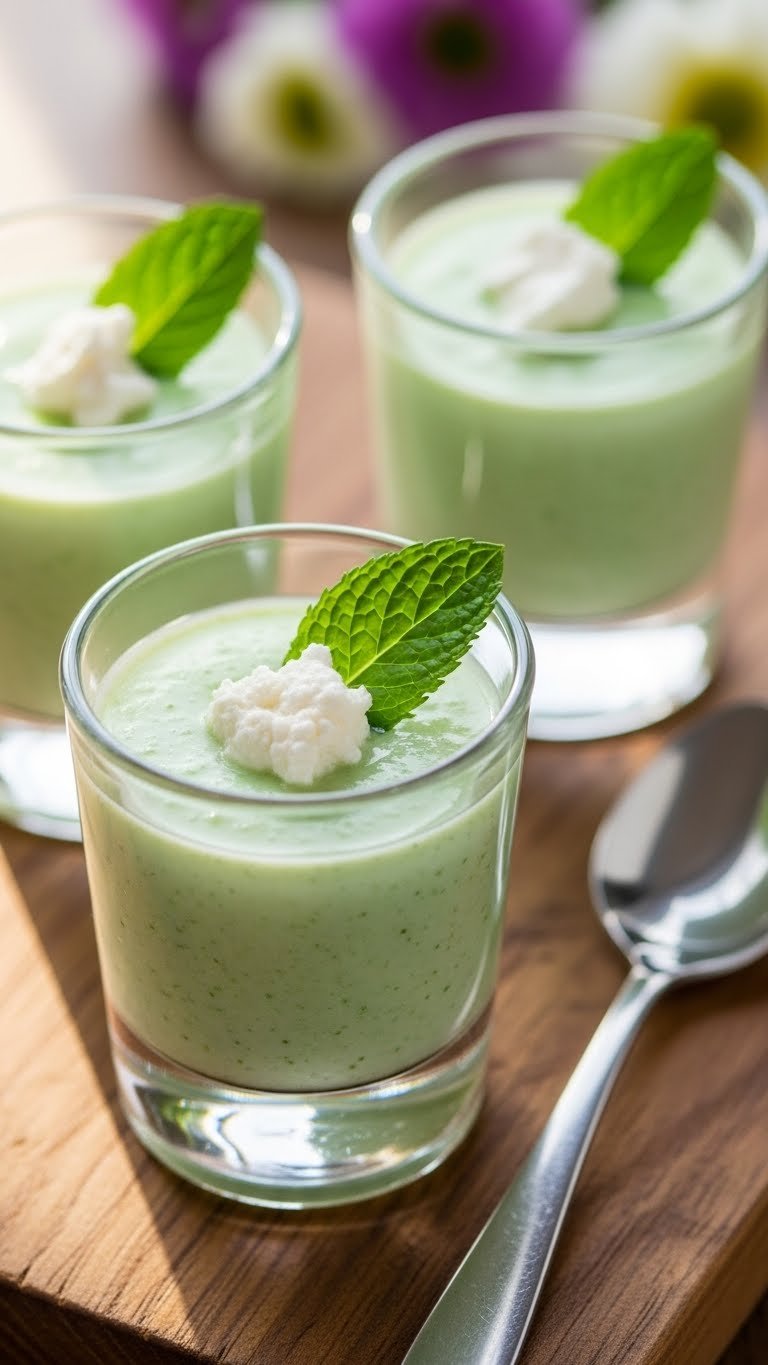
This chilled soup feels elegant and light. Fresh peas and mint give a bright green color and sweet-herbal flavor. Goat cheese adds creaminess and tang. It’s easy to make ahead and serve in small cups at a picnic. You’ll be drawn to its cool, silky texture and fresh aroma. Prep: 10 minutes | Cook: 8 minutes.
Ingredients
- 3 cups frozen peas
- 2 cups low-sodium vegetable broth
- 1 small shallot, chopped
- 1 tbsp olive oil
- 1/4 cup fresh mint leaves, packed
- 2 oz soft goat cheese, plus extra for garnish
- 2 tbsp heavy cream (optional)
- Juice of 1/2 lemon
- Salt and pepper, to taste
- Microgreens or mint sprigs, for garnish
Instructions
- In a saucepan, heat olive oil over medium heat. Sauté shallot 3–4 minutes until soft.
- Add peas and vegetable broth. Simmer 5 minutes until peas are tender.
- Remove from heat and let cool 5 minutes.
- Transfer to a blender, add mint, goat cheese, lemon juice, and heavy cream if using.
- Blend until silky and smooth, about 30–60 seconds. Season with salt and pepper.
- Chill in refrigerator at least 2 hours until cold.
- Before serving, taste and adjust seasoning. Spoon into shooter cups and top with a small dollop of goat cheese and a mint sprig.
- Keep chilled in a cooler until serving.
How to Serve It
Serve in small glass shooters or mason jars with spoons. Garnish with extra goat cheese and mint leaves. Pair with crisp champagne or a light sauvignon blanc. Store leftovers covered in fridge for 2 days. Make the soup a day ahead for best flavor melding.
4. Grilled Lemon-Garlic Chicken Skewers with Herb Yogurt Dip
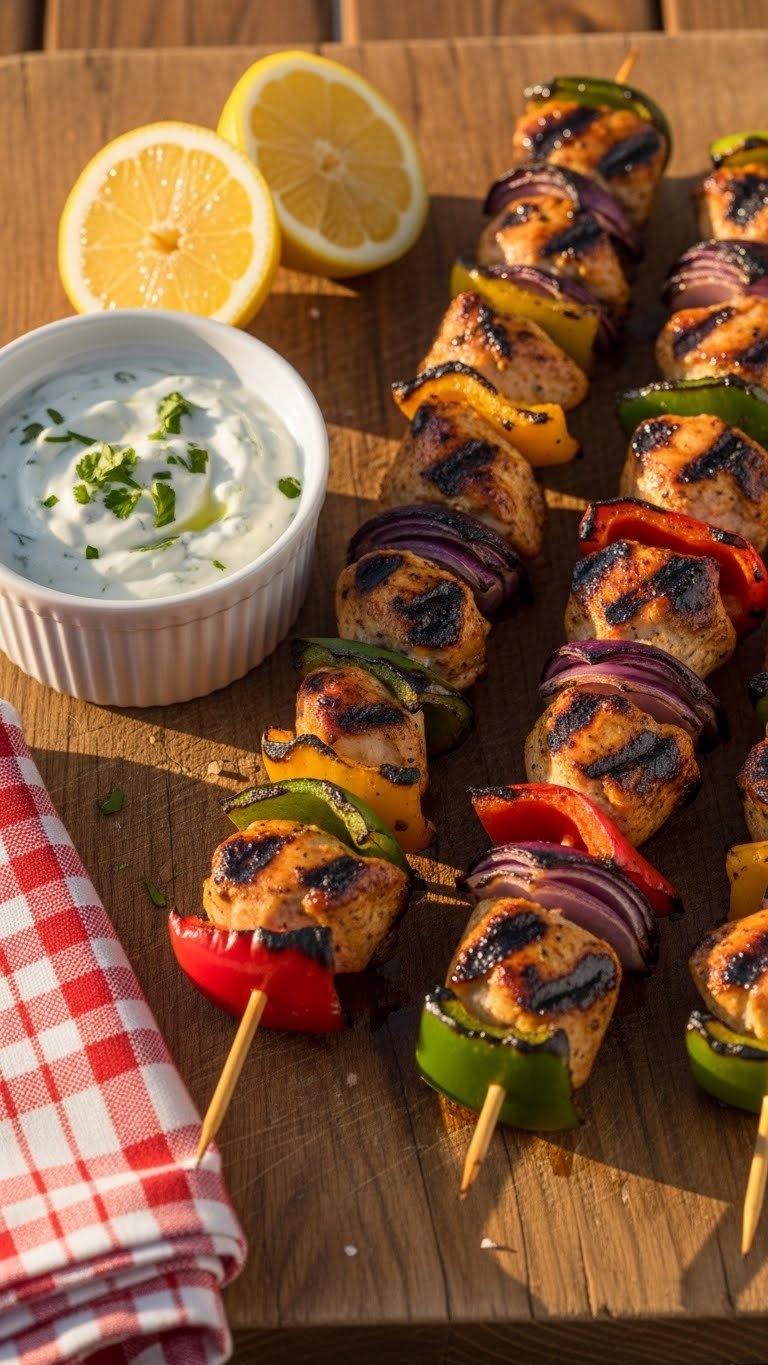
These skewers are juicy and bright with lemon and garlic. The marinade tenderizes and adds depth. They’re easy to grill at the picnic site or cook ahead and chill. The cool herb yogurt dip balances the charred flavor. Prep: 20 minutes (plus marinate 1 hour) | Cook: 8–10 minutes.
Ingredients
- 1 1/2 lbs boneless skinless chicken thighs, cut into 1-inch pieces
- 3 tbsp olive oil
- 3 cloves garlic, minced
- Zest and juice of 1 lemon
- 1 tsp smoked paprika
- 1/2 tsp ground cumin
- 1 tsp kosher salt
- 1/2 tsp black pepper
- 8–10 wooden skewers, soaked 30 minutes
- For dip: 1 cup Greek yogurt, 2 tbsp chopped dill, 1 tbsp lemon juice, salt & pepper to taste
Instructions
- Whisk olive oil, garlic, lemon zest/juice, paprika, cumin, salt, and pepper.
- Toss chicken pieces in marinade. Cover and refrigerate at least 1 hour (up to 4 hours).
- Thread chicken onto skewers leaving small gaps for even cooking.
- Preheat grill to medium-high. Oil grates.
- Grill skewers 3–4 minutes per side until internal temperature reaches 165°F (74°C) and juices run clear.
- Remove and rest 5 minutes before serving.
- Make yogurt dip by stirring ingredients together and chilling until service.
- Pack skewers in a shallow container; rewarm briefly on a portable grill or serve room temperature.
How to Serve It
Arrange skewers on a platter with lemon wedges and parsley. Serve with herb yogurt dip and a simple couscous salad. Pair with cold beer or iced tea. Store cooked chicken in fridge 3 days; freeze for longer. Marinate ahead and skewer on-site for convenience.
5. 15 Elevated Gourmet Picnic Recipes That Impress Guests — Smoked Salmon & Dill Tea Sandwiches
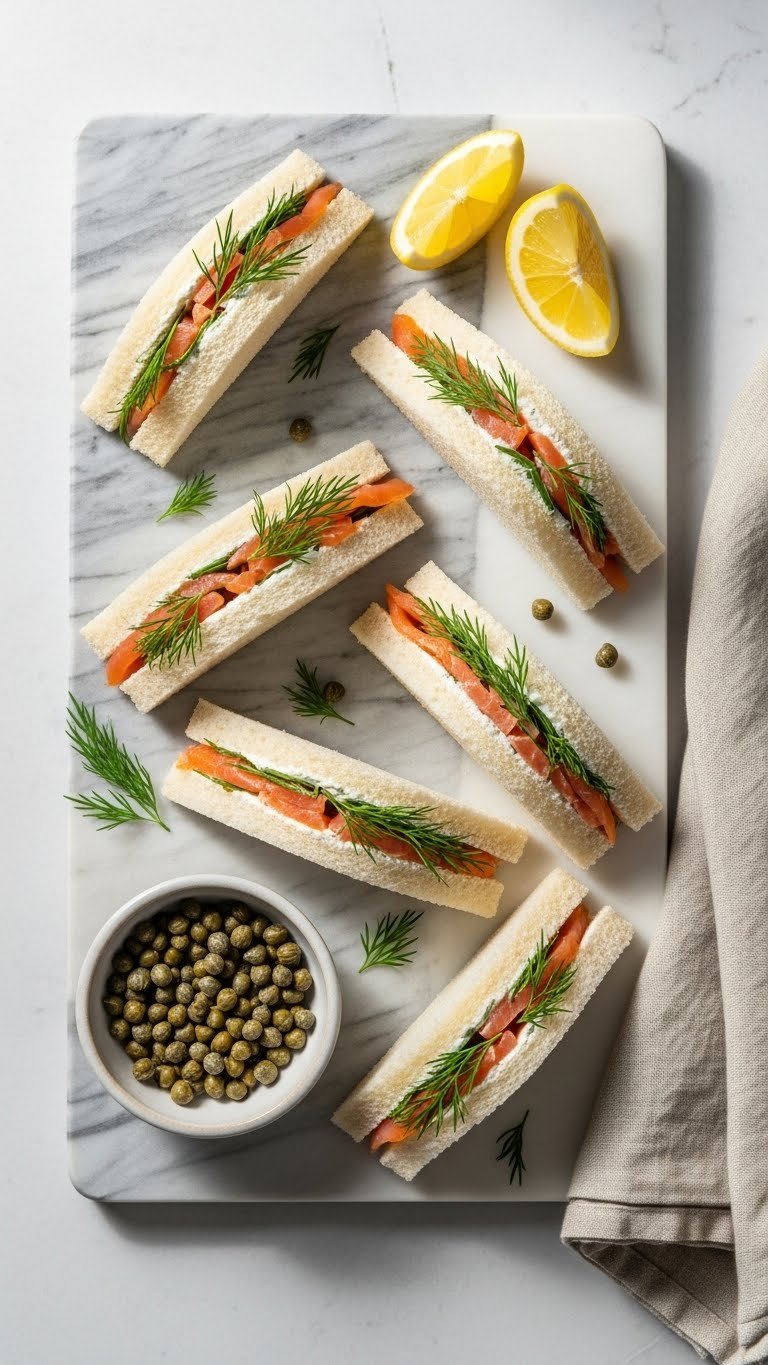
These tea sandwiches are classic with a gourmet twist. Smoked salmon adds a silky, smoky note; dill and lemon brighten each bite. They’re easy to eat and perfect for a refined picnic spread. The texture is smooth and slightly tangy. Prep: 15 minutes | Cook: no cooking.
Ingredients
- 8 slices soft white or rye sandwich bread, crusts removed if desired
- 8 oz cream cheese, softened to room temperature
- 2 tbsp sour cream
- 1 tbsp lemon juice
- 1 tbsp chopped fresh dill, plus sprigs for garnish
- 8 oz smoked salmon, thinly sliced
- 1 tbsp capers, drained
- Freshly ground black pepper, to taste
- Cucumber thin slices (optional)
- Olive oil spray or soft butter for bread, optional
Instructions
- In a bowl, mix cream cheese, sour cream, lemon juice, and chopped dill until smooth.
- Spread a thin layer of the mixture on each bread slice.
- Layer smoked salmon evenly over half the slices. Add optional thin cucumber slices.
- Sprinkle capers and cracked black pepper over the salmon.
- Top with remaining bread slices, press gently.
- Cut sandwiches into triangles or fingers. Wipe knife between cuts for clean edges.
- Chill 30 minutes to let flavors meld. Keep chilled until serving.
How to Serve It
Stack on a platter with lemon wedges and dill sprigs. Pair with chilled sparkling water or champagne. Keep in a cooler to maintain texture. Sandwiches stay best when made same day — make spread and slice salmon a few hours ahead then assemble on-site. Perfect for afternoon tea-style picnics.
6. Charred Corn, Avocado & Heirloom Tomato Salad with Chili-Lime Vinaigrette

This salad is bright, smoky, and buttery. Charred corn adds sweetness; avocado brings creaminess; heirloom tomatoes add juicy acidity. Chili-lime vinaigrette gives a gentle kick. It’s great served cold and holds up well in a cooler. Prep: 15 minutes | Cook: 6 minutes.
Ingredients
- 4 ears corn, husked (or 3 cups frozen corn, thawed)
- 2 ripe avocados, diced
- 2 cups heirloom tomatoes, chopped
- 1/2 cup red onion, finely chopped
- 1/4 cup cilantro, chopped
- For vinaigrette: 3 tbsp olive oil, 2 tbsp lime juice, 1 tsp honey, 1/2 tsp chili powder, 1/2 tsp cumin, salt & pepper to taste
- 1 tbsp lime zest, optional
- 1/2 tsp flaky sea salt for finishing
Instructions
- If using fresh corn, grill or char corn on high heat for 2–3 minutes per side until slightly blackened. Let cool and cut kernels off cob.
- In a large bowl, combine corn, avocados, tomatoes, red onion, and cilantro.
- Whisk vinaigrette ingredients until emulsified.
- Pour dressing over salad and toss gently to coat.
- Taste and adjust seasoning; add lime zest if desired.
- Chill 30 minutes before serving to meld flavors.
- Stir gently before serving to redistribute dressing.
How to Serve It
Serve in a wide bowl on the picnic blanket. Garnish with extra cilantro and lime wedges. Pair with grilled fish, tacos, or a crisp rosé. Store leftovers in fridge 2 days; avocado will brown slightly — squeeze extra lime to slow oxidation. Make corn ahead and combine with other ingredients on-site if preferred.
7. Fig, Goat Cheese & Honey Galette (Rustic Handheld Tart)
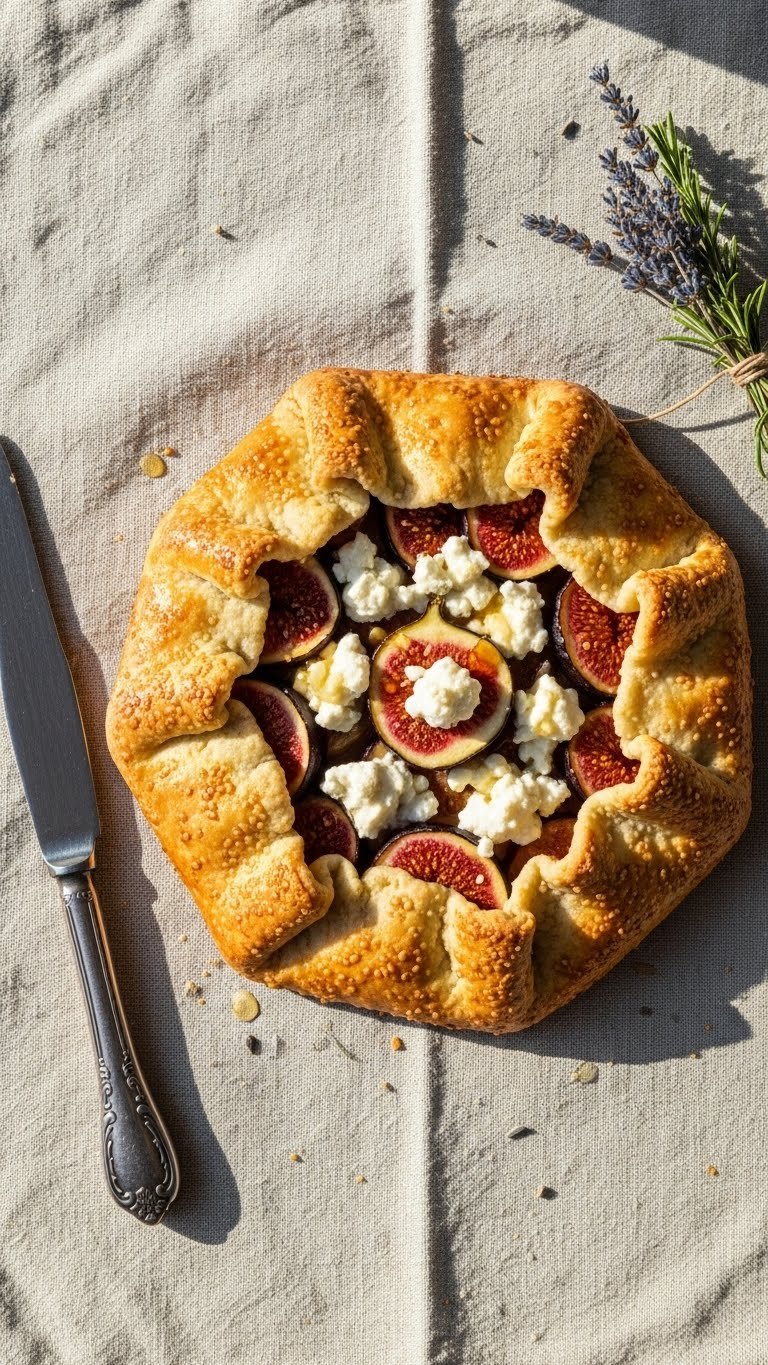
This galette has flaky pastry and creamy, tangy goat cheese with sweet figs. It’s built to share and holds up well at room temperature. The crust is crisp, the filling tender and fragrant with honey. You’ll love slicing it for a picnic centerpiece. Prep: 30 minutes (plus chilling) | Cook: 35–40 minutes.
Ingredients
- For crust: 1 1/4 cups all-purpose flour, 1/2 tsp salt, 8 tbsp (1 stick) cold unsalted butter, cubed, 3–4 tbsp ice water
- For filling: 4 oz goat cheese, softened to room temperature
- 2 tbsp honey, plus extra to drizzle
- 1 tsp lemon zest
- 6 fresh figs, sliced
- 1 egg, beaten for egg wash
- 1 tbsp turbinado or coarse sugar (optional for crust)
- Pinch salt
Instructions
- Make crust: pulse flour and salt in food processor. Add cold butter and pulse until pea-sized pieces form.
- Add ice water 1 tbsp at a time until dough comes together. Form disk, wrap, and chill at least 1 hour.
- Preheat oven to 400°F (200°C). Line baking sheet with parchment.
- Roll chilled dough on floured surface into a 12-inch circle.
- Mix goat cheese, 2 tbsp honey, and lemon zest until spreadable. Season with pinch of salt.
- Spread cheese mixture in center of dough leaving a 2-inch border. Arrange fig slices on top.
- Fold edges over figs to form rustic crust. Brush with beaten egg and sprinkle coarse sugar.
- Bake 35–40 minutes until crust is golden and filling is bubbling slightly.
- Let cool 30 minutes before slicing. Test doneness: crust should be deep golden and firm.
How to Serve It
Slice into wedges on a wooden board. Drizzle with extra honey and add fresh thyme sprigs. Pair with rosé or iced tea. Store wrapped at room temp 1 day or refrigerated 3 days. Make the crust and filling the day before; assemble and bake just before leaving or at a nearby picnic oven if you have one.
8. Truffle Egg Salad on Mini Brioche Sliders
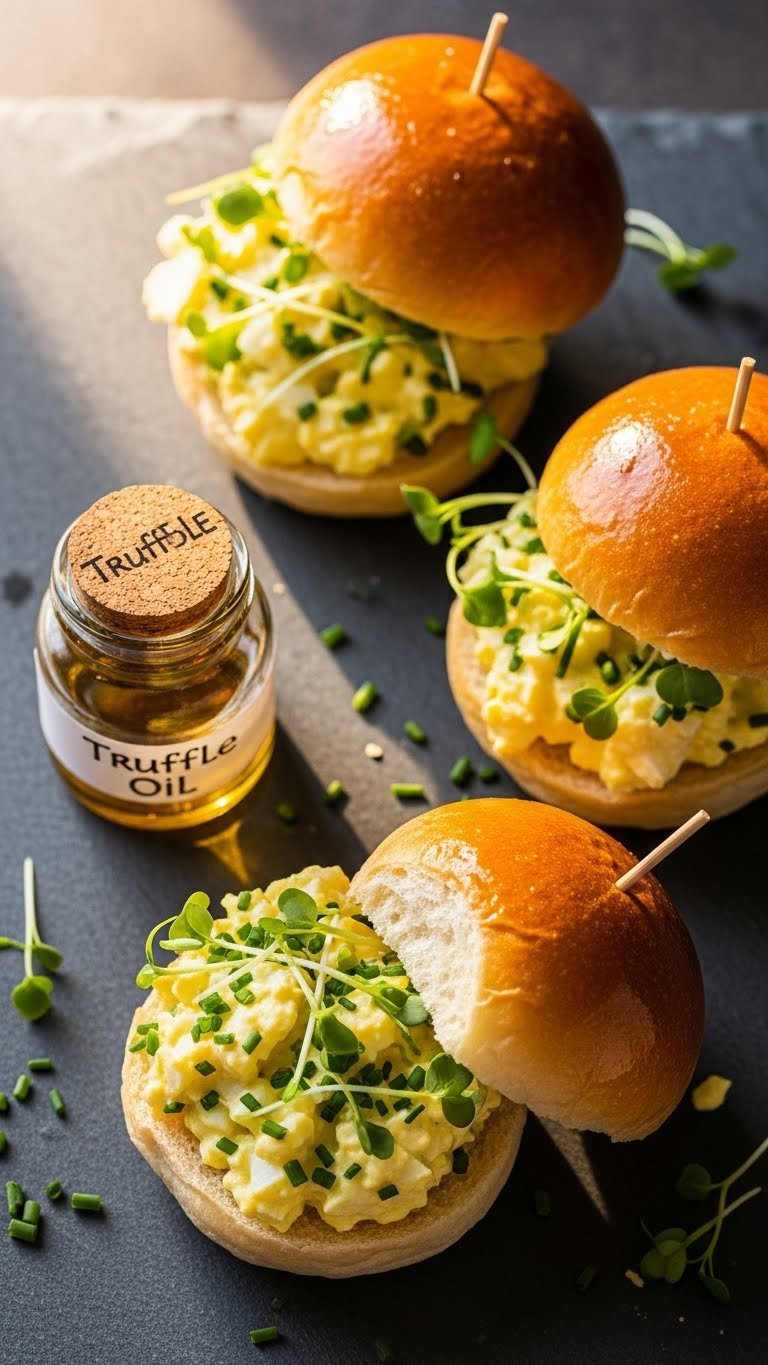
This egg salad is rich with a hint of truffle oil and crisp chives. The brioche adds buttery sweetness. It’s portable and feels indulgent without being fussy. Texture is creamy and pillowy with bright chive bites. Prep: 20 minutes | Cook: 10 minutes.
Ingredients
- 8 large eggs
- 1/3 cup mayonnaise
- 2 tbsp whole-grain mustard
- 1 tsp white wine vinegar
- 1/2 tsp truffle oil (adjust to taste)
- 2 tbsp chives, finely chopped
- Salt and pepper, to taste
- 8 mini brioche buns
- 1 cup baby spinach or microgreens
- Paprika, for dusting optional
Instructions
- Place eggs in a pot, cover with cold water by 1 inch, bring to a boil.
- Once boiling, remove from heat, cover, and let sit 10 minutes for hard-cooked eggs.
- Drain and cool eggs under cold running water. Peel and roughly chop.
- In a bowl, mix mayonnaise, mustard, vinegar, truffle oil, and chives.
- Fold chopped eggs into dressing. Season with salt and pepper.
- Split mini brioche buns and toast briefly if desired.
- Fill buns with egg salad and a few spinach leaves. Dust with paprika if using.
- Chill 30 minutes before packing. Keep salad chilled in cooler until serving.
How to Serve It
Arrange sliders on a platter with extra chives and microgreens. Pair with sparkling lemonade or a light pinot grigio. Store egg salad in fridge 2 days. Make egg salad ahead and assemble sliders just before serving to keep buns from getting soggy.
9. 15 Elevated Gourmet Picnic Recipes That Impress Guests — Grilled Shrimp, Mango & Avocado Salad Cups
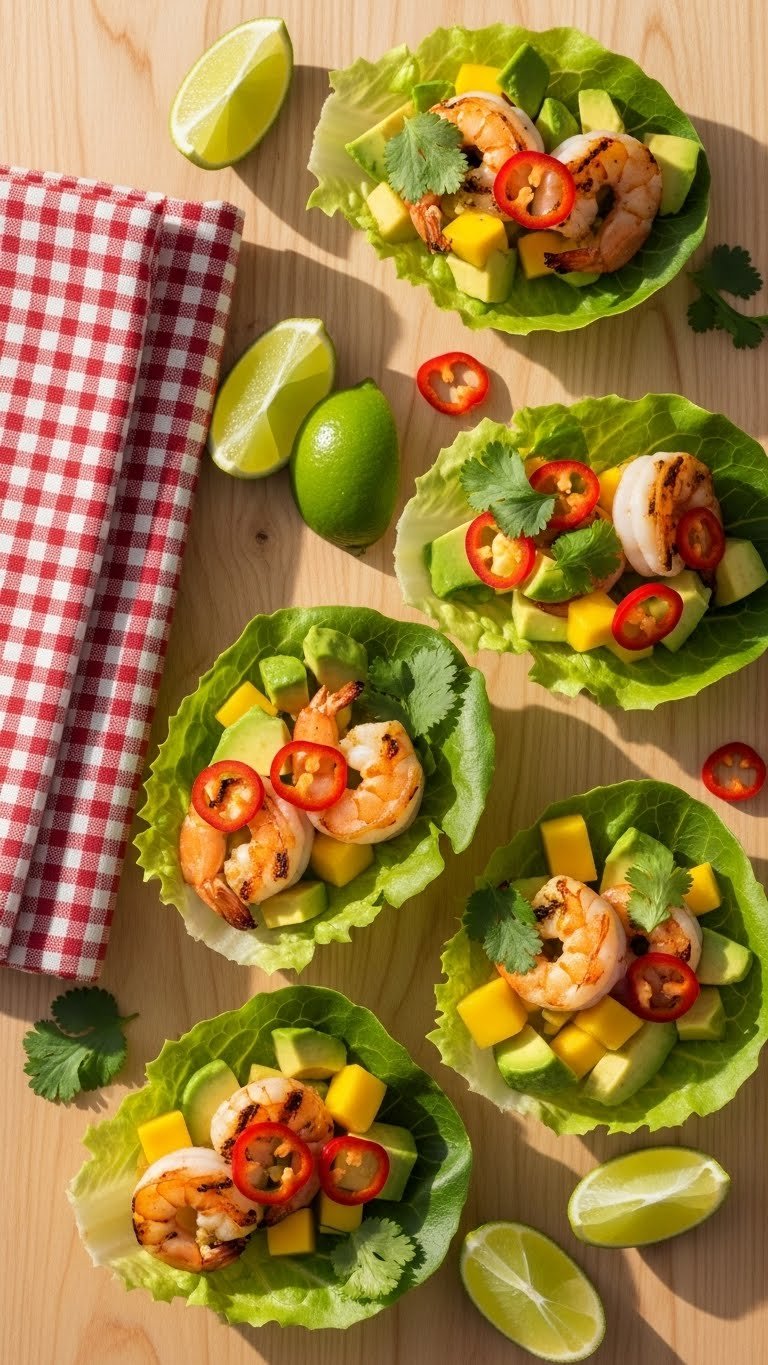
These salad cups are colorful and easy to eat. Juicy grilled shrimp, sweet mango, and creamy avocado create contrast. They’re light, portable, and full of tropical flavor. The lime-chili dressing wakes up the palate. Prep: 15 minutes (plus marinate 15 minutes) | Cook: 6 minutes.
Ingredients
- 1 lb large shrimp, peeled and deveined
- 2 tbsp olive oil
- 1 clove garlic, minced
- Zest and juice of 1 lime
- 1 ripe mango, diced
- 1 ripe avocado, diced
- 1/4 cup red onion, finely chopped
- 1 jalapeño, seeded and minced
- 2 tbsp cilantro, chopped
- Butter lettuce leaves for cups (about 12)
- Salt and pepper, to taste
Instructions
- Toss shrimp with olive oil, garlic, lime zest/juice, salt, and pepper. Marinate 15 minutes.
- Preheat grill or grill pan to medium-high. Oil grates.
- Grill shrimp 2–3 minutes per side until pink and opaque. Internal temp 145°F (63°C).
- Remove shrimp and cool slightly.
- In a bowl, combine mango, avocado, red onion, jalapeño, and cilantro. Toss gently.
- Add grilled shrimp to the fruit mixture and toss lightly.
- Spoon salad into butter lettuce cups.
- Chill briefly if not serving immediately. Keep cool in a container.
How to Serve It
Serve cups on a platter with extra lime wedges. Garnish with cilantro and a dusting of chili powder. Pair with chilled sauvignon blanc or a citrusy beer. Best eaten the day made; store components separately if making ahead. Great for sunny beach or park picnics.
10. Roasted Vegetable & Quinoa Nicoise-Style Salad

This Nicoise-inspired salad swaps tuna for hearty roasted veggies and quinoa. It’s colorful and satisfying, with warm roasted potatoes and crisp green beans. The vinaigrette ties everything together. It travels well in a cooler. Prep: 25 minutes | Cook: 25–30 minutes.
Ingredients
- 1 cup quinoa, rinsed
- 2 cups water or broth
- 1 lb baby potatoes, halved
- 8 oz green beans, trimmed
- 1 cup cherry tomatoes, halved
- 2 tbsp olive oil
- 1 tsp Dijon mustard
- 2 tbsp red wine vinegar
- 2 hard or soft-boiled eggs (to preference)
- 1/3 cup Niçoise or Kalamata olives, pitted
- Salt and pepper, to taste
- Fresh parsley, chopped
Instructions
- Preheat oven to 425°F (220°C). Toss potatoes with 1 tbsp olive oil, salt, and pepper. Roast 20–25 minutes until golden and tender.
- Cook quinoa with 2 cups water/broth per package instructions (about 15 minutes) until fluffy. Let cool.
- Blanch green beans 2–3 minutes in boiling salted water, then plunge into ice water to keep color.
- Whisk olive oil, Dijon, red wine vinegar, salt, and pepper to make dressing.
- In large bowl, combine quinoa, roasted potatoes, green beans, tomatoes, and olives.
- Toss with dressing and garnish with parsley.
- Add halved eggs on top before serving.
- Chill 30 minutes to meld flavors. Check doneness of potatoes — fork tender.
How to Serve It
Serve in a large wooden bowl with serving spoons. Garnish with more parsley and a lemon wedge. Pair with chilled white wine or rosé. Keeps well for 2–3 days refrigerated. Make-ahead tip: roast and cook quinoa a day ahead and assemble before leaving.
11. Herbed Ricotta & Zest-Stuffed Peppers (Mini Bell Peppers)

These stuffed mini peppers are creamy, tangy, and crunchy. Herbed ricotta with lemon zest fills the sweet pepper cups. They're bite-sized and mess-free for a picnic. Texture is crisp pepper and silky cheese. Prep: 15 minutes | Cook: no cooking.
Ingredients
- 12–16 mini sweet bell peppers, halved and seeded
- 1 1/2 cups ricotta cheese
- 2 tbsp grated Parmesan
- 1 tbsp lemon zest
- 2 tbsp chopped chives
- 1 tbsp chopped basil
- 1 clove garlic, minced
- 1 tbsp olive oil
- Salt and pepper, to taste
- Cracked red pepper flakes, optional
Instructions
- Whisk ricotta, Parmesan, lemon zest, garlic, and herbs until smooth. Add olive oil.
- Season with salt and pepper.
- Spoon or pipe ricotta into pepper halves.
- Arrange on a platter and sprinkle with red pepper flakes if desired.
- Chill 30 minutes to let flavors meld.
- Keep covered and cold in a cooler until serving.
- Taste test: ricotta should be creamy and well seasoned.
How to Serve It
Serve on a shallow dish with basil sprigs. Pair with light white wine or citrus-infused water. Store in fridge 2 days; assemble the filling ahead and fill peppers on-site. Excellent as a refreshing picnic appetizer during warm weather.
12. Caramelized Onion, Fig & Goat Cheese Galette Bites (Mini Versions)

These mini galettes pack the same flavor as the larger version in one hand. Sweet caramelized onion and fig meet tangy goat cheese in flaky pastry. They’re portable and elegant. You’ll notice the sweet onion perfume and buttery crust. Prep: 30 minutes (plus chilling) | Cook: 18–22 minutes.
Ingredients
- For crust: 2 cups all-purpose flour, 1/2 tsp salt, 12 tbsp (1 1/2 sticks) cold butter, cubed, 4–6 tbsp ice water
- 3 cups onions, thinly sliced
- 1 tbsp olive oil
- 1 tbsp butter
- 1 tsp brown sugar
- 1/2 cup figs, sliced
- 4 oz goat cheese, crumbled
- 1 egg, beaten for wash
- Fresh thyme for garnish
- Salt and pepper, to taste
Instructions
- Make crust: pulse flour and salt. Cut in butter until coarse crumbs form. Add ice water to bring dough together. Chill 1 hour.
- In a skillet, heat olive oil and butter. Add onions and brown sugar, cook 15–18 minutes over medium-low until caramelized. Season.
- Preheat oven to 375°F (190°C).
- Roll dough and cut into 3–4-inch rounds for mini galettes.
- Spread a small spoonful of caramelized onions, top with fig slices and crumbled goat cheese.
- Fold edges up and brush with beaten egg.
- Bake 18–22 minutes until golden and edges set.
- Cool 15 minutes before packing. Check crust — it should be golden and flaky.
How to Serve It
Serve warm or room temperature on a board. Garnish with thyme sprigs and drizzle a little honey. Pair with a glass of bubbly or light red. Store in fridge 2 days. Make filling and dough ahead; assemble and bake the morning of your picnic for best texture.
13. Mediterranean Farro Salad with Feta and Marinated Olives
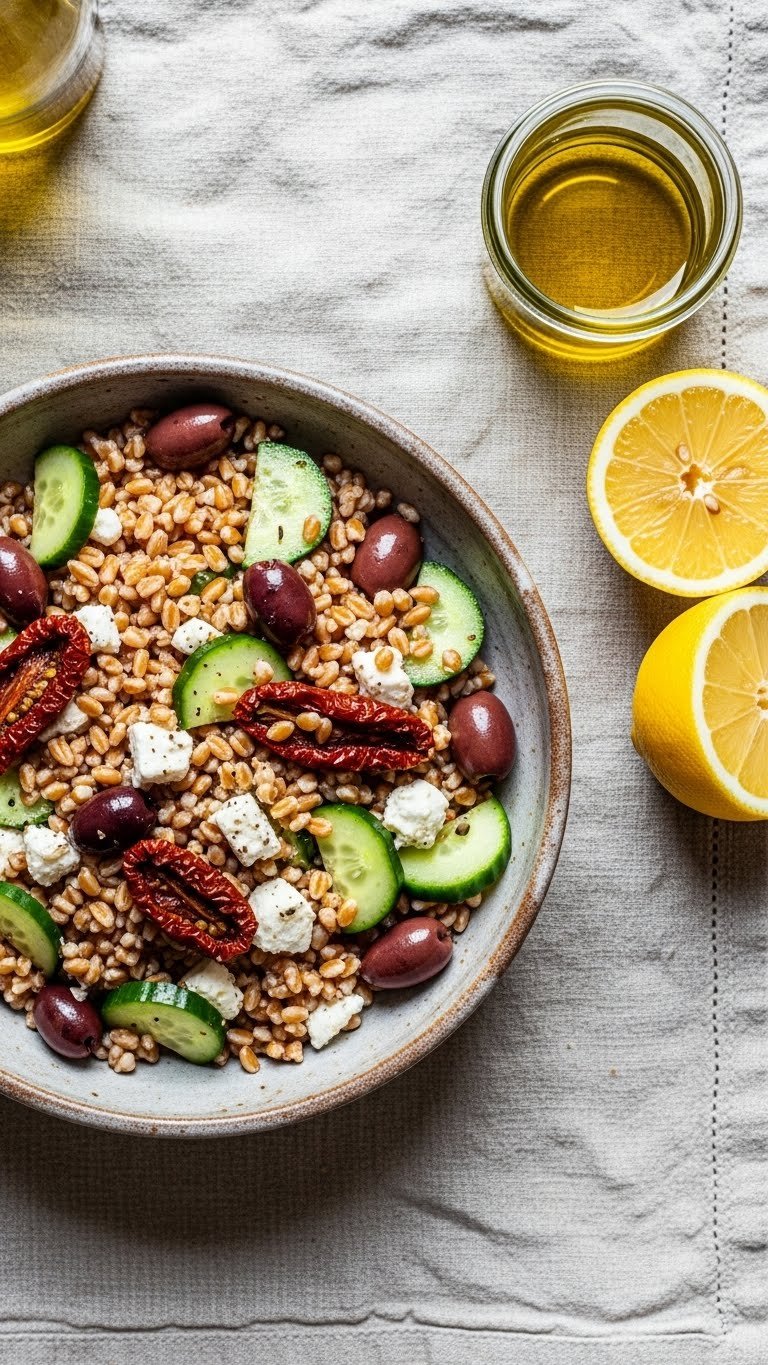
This farro salad is hearty and chewy with Mediterranean brightness. Farro holds up well and keeps textures distinct. Marinated olives and feta add savory depth. The salad is meal-worthy and great for sharing. Prep: 10 minutes | Cook: 25–30 minutes.
Ingredients
- 1 1/2 cups pearled farro
- 3 cups water or vegetable broth
- 1 cup cucumber, diced
- 1/2 cup sun-dried tomatoes, chopped
- 1/2 cup marinated olives, sliced
- 3/4 cup crumbled feta
- 1/4 cup red onion, finely chopped
- 3 tbsp olive oil
- 2 tbsp red wine vinegar
- 1 tbsp chopped parsley
- Salt and pepper, to taste
Instructions
- Rinse farro, then cook in 3 cups boiling water/broth 25–30 minutes until tender but slightly chewy. Drain and cool.
- Whisk olive oil, red wine vinegar, salt, and pepper.
- In a large bowl, combine cooled farro, cucumber, sun-dried tomatoes, olives, onion, and parsley.
- Toss with dressing and fold in feta gently.
- Taste and adjust seasoning.
- Chill 30 minutes before serving for flavors to meld.
- Store in fridge up to 3 days.
How to Serve It
Spoon into a large bowl and garnish with extra feta and parsley. Pair with grilled meats, pita, or chilled white wine. This salad makes a great base for a picnic grain bowl. Make a day ahead; it improves after resting.
14. Strawberry Basil Pavlova Cups with Lemon Curd
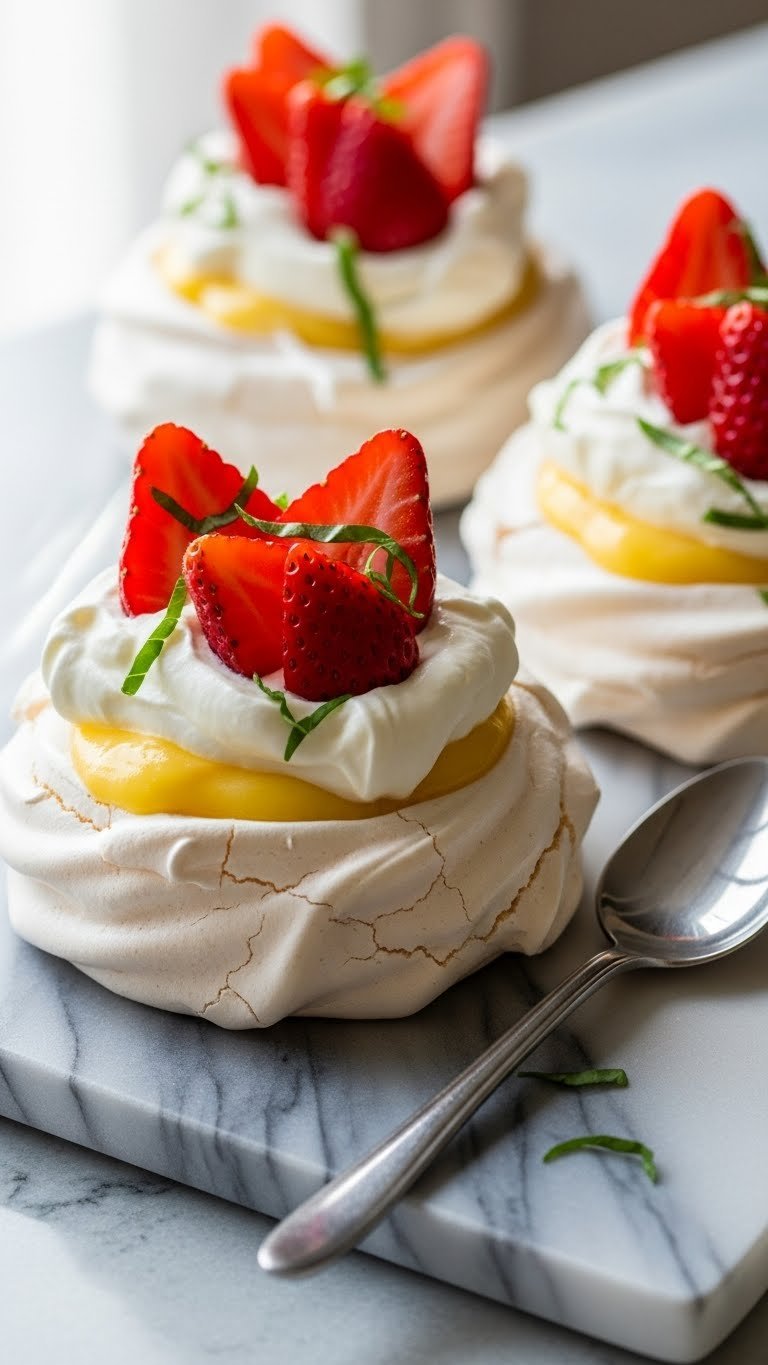
Light meringue cups hold zesty lemon curd and fragrant strawberries. The basil adds a surprising herbaceous note. They’re airy, sweet-tart, and pretty on the picnic blanket. The texture is crisp outside, marshmallowy inside, with creamy curd. Prep: 20 minutes (plus baking/cooling) | Cook: 1 hour (bake).
Ingredients
- For meringue cups: 4 large egg whites, room temperature
- 1 cup superfine sugar
- 1 tsp vanilla extract
- 1 tsp cornstarch
- 1 tsp white wine vinegar
- For filling: 1 cup lemon curd (homemade or store-bought)
- 1 cup heavy cream, whipped to soft peaks
- 1 cup strawberries, sliced
- 1 tbsp chopped basil
- Powdered sugar, for dusting
Instructions
- Preheat oven to 250°F (120°C). Line baking sheet with parchment.
- Beat egg whites until soft peaks form. Gradually add sugar until glossy stiff peaks form.
- Fold in vanilla, cornstarch, and vinegar gently.
- Pipe or spoon dollops into 6 cup shapes, creating a small well in each.
- Bake 60–70 minutes until dry to touch and slightly colored. Turn off oven and cool inside oven for 1 hour to prevent cracking.
- Whip cream to soft peaks. Fold in a little lemon curd if desired.
- Fill cooled meringue cups with lemon curd, top with whipped cream, strawberries, and basil.
- Dust with powdered sugar before serving. Keep chilled until packing.
How to Serve It
Arrange cups in a shallow box with parchment. Garnish with extra basil leaves and a strawberry half. Pair with sparkling rosé or iced tea. Keep refrigerated; meringue cups are best within 24 hours to avoid sogginess. Assemble fillings on-site for crispest shells.
15. Dark Chocolate Hazelnut Shortbread Bars
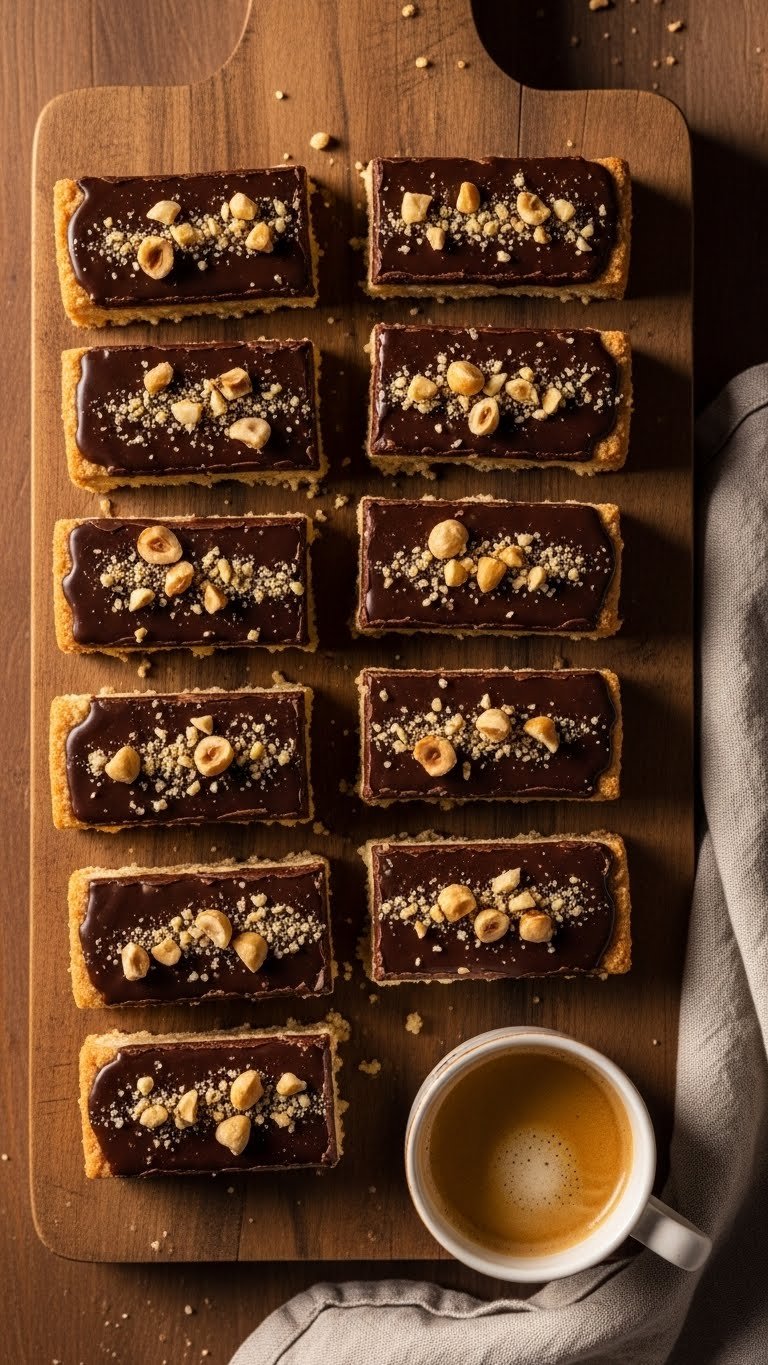
These bars combine crumbly buttery shortbread with dark chocolate and toasted hazelnuts. They’re rich yet portable and hold well in a picnic box. Texture is crunchy top and melt-in-your-mouth base. You’ll love the nutty aroma and chocolate sheen. Prep: 20 minutes | Cook: 25 minutes.
Ingredients
- 1 1/2 cups all-purpose flour
- 1/2 cup powdered sugar
- 1/4 tsp salt
- 3/4 cup (1 1/2 sticks) cold unsalted butter, cubed
- 1 tsp vanilla extract
- 6 oz dark chocolate (70%), chopped
- 1/2 cup heavy cream
- 3/4 cup toasted hazelnuts, chopped
- Flaky sea salt, for finishing
Instructions
- Preheat oven to 350°F (180°C). Line an 8×8-inch pan with parchment.
- In a bowl, combine flour, powdered sugar, and salt.
- Cut in cold butter until mixture resembles coarse crumbs. Stir in vanilla.
- Press mixture firmly into prepared pan to form an even layer.
- Bake 22–25 minutes until edges are lightly golden. Toothpick should come out clean with a few crumbs.
- Cool slightly, then chill 15 minutes.
- Heat heavy cream until simmering and pour over chopped chocolate. Let sit 1 minute, then whisk until smooth to make ganache.
- Pour ganache over cooled shortbread, spread evenly, and scatter toasted hazelnuts on top.
- Chill 1–2 hours until set. Cut into bars and finish with flaky sea salt.
How to Serve It
Serve on a small dessert board with espresso or port. Store in an airtight container at room temp 2 days or refrigerated 5 days. Make up to a week ahead; bring to room temperature before serving. Great for an indulgent picnic dessert.
These 15 Elevated Gourmet Picnic Recipes That Impress Guests give you a variety of handheld bites, make-ahead salads, grilled options, and sweets that travel well. You’ve got savory starters, filling mains, and fresh desserts to mix and match for any picnic mood. Pin this list for your next outing and try one new recipe at a time — which one will you make first? Share these with friends and family and enjoy the simple pleasure of a thoughtfully packed meal outdoors.