
You love hosting summer get-togethers, but you don’t want to babysit melting ice buckets all afternoon. If you’re wondering how to keep drinks cold at summer parties without ice buckets, this guide gives fast, practical solutions you can set up today. You’ll learn simple swaps — like frozen bottles, gel packs, chilled trays, and evaporative cooling tricks — that keep drinks icy-cold and pin-worthy.
Follow these steps and you’ll spend less time topping off buckets and more time enjoying the party.
What You'll Need (materials + quick supplies)
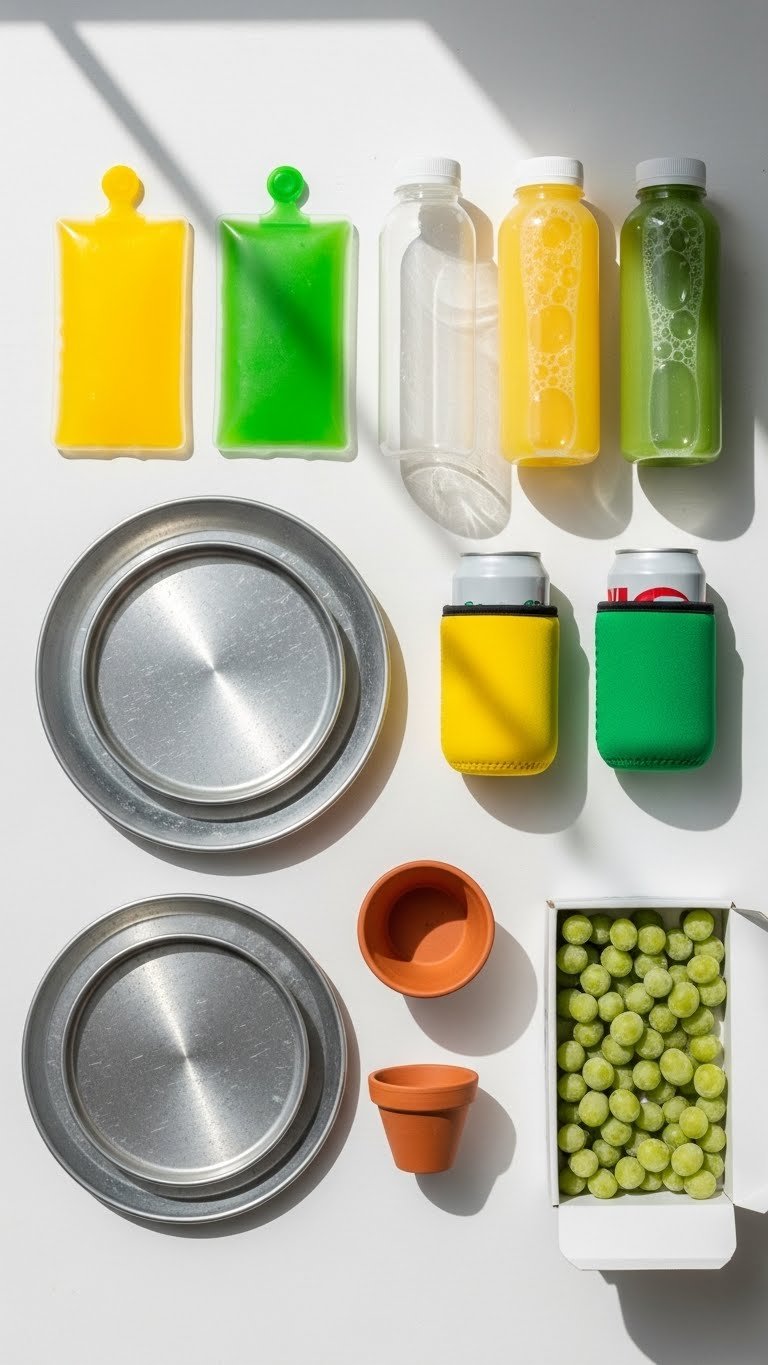
- Pre-chilled drinks straight from the fridge (ideal).
- Frozen 1–2 L plastic bottles (leave 25% headspace).
- Reusable gel packs (several sizes) — one large pack per 6–8 drinks.
- Neoprene can sleeves / bottle koozies — one per guest.
- Metal serving trays or shallow baking sheets (chilled in freezer 30–60 minutes).
- Terracotta pot + damp towel (for evaporative cooling in dry climates).
- Frozen fruit (grapes, lemon slices) for dispensers and garnishes.
Pro tip: Have extra gel packs in the freezer. They’re cheaper than constant ice and keep temps low for hours.
Prep and Setup: Fast steps before guests arrive

- Chill everything overnight. Put beverages and your metal serving trays in the fridge the night before.
- Freeze bottles correctly. Fill plastic bottles ¾ full, cap loosely before freezing. Freeze 12–24 hours.
- Pre-freeze gel packs and trays. Gel packs need at least 6–8 hours; metal trays benefit from 30–60 minutes in the freezer.
- Organize stations. Place chilled trays on tables with gel packs beneath (see next section). Keep a fridge stash for refills.
Warning: don’t freeze sealed glass bottles — they can crack. Use plastic or cans for freezing.
Practical cooling methods you can use now
-
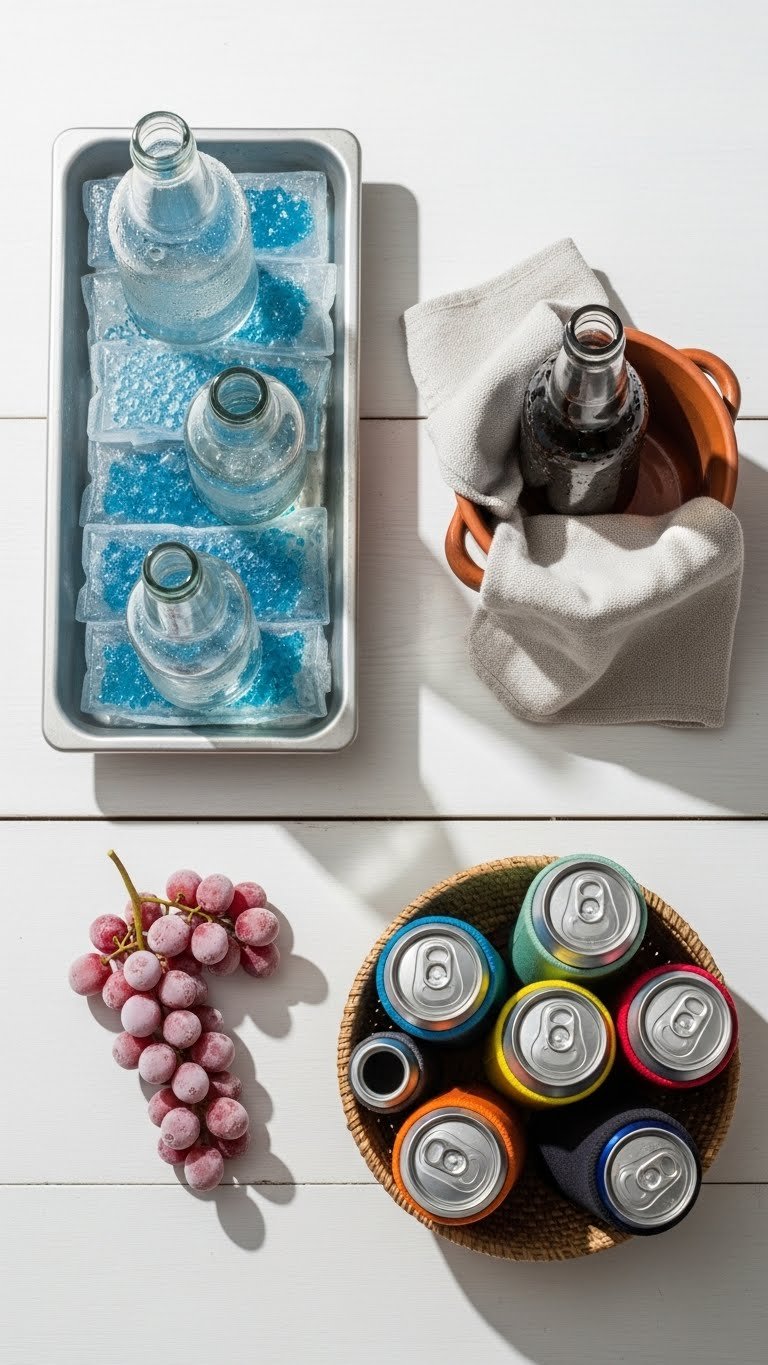
Use frozen bottles as passive ice:
- Arrange frozen 1–2 L bottles on a chilled metal tray.
- Set the drinks directly on the frozen bottles; rotate bottles as they thaw.
- Expect 3–6 hours cooling depending on outside temp.
-
Gel-pack cooling station:
- Lay 2–3 large gel packs under a metal tray or shallow wooden board.
- Place bottles/cans on top. This avoids water and slushy buckets.
- Replace gel packs every 4–6 hours as needed.
-
Evaporative terracotta cooler (dry climates):
- Nest bottle inside a terracotta pot lined with a damp towel.
- Keep in shade and aim a fan at it for extra cooling.
- Good for wine or beer for 2–4 hours.
-
Use frozen fruit and grapes:
- Freeze grapes and use as garnish or inside drink dispensers.
- They cool without watering down drinks and look pin-worthy.
Quick tips:
- Offer neoprene sleeves so guests' drinks stay cold in hand.
- Keep a rotation plan: move chilled trays inside the shade and swap empty frozen bottles with fresh ones from the freezer.
Serving, refill strategy, and common pitfalls

-
Refill plan:
- Reserve a cooler bag or spare fridge shelf for backup frozen bottles.
- Swap thawed bottles with fresh frozen ones every 3–6 hours.
- Keep smaller items (gel packs, neoprene sleeves) within reach for quick changes.
-
Troubleshooting:
- If drinks warm quickly, add more gel packs and shade the station.
- Avoid glass freezing; use plastic or cans for frozen methods.
- Don’t stack too many warm bottles together — separate them on trays for better airflow.
-
What to avoid:
- Don’t rely on freezer space alone for long events; plan a rotating stash.
- Avoid pouring hot liquids near chilled trays; it speeds warming.
You can host a relaxed, visually pleasing summer party without any ice buckets. These methods save time and give a cleaner look for photos and Pinterest boards.
You’ve got a starter plan you can use tonight: freeze bottles, charge gel packs, chill trays, and set a refill rotation. Pin this guide for your next backyard party and share with friends who hate soggy tables. Which method will you try first? Ready to make it happen? Let’s do it!