
You’ve packed the blanket and the sun is just right. Now you need snacks that travel well, look irresistible, and disappear fast. These outdoor picnic snack ideas everyone devours are perfect for busy afternoons, park dates, and lazy lakeside lunches.
You’ll find handheld bites, make-ahead jars, sweet bars, and savory sliders in this list. Each recipe is easy to prep, portable, and built for sharing. The outdoor picnic snack ideas everyone devours are balanced for flavor, texture, and crowd appeal. I’ll walk you through ingredients, clear steps, and serving tips so you can picnic with confidence.
Pin the recipes you want, mix and match, and bring the ones your friends will keep asking for. Ready for ten snacks that vanish first at every picnic? Let’s get cooking.
1. Outdoor Picnic Snack Ideas Everyone Devours: Caprese Skewers with Balsamic Glaze
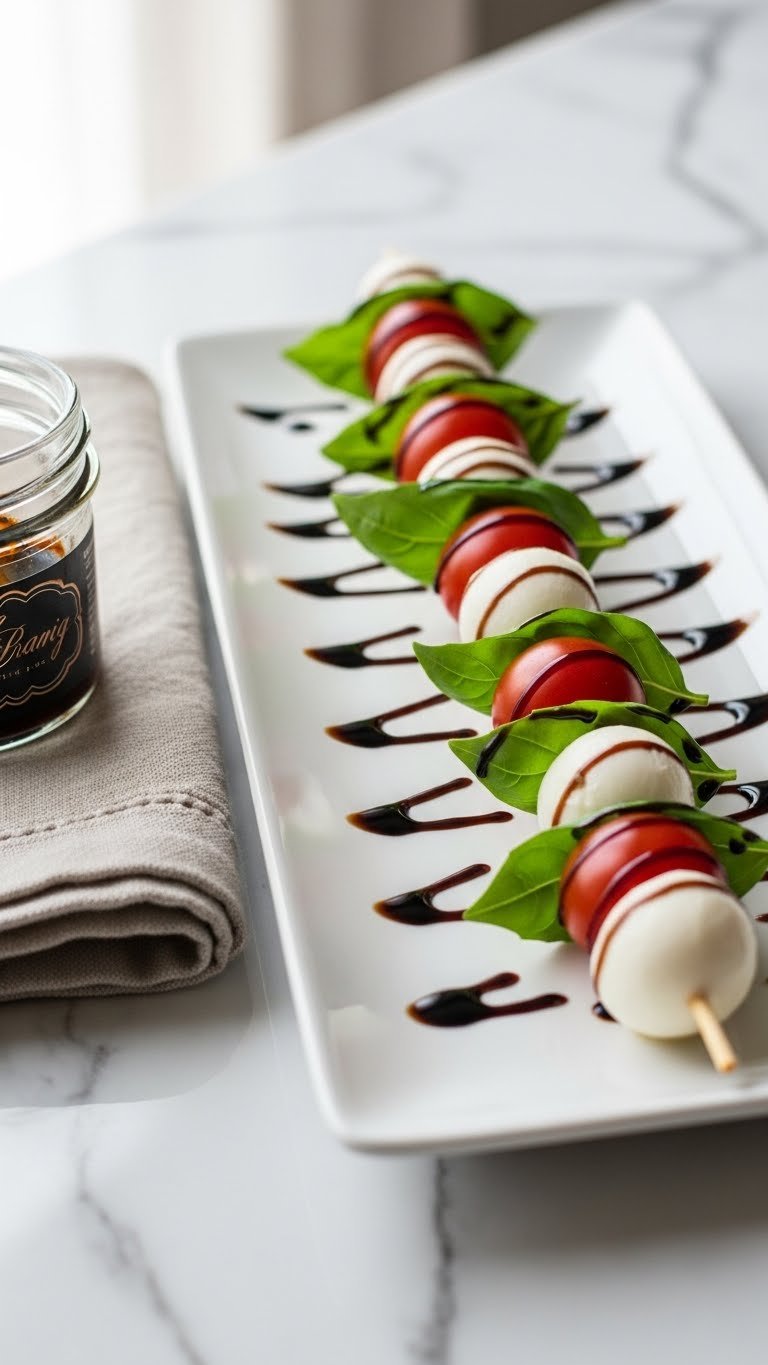
These Caprese skewers turn a classic salad into a grab-and-go snack. The combo of juicy cherry tomatoes, creamy mozzarella, and bright basil pops with a sweet-tangy balsamic glaze. They’re fresh, light, and travel well in a cooler.
You’ll love these for warm-weather picnics and potlucks. They’re bright red, white, and green on the plate. Expect fresh tomato juice, herbal basil aroma, and silky cheese. Kids and adults both reach for them first.
Prep time: 15 minutes | Cook time: 0 minutes | Makes 24 skewers
Ingredients
- 24 cherry tomatoes
- 24 mini mozzarella balls (bocconcini), drained
- 24 fresh basil leaves
- 24 4-inch wooden skewers
- 1/3 cup balsamic glaze (store-bought or homemade)
- 2 tbsp extra-virgin olive oil
- 1/2 tsp flaky sea salt
- 1/4 tsp freshly ground black pepper
- 1 tsp lemon zest
- Optional: 6 thin prosciutto slices, torn into pieces
Instructions
- Wash tomatoes and basil. Pat dry with a towel.
- Thread a cherry tomato, folded basil leaf, and a mozzarella ball onto each skewer. Repeat until all skewers are assembled.
- If using prosciutto, add a small torn piece between tomato and cheese on half the skewers.
- Whisk 1/3 cup balsamic glaze with 2 tbsp olive oil and 1 tsp lemon zest in a small bowl.
- Lightly brush or drizzle glaze mixture over skewers just before serving.
- Season with 1/2 tsp flaky sea salt and 1/4 tsp black pepper.
- Taste one skewer to check seasoning; adjust glaze or salt if needed.
- Chill skewers in the fridge for 10–15 minutes for flavors to meld.
- Transport in a shallow container with paper towel lining to absorb moisture.
How to Serve It
- Arrange skewers on a long platter or rustic wooden board for an easy grab-and-go display.
- Garnish with extra basil sprigs and a small bowl of extra balsamic glaze.
- Pair with chilled white wine or sparkling water with lemon.
- Store in an airtight container in the fridge up to 24 hours.
- Make ahead: assemble skewers but add glaze right before serving to avoid soggy cheese.
- Great for summer picnics and Italian-themed spreads.
2. Smoked Salmon Cucumber Bites with Dill Cream Cheese
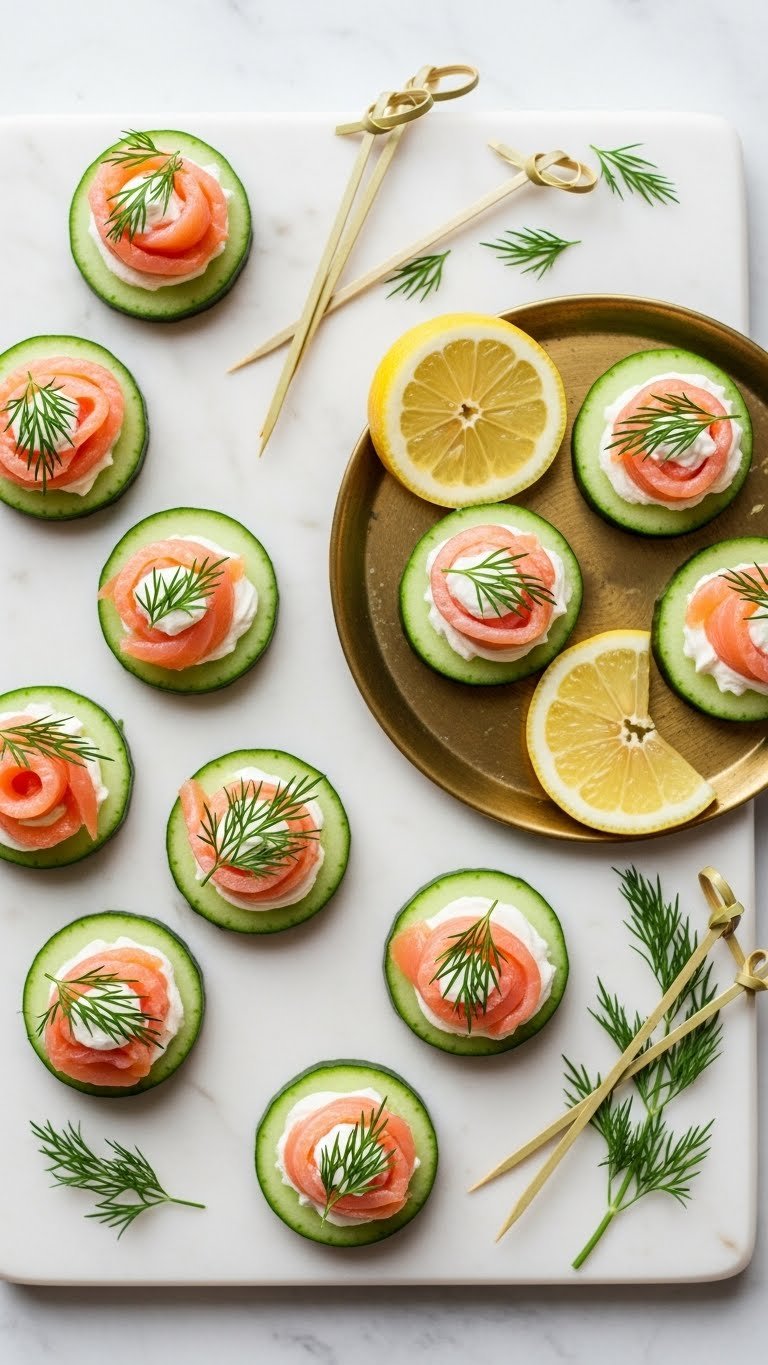
These smoked salmon cucumber bites are cool, bright, and elegant. Crisp cucumber meets silky dill cream cheese and smoky fish for a fresh contrast. They’re light, low-carb, and easy to eat with fingers.
The flavor is briny and herby, with a creamy texture and a refreshing cucumber crunch. They fit perfectly in a picnic basket and please guests who love seafood. Expect a lemony aroma and silky mouthfeel.
Prep time: 20 minutes | Cook time: 0 minutes | Makes 30 bites
Ingredients
- 2 English cucumbers
- 8 oz cream cheese, softened to room temperature
- 2 tbsp sour cream
- 2 tbsp fresh dill, chopped
- 1 tbsp lemon juice
- 1 tsp lemon zest
- 1/4 tsp smoked paprika
- 1/2 tsp flaky sea salt
- 1/4 tsp black pepper
- 6 oz smoked salmon, sliced into strips
- 1 tbsp capers, drained
- Optional: 1 tbsp finely chopped chives
Instructions
- Slice cucumbers into 1/2-inch rounds and lay them on paper towels to drain excess moisture.
- In a bowl, beat 8 oz cream cheese with 2 tbsp sour cream until smooth.
- Stir in 2 tbsp dill, 1 tbsp lemon juice, 1 tsp lemon zest, 1/4 tsp smoked paprika, 1/2 tsp salt, and 1/4 tsp pepper.
- Transfer cream cheese mixture to a piping bag or use a spoon.
- Pipe or spoon a dollop onto each cucumber round.
- Top with a strip of smoked salmon and a few capers.
- Sprinkle with chopped chives and extra dill as garnish.
- Chill for 15–20 minutes to let flavors set before packing.
- Pack in a single layer in a shallow container with paper towels between layers to avoid sliding.
How to Serve It
- Arrange on a slate tray with lemon wedges for brightness.
- Garnish with smoked paprika for color and extra dill.
- Pair with iced tea, crisp white wine, or cucumber-mint water.
- Store in the fridge up to 24 hours; avoid stacking.
- Make ahead: prepare cream cheese mix and slice salmon; assemble within 6 hours before serving.
- Ideal for elegant picnic spreads or brunch in the park.
3. Mediterranean Chickpea Salad Jars (Portable Picnic Salads)
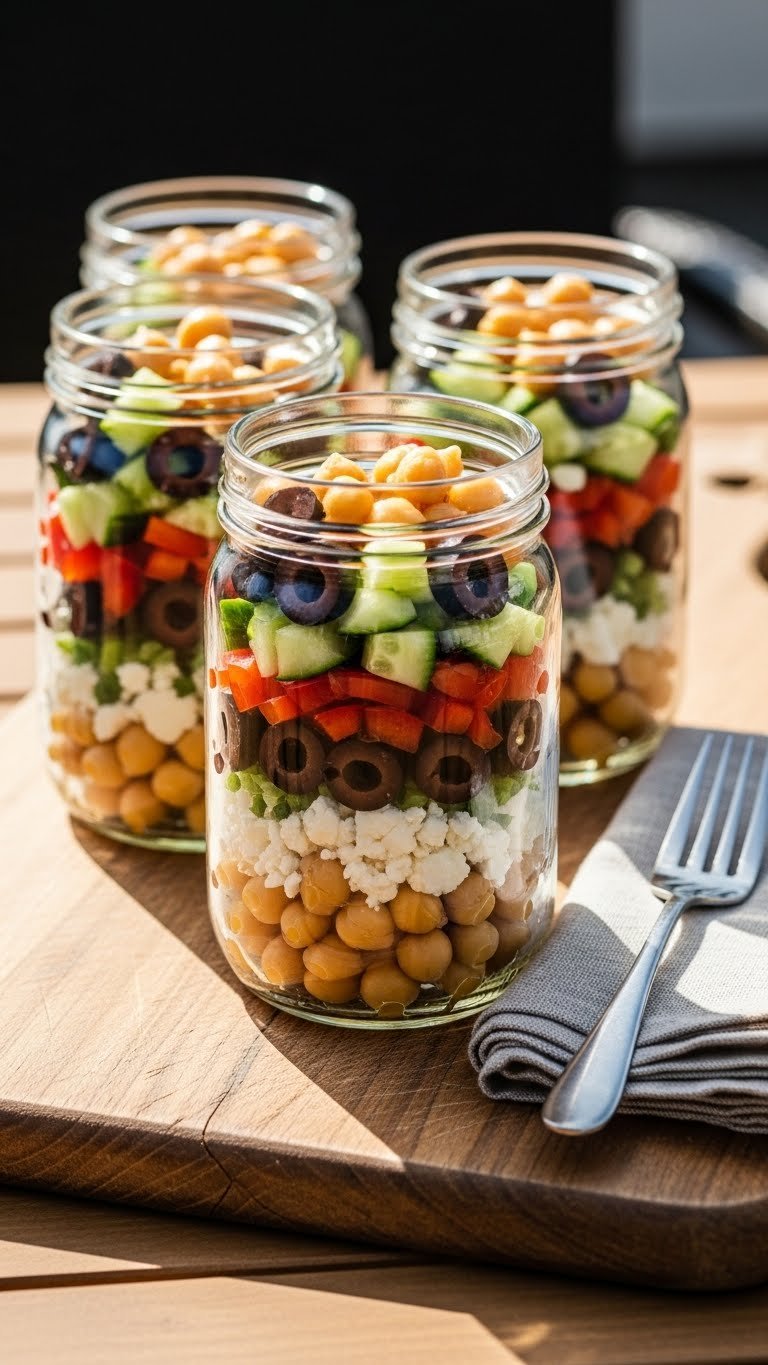
These Mediterranean chickpea salad jars are hearty, portable, and packed with Mediterranean flavor. Chickpeas, crisp veggies, tangy feta, and lemon-herb dressing make each jar satisfying and bright. They’re perfect for folks who want a filling, no-fuss picnic snack.
Textures are crunchy veggies and creamy feta with toothsome chickpeas. The dressing is lemony with olive oil aroma. You’ll reach for this jar when you want a healthy, colorful snack that’s easy to eat outdoors.
Prep time: 20 minutes | Cook time: 0 minutes | Makes 4 jars
Ingredients
- 2 cans (15 oz each) chickpeas, drained and rinsed
- 1 medium cucumber, diced
- 1 red bell pepper, diced
- 1/2 small red onion, finely chopped
- 1 cup cherry tomatoes, halved
- 3/4 cup crumbled feta cheese
- 1/2 cup pitted Kalamata olives, halved
- 1/4 cup fresh parsley, chopped
- 1/4 cup extra-virgin olive oil
- 3 tbsp lemon juice (fresh)
- 1 tsp dried oregano
- 1/2 tsp flaky sea salt
- 1/4 tsp black pepper
Instructions
- In a large bowl, combine 2 cans chickpeas, 1 diced cucumber, 1 diced red bell pepper, 1/2 chopped red onion, and 1 cup halved cherry tomatoes.
- Add 1/2 cup halved olives and 3/4 cup crumbled feta.
- Whisk 1/4 cup olive oil, 3 tbsp lemon juice, 1 tsp dried oregano, 1/2 tsp salt, and 1/4 tsp pepper in a small bowl.
- Pour dressing over salad and toss gently to coat.
- Stir in 1/4 cup chopped parsley.
- Taste and adjust salt or lemon as needed.
- Spoon salad into 4 clean mason jars, packing tightly but not smashed.
- Seal jars and chill at least 30 minutes before transport.
- When serving, shake jar or invert onto plate to mix.
How to Serve It
- Serve jars with small forks or wooden spoons for easy picnic eating.
- Garnish with a sprig of parsley and a lemon wedge on the side.
- Pair with chilled rosé, iced coffee, or sparkling water.
- Store sealed jars in fridge up to 3 days; dressing keeps chickpeas well.
- Make ahead: assemble jars up to 24 hours before your picnic.
- Great for warm days, beach trips, and lunchboxes.
4. Outdoor Picnic Snack Ideas Everyone Devours: Lemon Poppy Seed Muffins
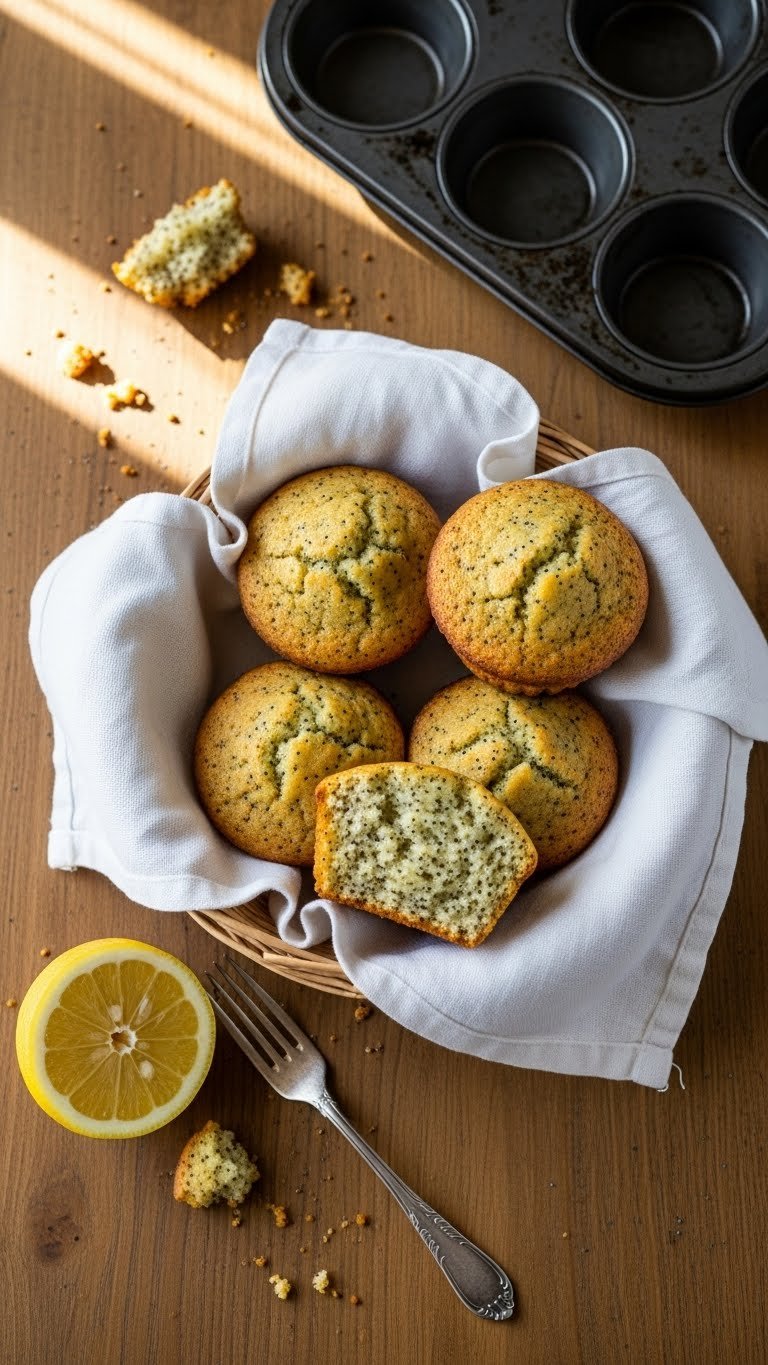
These lemon poppy seed muffins are soft, bright, and slightly tart. They’re easy to eat on a blanket and pair well with afternoon tea. The lemon glaze adds a shiny, sweet tang that kids and adults enjoy.
Expect tender crumb, citrus aroma, and a tiny nutty crunch from poppy seeds. They hold up well in a picnic basket. Your picnic will smell like fresh lemon while they bake.
Prep time: 15 minutes | Cook time: 20 minutes | Makes 12 muffins
Ingredients
- 2 cups all-purpose flour
- 3/4 cup granulated sugar
- 2 tsp baking powder
- 1/2 tsp baking soda
- 1/2 tsp flaky sea salt
- 2 tbsp poppy seeds
- 2 large eggs, room temperature
- 3/4 cup buttermilk, room temperature
- 1/2 cup unsalted butter, melted and cooled slightly
- 2 tbsp lemon zest (about 2 lemons)
- 1/4 cup lemon juice (fresh)
- 1 tsp vanilla extract
Instructions
- Preheat oven to 375°F (190°C) and line a 12-cup muffin tin with liners.
- Whisk 2 cups flour, 3/4 cup sugar, 2 tsp baking powder, 1/2 tsp baking soda, 1/2 tsp salt, and 2 tbsp poppy seeds in a bowl.
- In another bowl, whisk 2 large eggs, 3/4 cup buttermilk, 1/2 cup melted butter, 2 tbsp lemon zest, 1/4 cup lemon juice, and 1 tsp vanilla until smooth.
- Fold wet ingredients into dry until just combined; don’t overmix. Batter should be slightly lumpy.
- Spoon batter into liners, filling them about 3/4 full.
- Bake 18–20 minutes or until tops are golden and a toothpick inserted in the center comes out clean.
- Cool muffins in tin 5 minutes, then transfer to a wire rack.
- Make glaze: whisk 1 cup powdered sugar with 1–2 tbsp lemon juice until pourable.
- Drizzle glaze over cooled muffins and let set 10 minutes.
How to Serve It
- Arrange muffins in a lined basket with parchment paper.
- Garnish with extra lemon zest or thin lemon slices.
- Pair with cold-brew coffee, iced tea, or lemonade.
- Store in an airtight container at room temperature 2 days, or refrigerate up to 5 days.
- Make ahead: bake muffins 1 day ahead and add glaze before serving.
- Ideal for spring picnics and tea-time snacks.
5. Watermelon Feta Bites with Mint and Lime

Watermelon feta bites are sweet, salty, and refreshingly juicy. They’re tiny flavor explosions that travel cool in a cooler. The lime brightens everything, and mint adds fragrant green notes.
You’ll get a crunchy-sweet contrast and a cool burst of juice. They’re ideal for hot days and kids love the bright colors. Expect a tangy finish and a fresh herbal scent.
Prep time: 15 minutes | Cook time: 0 minutes | Makes 24 bites
Ingredients
- 4 cups seedless watermelon, cut into 1-inch cubes
- 3/4 cup crumbled feta cheese
- 1/4 cup fresh mint leaves, chopped
- 2 tbsp lime juice (fresh)
- 1 tsp lime zest
- 1 tbsp extra-virgin olive oil
- 1/4 tsp flaky sea salt
- 1/8 tsp black pepper
- 24 toothpicks or small skewers
- Optional: 1 tbsp honey for drizzling
Instructions
- Cut watermelon into 1-inch cubes and drain on a paper towel for 5 minutes.
- In a small bowl, combine 3/4 cup feta, 1/4 cup mint, 2 tbsp lime juice, 1 tsp lime zest, 1 tbsp olive oil, 1/4 tsp salt, and 1/8 tsp pepper.
- Place a watermelon cube on each toothpick.
- Spoon or press a small amount of feta-mint mix onto each cube.
- Drizzle lightly with honey if using.
- Chill 10–15 minutes before serving for flavors to meld.
- Pack in a single layer in a shallow container lined with paper towels.
How to Serve It
- Serve on a chilled platter with extra mint sprigs and lime wedges.
- Garnish with cracked black pepper or a few microgreens.
- Pair with rosé, sparkling water, or iced herbal tea.
- Store in fridge up to 12 hours; watermelon can get watery.
- Make ahead: assemble up to 6 hours before serving, but add feta close to serving time if possible.
- Perfect for poolside or summer park picnics.
6. Savory Herb Palmiers (Puff Pastry Picnic Pastries)
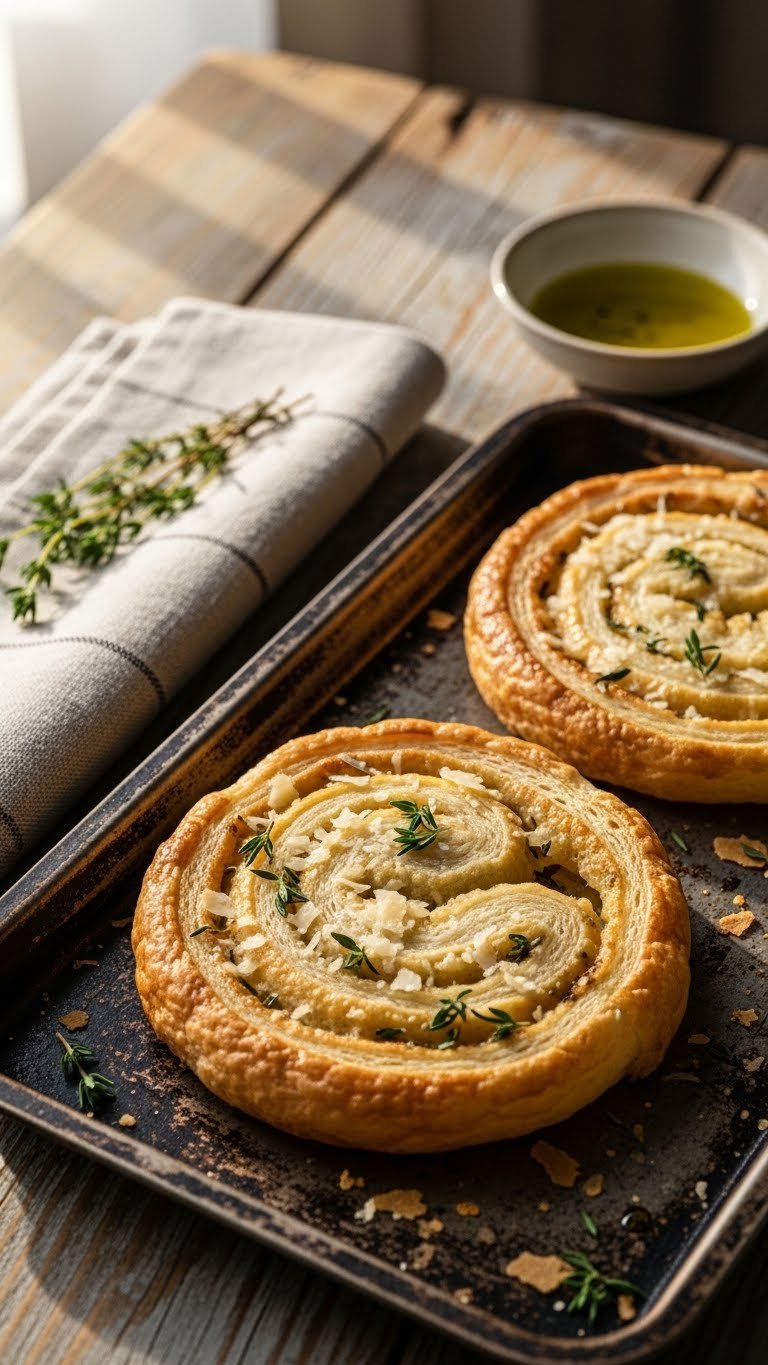
Savory herb palmiers are crisp, buttery, and herb-scented. Puff pastry forms delicate layers that melt in your mouth. The parmesan adds a salty, nutty note.
They travel well and keep their crispness if stored properly. These are perfect finger snacks with flaky texture and herby aroma. Expect a golden crunch and rich buttery smell.
Prep time: 15 minutes | Cook time: 18 minutes | Makes 24 palmiers
Ingredients
- 1 sheet puff pastry (about 8 oz), thawed
- 1/3 cup grated Parmesan cheese
- 2 tbsp fresh thyme leaves, chopped
- 2 tbsp fresh rosemary, chopped
- 1 egg, beaten (for egg wash)
- 2 tbsp unsalted butter, melted
- 1 tsp garlic powder
- 1/2 tsp flaky sea salt
- 1/4 tsp black pepper
- Optional: 1 tbsp Dijon mustard
Instructions
- Preheat oven to 400°F (200°C). Line a baking sheet with parchment.
- Unfold puff pastry on a lightly floured surface.
- Brush with 2 tbsp melted butter (or spread 1 tbsp Dijon mustard for a tangy version).
- Sprinkle 1/3 cup Parmesan evenly, then scatter 2 tbsp thyme and 2 tbsp rosemary.
- Fold the two long edges of pastry inward toward the center, then fold one half over the other, pressing gently to seal.
- Chill the folded log 10 minutes to firm up for cleaner slicing.
- Slice into 24 slices about 1/4–1/2 inch thick.
- Place slices cut-side down on the sheet, brush with beaten egg, and sprinkle a little extra Parmesan.
- Bake 16–18 minutes until golden brown and puffed. Look for deep golden edges.
- Cool 5 minutes on sheet, then transfer to a rack to cool completely.
How to Serve It
- Arrange palmiers on a wooden board with olives and cheese.
- Garnish with extra thyme sprigs.
- Pair with craft beer, sparkling water, or a light white wine.
- Store in an airtight container up to 2 days; refresh in a 350°F (175°C) oven 3–5 minutes.
- Make ahead: bake and cool, then pack in single layer; they’ll keep for travel.
- Great for autumn picnics and wine-and-cheese afternoons.
7. Outdoor Picnic Snack Ideas Everyone Devours: Mini Chicken Salad Croissant Sandwiches

Mini chicken salad croissant sandwiches are rich, creamy, and perfectly portable. Tender chicken, crunchy celery, and a tangy dressing tuck into buttery croissants. They’re filling but still snack-sized.
The texture is creamy with a light crunch and a warm buttery aroma from the croissant. These are picnic classics and suit family outings. Expect savory-sweet notes and herbal brightness.
Prep time: 20 minutes | Cook time: 0 minutes | Makes 12 mini sandwiches
Ingredients
- 3 cups cooked chicken, shredded (rotisserie works)
- 1/2 cup mayonnaise
- 1/4 cup plain Greek yogurt
- 1 tbsp Dijon mustard
- 1/2 cup celery, finely chopped
- 1/3 cup red grapes, halved
- 1/4 cup sliced almonds, toasted
- 2 tbsp fresh parsley, chopped
- 1 tbsp lemon juice
- 1/2 tsp flaky sea salt
- 1/4 tsp black pepper
- 12 mini croissants, split
Instructions
- In a large bowl, mix 1/2 cup mayonnaise, 1/4 cup Greek yogurt, and 1 tbsp Dijon mustard until smooth.
- Add 3 cups shredded chicken, 1/2 cup chopped celery, 1/3 cup halved grapes, 1/4 cup toasted almonds, and 2 tbsp parsley.
- Stir in 1 tbsp lemon juice, 1/2 tsp salt, and 1/4 tsp pepper.
- Taste and adjust seasoning—add more lemon or salt if needed.
- Chill chicken salad 15–20 minutes to let flavors meld.
- Slice 12 mini croissants horizontally and spoon about 3 tbsp chicken salad into each.
- Close sandwiches gently and wrap individually in parchment for transport.
- Keep sandwiches chilled until serving.
How to Serve It
- Arrange sandwiches in a basket lined with parchment for a rustic look.
- Garnish with extra parsley and a side of grapes or pickles.
- Pair with chilled lemonade or light beer.
- Store chicken salad in fridge up to 2 days; assemble sandwiches the day of.
- Make ahead: prepare chicken salad 1 day ahead and chill; fill croissants just before serving.
- Perfect for family picnics and kid-friendly outings.
8. Sweet & Spicy Roasted Nuts with Maple and Chili

These sweet & spicy roasted nuts are sticky, crunchy, and addictive. Maple and brown sugar add sweetness, while chili flakes bring heat. They make snack bowls pop on any picnic spread.
You’ll enjoy a caramelized coating with a warm spice finish. Nuts are toasted to a deep golden color for maximum crunch. They’re shelf-stable, making them ideal for travel.
Prep time: 10 minutes | Cook time: 20 minutes | Makes 4 cups
Ingredients
- 1 cup raw almonds
- 1 cup raw cashews
- 1 cup raw pecans
- 2 tbsp unsalted butter
- 1/4 cup pure maple syrup
- 2 tbsp brown sugar, packed
- 1 tsp smoked paprika
- 1/2 tsp chili flakes (adjust)
- 1/2 tsp flaky sea salt
- 1/2 tsp ground cinnamon
- 1/4 tsp black pepper
- 1 tsp vanilla extract
Instructions
- Preheat oven to 350°F (175°C) and line a baking sheet with parchment.
- In a small saucepan over low heat, melt 2 tbsp butter with 1/4 cup maple syrup, 2 tbsp brown sugar, and 1 tsp vanilla until smooth.
- Stir in 1 tsp smoked paprika, 1/2 tsp chili flakes, 1/2 tsp salt, 1/2 tsp cinnamon, and 1/4 tsp pepper.
- Place 1 cup almonds, 1 cup cashews, and 1 cup pecans in a bowl.
- Pour warm maple spice mixture over nuts and toss to coat evenly.
- Spread nuts in a single layer on prepared sheet.
- Roast 18–22 minutes, stirring once at 10 minutes, until nuts are fragrant and coating is caramelized. Watch for color to avoid burning.
- Remove and cool completely; coating will harden as they cool.
- Break into clusters and store in airtight jar once fully cool.
How to Serve It
- Serve in small bowls for easy snacking on a picnic blanket.
- Garnish with flaky sea salt or a few rosemary sprigs.
- Pair with crisp cider, coffee, or a bold cheese board.
- Store at room temperature up to 2 weeks in airtight container.
- Make ahead: these keep well and improve in flavor after a day.
- Great for fall picnics and hiking snacks.
9. BBQ Pulled Pork Sliders with Quick Apple Slaw

Pulled pork sliders are saucy, smoky, and perfectly handheld. Slow-cooked pork with tangy BBQ sauce meets a crisp apple slaw for contrast. They’re crowd-pleasers and fill hungry bellies fast.
You’ll love the tender meat and crunchy slaw bite. The slaw adds bright acidity and texture. These sliders are hearty picnic fare and travel well in a cooler.
Prep time: 20 minutes (plus slow-cook time) | Cook time: 6–8 hours (slow cooker) | Makes 12 sliders
Ingredients
- 3 lbs pork shoulder (boneless)
- 1 cup BBQ sauce (your favorite)
- 1/2 cup chicken or vegetable broth
- 1 tbsp brown sugar
- 1 tbsp smoked paprika
- 1 tsp garlic powder
- 1 tsp onion powder
- 1 tsp flaky sea salt
- 1/2 tsp black pepper
- 12 mini brioche buns, split
- Quick apple slaw:
- 2 cups green cabbage, shredded
- 1 medium apple, julienned
- 2 tbsp apple cider vinegar
- 1 tbsp mayonnaise
- 1 tsp honey
- Salt and pepper to taste
Instructions
- Rub pork with 1 tbsp brown sugar, 1 tbsp smoked paprika, 1 tsp garlic powder, 1 tsp onion powder, 1 tsp salt, and 1/2 tsp pepper.
- Place pork in slow cooker and add 1/2 cup broth.
- Cook on low 6–8 hours until pork is fork-tender and shreds easily.
- Remove pork and shred with two forks. Stir in 1 cup BBQ sauce.
- For slaw: toss 2 cups shredded cabbage and 1 julienned apple with 2 tbsp apple cider vinegar, 1 tbsp mayo, 1 tsp honey, and salt and pepper.
- Taste slaw and adjust acidity or sweetness.
- Toast mini buns briefly on a skillet or in an oven (2–3 minutes) until edges are golden.
- Build sliders with 2–3 tbsp pulled pork and a spoonful of apple slaw.
- Pack sliders in a shallow container with parchment; keep chilled until serving.
How to Serve It
- Serve sliders on a wooden board lined with parchment for rustic appeal.
- Add pickles or extra BBQ sauce on the side.
- Pair with cold beer, iced tea, or lemonade.
- Store pork and slaw separately up to 3 days in fridge; assemble before serving.
- Make ahead: slow-cook pork a day ahead and reheat gently; prepare slaw the morning of.
- Great for backyard picnics and tailgates.
10. No-Bake Peanut Butter Oat Bars with Chocolate Drizzle
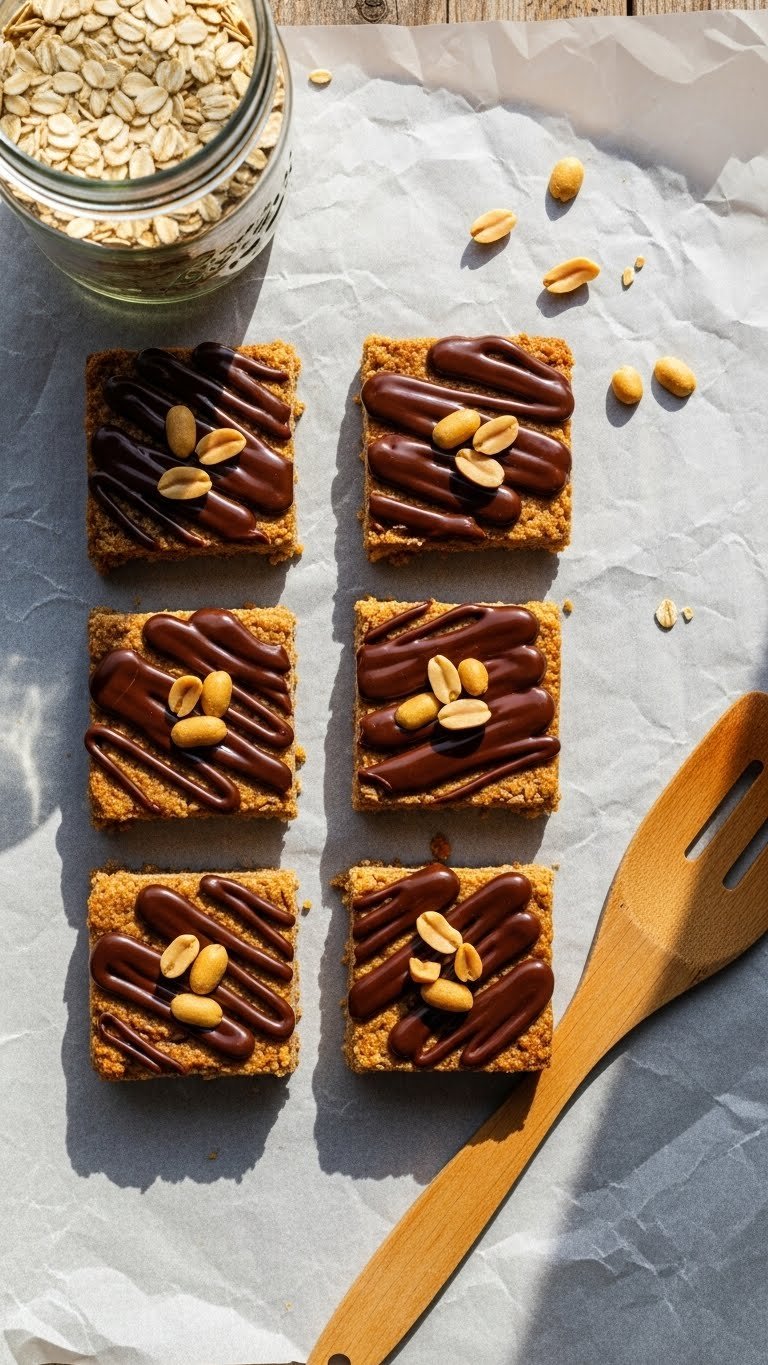
These no-bake peanut butter oat bars are chewy, nutty, and satisfy sweet cravings. They’re held together with peanut butter and honey, then topped with a chocolate drizzle. They’re easy to make and great for kids.
Texture is chewy with peanut bits and a glossy chocolate top. They’re portable and keep well, making them perfect for long afternoons outdoors. Expect a warm nutty scent.
Prep time: 15 minutes | Chill time: 2 hours | Makes 16 bars
Ingredients
- 2 cups old-fashioned rolled oats
- 1 cup creamy peanut butter
- 1/2 cup honey
- 1/4 cup unsalted butter
- 1/2 cup brown sugar, packed
- 1 tsp vanilla extract
- 1/4 tsp flaky sea salt
- 1/2 cup finely chopped peanuts
- 1/2 cup mini chocolate chips
- Chocolate drizzle:
- 1/2 cup semisweet chocolate chips
- 1 tbsp coconut oil
Instructions
- Line an 8×8-inch pan with parchment, leaving an overhang for easy removal.
- In a medium saucepan, combine 1/2 cup butter, 1/2 cup brown sugar, and 1/2 cup honey over medium heat. Stir until butter melts and sugar dissolves.
- Remove from heat and stir in 1 cup peanut butter and 1 tsp vanilla until smooth.
- Add 2 cups oats, 1/2 cup chopped peanuts, and 1/4 tsp salt. Stir until fully combined.
- Press mixture firmly into prepared pan using the back of a spoon.
- Melt 1/2 cup chocolate chips with 1 tbsp coconut oil in 20-second bursts in microwave, stirring until smooth.
- Drizzle chocolate evenly over the pressed oat layer.
- Chill in fridge at least 2 hours until set.
- Lift out using parchment overhang and cut into 16 bars.
- Store in an airtight container in the fridge or a cool place.
How to Serve It
- Stack bars on a small wooden board or wrap individually in parchment for easy serving.
- Garnish with extra chopped peanuts or a sprinkle of flaky salt.
- Pair with cold milk, coffee, or iced chocolate.
- Store in fridge up to 2 weeks, or at room temperature in cool weather for 4 days.
- Make ahead: these are ideal for prepping days in advance.
- Perfect for hiking snacks and kid-friendly picnics.
These ten snacks give you a variety of textures and flavors to mix and match. You’ve got handheld bites, make-ahead jars, sweet bars, and warm sliders. Try the outdoor picnic snack ideas everyone devours that match your crowd and the day’s vibe.
Save or pin the recipes you love and plan a picnic menu that feels effortless. Which recipe will you bring to your next picnic? Share a photo with friends or family and see which snack disappears first. Enjoy the sun, the food, and the company.