
You know that perfect park afternoon: warm sun, a shady tree, and kids chasing bubbles while you relax. Pack a lunch that keeps energy high and smiles wide with park picnic lunch ideas kids love too. These recipes focus on simple prep, bright flavors, and handheld fun so you can eat easily on a blanket.
Inside you’ll find eleven tried-and-true park picnic lunch ideas kids love too — from finger sandwiches to no-bake bars. Each recipe includes full ingredients, clear steps, and serving tips for picnic-friendly packing. You’ll also get quick make-ahead ideas and kid-approved swaps.
Grab a cooler, line up some reusable containers, and pick a few recipes to mix and match. These lunches are built for easy assembly, little hands, and big appetites.
1. Park Picnic Lunch Ideas Kids Love Too: Turkey & Cheese Pinwheels

These turkey & cheese pinwheels are soft, savory, and perfectly portable. Creamy spread and sliced turkey roll into bite-sized spirals kids can grab. The texture is tender with a slight crunch from lettuce.
This recipe fits park lunches because it’s handheld, mess-light, and stays fresh in a cooler. Kids and adults both like the mild, familiar flavors. You’ll smell the fresh tortilla and deli turkey as you unwrap them.
Prep time: 15 minutes • Cook time: 0 minutes • Yields: 12 pinwheels
Ingredients
- 4 large flour tortillas (10-inch)
- 6 oz sliced turkey breast
- 4 slices mild cheddar cheese
- 1/2 cup cream cheese, softened to room temperature
- 2 tbsp mayonnaise
- 1 tbsp Dijon mustard
- 1 cup shredded iceberg lettuce
- 1/4 cup finely grated carrot
- 1/4 tsp black pepper
- 1/2 tsp dried oregano
- 1/4 cup sliced cucumber, thinly sliced
Instructions
- Lay tortillas flat on a clean surface. Spread 2 tablespoons cream cheese evenly on each tortilla.
- Mix remaining cream cheese with mayonnaise, Dijon, black pepper, and oregano until smooth. Divide mixture across tortillas and spread thinly.
- Layer turkey slices evenly, then place cheese slices on top.
- Sprinkle shredded lettuce, grated carrot, and thin cucumber slices over each tortilla.
- Tightly roll each tortilla from one edge to the other. Use gentle pressure so fillings stay compact.
- Wrap each roll in plastic wrap and chill for 15 minutes to firm up. This helps make clean slices.
- Unwrap and slice each roll into 12 pinwheels (about 1-inch thick). If edges look loose, trim and press.
- Pack in a shallow container with a paper towel to absorb extra moisture. Serve chilled.
How to Serve It
Serve pinwheels on a wooden board or in a reusable container. Garnish with fresh parsley and raw veggie sticks. Pair with fruit cups and iced lemonade. Store chilled in an airtight container for up to 24 hours. Make them the night before and slice just before leaving to keep edges neat.
2. Park Picnic Lunch Ideas Kids Love Too: PB&J Roll-Ups (Allergy-Friendly Option)

These PB&J roll-ups are nostalgic and tidy. Swap peanut butter for sunflower seed butter to keep them school- and park-safe. The swirls are sweet and soft, easy for little fingers to hold.
They fit park lunch lists because they don’t drip and travel well in small containers. Kids love the familiar jam flavor and the fun spiral look.
Prep time: 10 minutes • Cook time: 0 minutes • Yields: 8 roll-ups
Ingredients
- 8 slices whole wheat sandwich bread, crusts removed
- 1/2 cup sunflower seed butter (or peanut butter if allowed)
- 1/3 cup strawberry jam, room temperature
- 1 tbsp honey (optional, for sweetness)
- 1 tsp lemon juice (to thin jam if needed)
- 2 tbsp softened butter, room temperature
- 1/4 cup finely chopped fresh strawberries (optional)
- 1 tsp chia seeds (optional, for texture)
- Plastic wrap for rolling
Instructions
- Trim crusts from bread. Use a rolling pin to flatten each slice gently.
- In a small bowl, mix sunflower seed butter with honey if using.
- Thin jam with lemon juice if too thick. Stir in chopped strawberries and chia seeds if using.
- Spread 1 tbsp softened butter over each flattened slice to prevent sogginess.
- Spread 1 tbsp seed butter and 1 tbsp jam over each slice, leaving a small edge.
- Roll each slice tightly into a log. Wrap in plastic wrap and chill 10 minutes to set.
- Slice each log into 4 bite-size roll-ups. Arrange cut side up.
- Place roll-ups in a shallow container with a paper towel to prevent moisture build-up.
How to Serve It
Arrange roll-ups in a colorful bento box with apple slices and carrot sticks. Garnish with a few fresh berries. Serve with milk, water, or a small smoothie. Make them the morning you leave or the night before and keep chilled. Freeze individually for up to 1 month, thaw in lunchbox cooler.
3. Park Picnic Lunch Ideas Kids Love Too: Mini Ham & Cheese Sliders
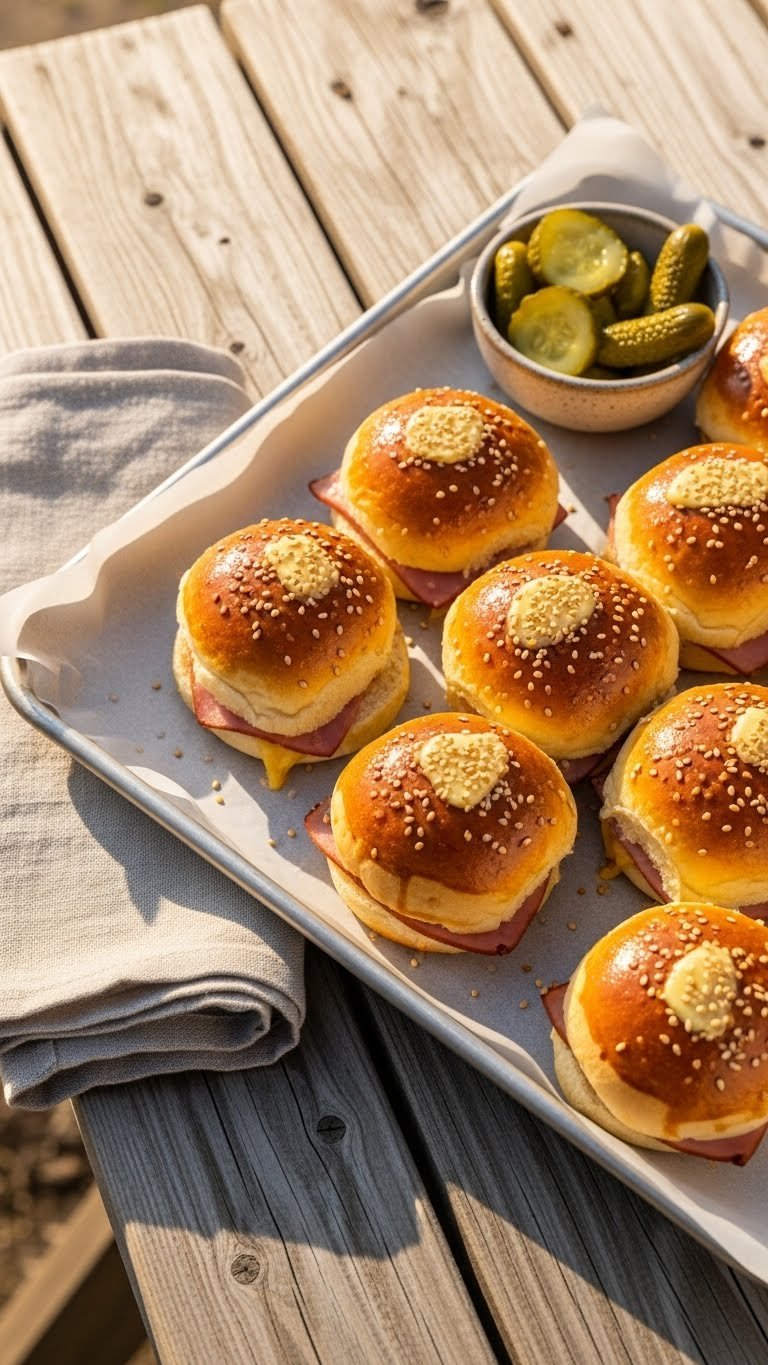
Mini sliders are soft, buttery, and perfectly portioned for small hands. These ham and cheese bites have melty centers and a crisp top from a butter brush. They’re savory and slightly sweet.
They’re picnic-ready since they’re easy to hold and taste great warm or at room temperature. Kids love the gooey cheese and slider size.
Prep time: 15 minutes • Cook time: 15 minutes • Yields: 12 sliders
Ingredients
- 12 small slider rolls or Hawaiian rolls
- 8 oz sliced deli ham, thinly sliced
- 6 slices Swiss or cheddar cheese, halved
- 4 tbsp unsalted butter, melted
- 1 tbsp Dijon mustard
- 1 tbsp honey
- 1/2 tsp garlic powder
- 1/2 tsp onion powder
- 1 tbsp poppy seeds or sesame seeds (optional)
- Fresh chives, finely chopped, for garnish
Instructions
- Preheat oven to 350°F (175°C). Line a small baking dish with parchment.
- Slice rolls in half horizontally without separating the pieces. Place bottom halves in dish.
- Layer ham evenly across the bottom halves, then top with halved cheese slices.
- Place top halves back on. Mix melted butter, Dijon, honey, garlic powder, and onion powder.
- Brush the butter mixture evenly over the tops. Sprinkle poppy or sesame seeds if using.
- Cover loosely with foil and bake 10 minutes, then remove foil and bake 5 minutes more until tops are golden and cheese is melted.
- Check doneness: tops should be golden, cheese fully melted.
- Cool 5 minutes before slicing between rolls. Garnish with chopped chives.
How to Serve It
Serve sliders warm in a lined basket or packed in parchment-lined container. Offer ketchup, pickles, or sliced apples as sides. Store leftovers covered in fridge for up to 3 days; reheat in oven at 325°F for 8–10 minutes. Assemble up to a day ahead and bake before leaving.
4. Caprese Pasta Salad — Kid-Friendly Picnic Salad

This Caprese pasta salad is bright, saucy, and holds up in a cooler. Cherry tomatoes and mini mozzarella pearls give bite-sized pops of flavor. Basil adds a fragrant herbal note.
It’s ideal for park lunches because it’s hearty but not messy. Kids love the little pasta shapes and sweet tomatoes. The balsamic glaze adds a tangy-sweet finish.
Prep time: 15 minutes • Cook time: 8 minutes • Yields: 4 servings
Ingredients
- 8 oz tri-color rotini pasta
- 1 pint cherry tomatoes, halved
- 8 oz mini mozzarella balls (bocconcini), drained
- 1/2 cup fresh basil leaves, torn
- 1/4 cup extra-virgin olive oil
- 2 tbsp balsamic vinegar
- 1 tbsp balsamic glaze (optional, for serving)
- 1 tsp honey
- 1/2 tsp sea salt
- 1/4 tsp freshly ground black pepper
- 2 cloves garlic, minced
Instructions
- Bring a large pot of salted water to a boil. Cook pasta to al dente, about 8 minutes. Drain and rinse under cold water to stop cooking.
- In a large bowl, whisk olive oil, balsamic vinegar, honey, salt, pepper, and minced garlic.
- Add cooled pasta to the bowl. Toss to coat with dressing.
- Fold in halved cherry tomatoes, mozzarella balls, and torn basil.
- Taste and adjust seasoning. Let salad rest 10 minutes for flavors to meld.
- Drizzle balsamic glaze before serving for a sweet finish.
- Chill in cooler until serving. Serve cold or at room temperature.
How to Serve It
Spoon into individual containers for easy serving. Garnish with whole basil leaves and a light extra drizzle of olive oil. Pair with grilled chicken skewers and fresh fruit. Keeps well chilled for 24–36 hours. Make the pasta and dressing a day ahead and toss with tomatoes and cheese just before leaving.
5. Rainbow Veggie Hummus Cups — Fun Finger Food
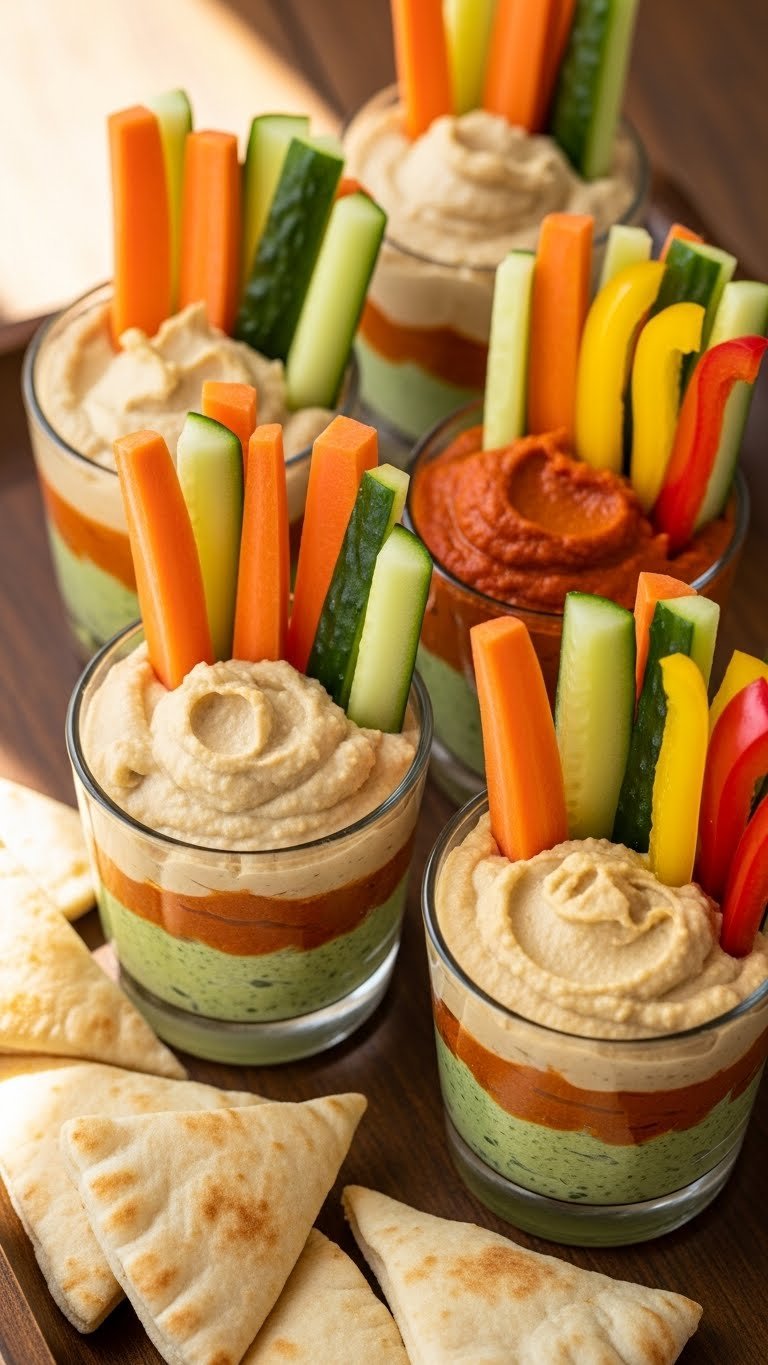
These rainbow veggie hummus cups are colorful, crunchy, and perfectly portioned. Each cup gets creamy hummus and a rainbow of veggie sticks standing upright. The contrast of creamy and crisp textures is a hit.
Great for picnics because they’re single-portion and mess-light. Kids enjoy choosing their favorite colors and dipping as they play.
Prep time: 15 minutes • Cook time: 0 minutes • Yields: 6 cups
Ingredients
- 1 1/2 cups hummus (store-bought or homemade)
- 2 carrots, peeled and cut into sticks
- 1 cucumber, cut into sticks
- 1 red bell pepper, cut into sticks
- 1 yellow bell pepper, cut into sticks
- 1 cup cherry tomatoes, halved
- 6 small whole wheat pita wedges
- 2 tbsp olive oil
- 1/2 tsp paprika
- Fresh parsley for garnish
- Salt and pepper, to taste
Instructions
- Wash and cut all veggies into thin sticks about 3 inches long.
- If using pita, cut into wedges and lightly brush with olive oil, then toast in oven at 350°F for 6 minutes until just crisp.
- Divide hummus evenly into 6 small clear cups, filling each about halfway.
- Arrange veggie sticks vertically in each cup in rainbow order. Add a few cherry tomato halves.
- Sprinkle each cup with paprika, salt, and pepper. Garnish with parsley.
- Cover cups and chill until ready to serve. Keep pita wedges separate to avoid sogginess.
How to Serve It
Serve cups on a tray with pita wedges on the side. Garnish with lemon wedges for squeezing. Pair with turkey pinwheels or cheese cubes. Store covered in fridge for up to 24 hours. Assemble the morning of the picnic for the freshest presentation.
6. Chicken Caesar Wraps — Kid-Approved Classic

These chicken Caesar wraps are savory, crisp, and familiar. Grilled chicken, crunchy romaine, and tangy Caesar dressing wrapped in a soft tortilla make them satisfying. Parmesan adds a salty finish.
They’re perfect for park lunch because wraps travel well and stay intact. Kids who like classic flavors will reach for seconds.
Prep time: 20 minutes • Cook time: 10 minutes • Yields: 4 wraps
Ingredients
- 2 cups cooked chicken, shredded or chopped (about 8 oz)
- 4 large flour tortillas
- 2 cups romaine lettuce, chopped
- 1/3 cup Caesar dressing
- 1/4 cup grated Parmesan cheese
- 1/2 cup cherry tomatoes, quartered (optional)
- 1 tbsp lemon juice
- 1 tsp olive oil
- 1/4 tsp black pepper
- Salt, to taste
Instructions
- If chicken isn’t cooked, season and cook breasts in a skillet 6–8 minutes per side until internal temp reads 165°F. Cool and shred.
- Toss chicken with lemon juice, olive oil, black pepper, and half the Caesar dressing.
- Lay tortillas flat and divide romaine among them.
- Top lettuce with dressed chicken, Parmesan, and cherry tomatoes if using.
- Drizzle remaining dressing over fillings.
- Fold sides and roll tightly into wraps. Wrap in foil or plastic for transport.
- Slice in half at a 45-degree angle before serving.
How to Serve It
Cut wraps into halves and secure with toothpicks for picnic platter display. Pair with baked veggie chips and apple slices. Store refrigerated for up to 24 hours. You can make chicken ahead and assemble wraps in the morning.
7. Mini Spinach & Feta Frittatas — Portable Protein Bites
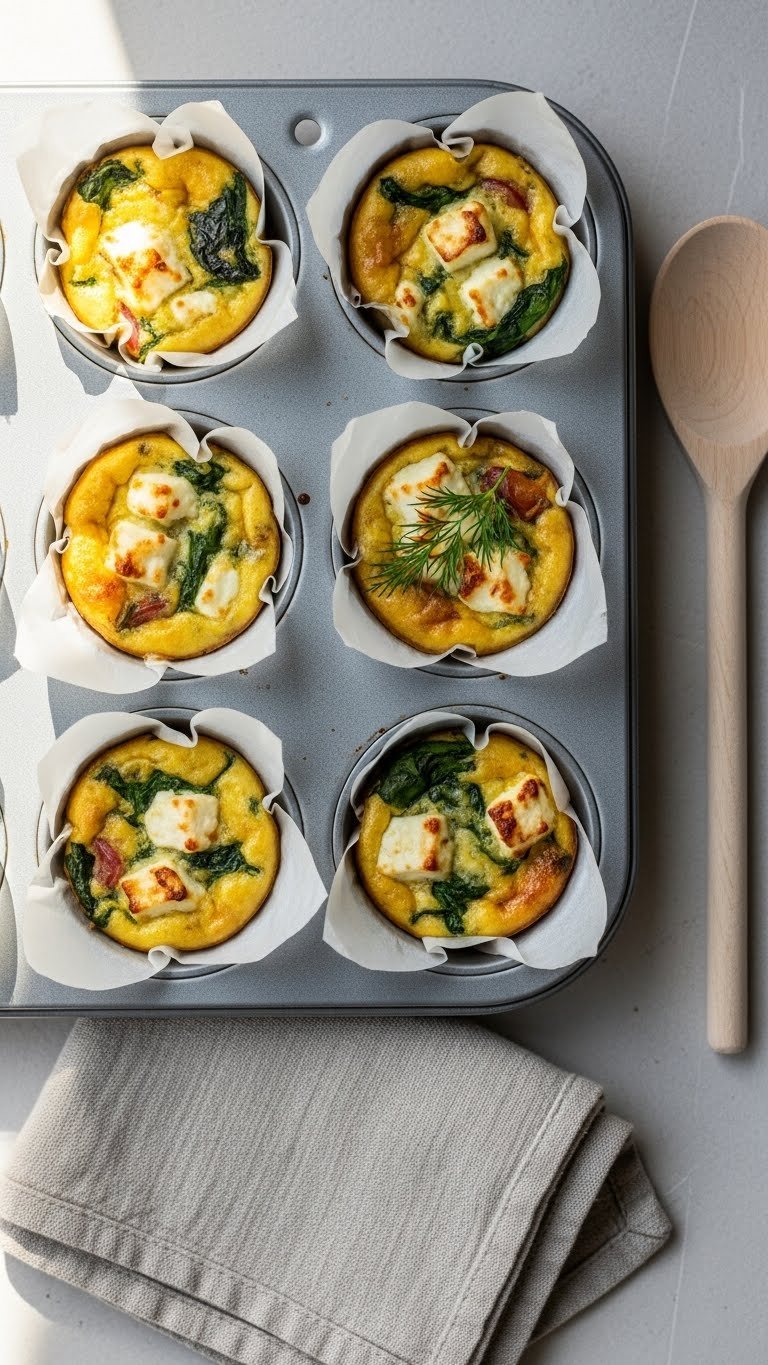
Mini frittatas are fluffy, savory, and full of protein. Spinach and feta bring a tangy, earthy flavor. They’re small, easy to hold, and reheat well.
They fit the picnic theme since they’re sturdy at room temperature and satisfy hungry kids. Expect warm egg aroma and a soft, tender texture.
Prep time: 10 minutes • Cook time: 18 minutes • Yields: 12 mini frittatas
Ingredients
- 6 large eggs, room temperature
- 1/2 cup milk
- 1 cup fresh spinach, chopped
- 1/2 cup crumbled feta cheese
- 1/4 cup red bell pepper, finely diced
- 1/4 cup green onions, sliced
- 1/2 tsp dried oregano
- 1/4 tsp salt
- 1/4 tsp black pepper
- 2 tbsp olive oil or nonstick spray
Instructions
- Preheat oven to 375°F (190°C). Grease a 12-cup muffin tin with oil or spray.
- In a bowl, whisk eggs and milk until smooth.
- Fold in spinach, feta, bell pepper, green onions, oregano, salt, and pepper.
- Divide mixture evenly among muffin cups, filling each about 3/4 full.
- Bake 15–18 minutes until edges are set and tops are lightly golden. Insert toothpick; it should come out clean.
- Let frittatas cool in tin 5 minutes, then transfer to wire rack to cool fully.
- Store in airtight container and chill until heading to the park.
How to Serve It
Serve warm or at room temperature in a container layered with parchment. Garnish with a small sprig of dill or chives. Pair with fruit salad and whole-grain crackers. Keep refrigerated and enjoy within 3 days. Freeze extras and reheat in microwave for 45–60 seconds.
8. Turkey, Apple & Cheddar Sandwich Skewers
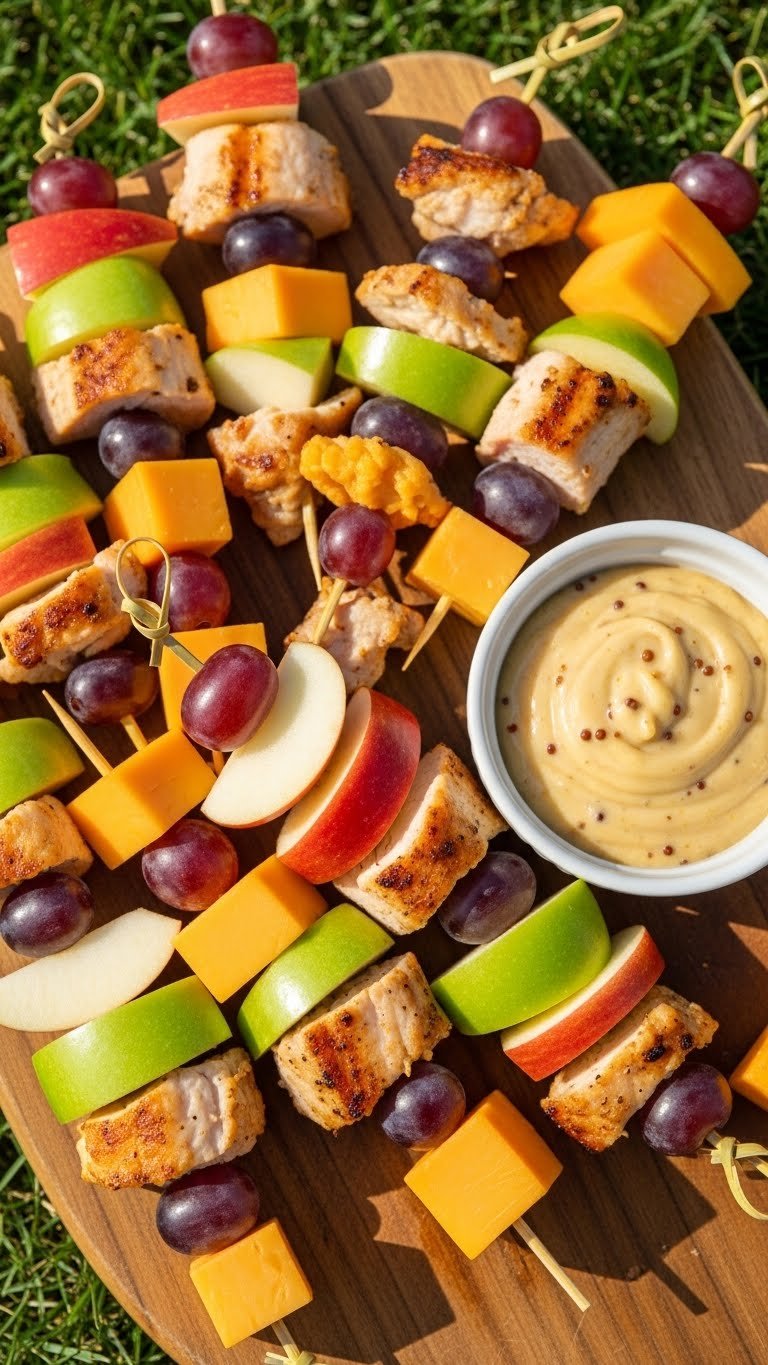
These skewers mix savory turkey with crisp apple and sharp cheddar. The sweet-tart apple and mild turkey balance the creamy cheddar. Skewers are simple, no-mess, and fun for kids.
They’re ideal for picnic lunches because they’re portable and require no bread. Kids will like the combination of textures and flavors.
Prep time: 15 minutes • Cook time: 0 minutes • Yields: 8 skewers
Ingredients
- 8 bamboo skewers (6-inch)
- 8 oz sliced turkey, rolled
- 8 oz sharp cheddar, cut into 1-inch cubes
- 1 crisp apple (Honeycrisp or Fuji), cored and sliced into wedges
- 1 cup seedless grapes
- 1/4 cup honey-mustard dipping sauce
- 1 tbsp lemon juice (to prevent apple browning)
- Fresh rosemary sprigs for garnish (optional)
- Toothpicks for securing
Instructions
- Toss apple slices with lemon juice to prevent browning.
- Thread turkey, cheddar cube, apple wedge, and grape onto each skewer in any order, leaving a little space between items.
- Secure loose elements with a toothpick if needed.
- Arrange skewers on a platter and cover with plastic wrap until departure.
- Place dipping sauce in a small container with a lid for dipping on-site.
- Store skewers chilled and consume within 24 hours.
How to Serve It
Lay skewers on a wooden board with dipping sauce in the center. Add whole-grain crackers and pickles for variety. Keep chilled on ice in the cooler. Make skewers the morning of the picnic to keep apples fresh. For a nut-free option, omit any nutty sides.
9. Sunflower Butter Banana Sushi Rolls (No-Bake, Kid-Friendly)
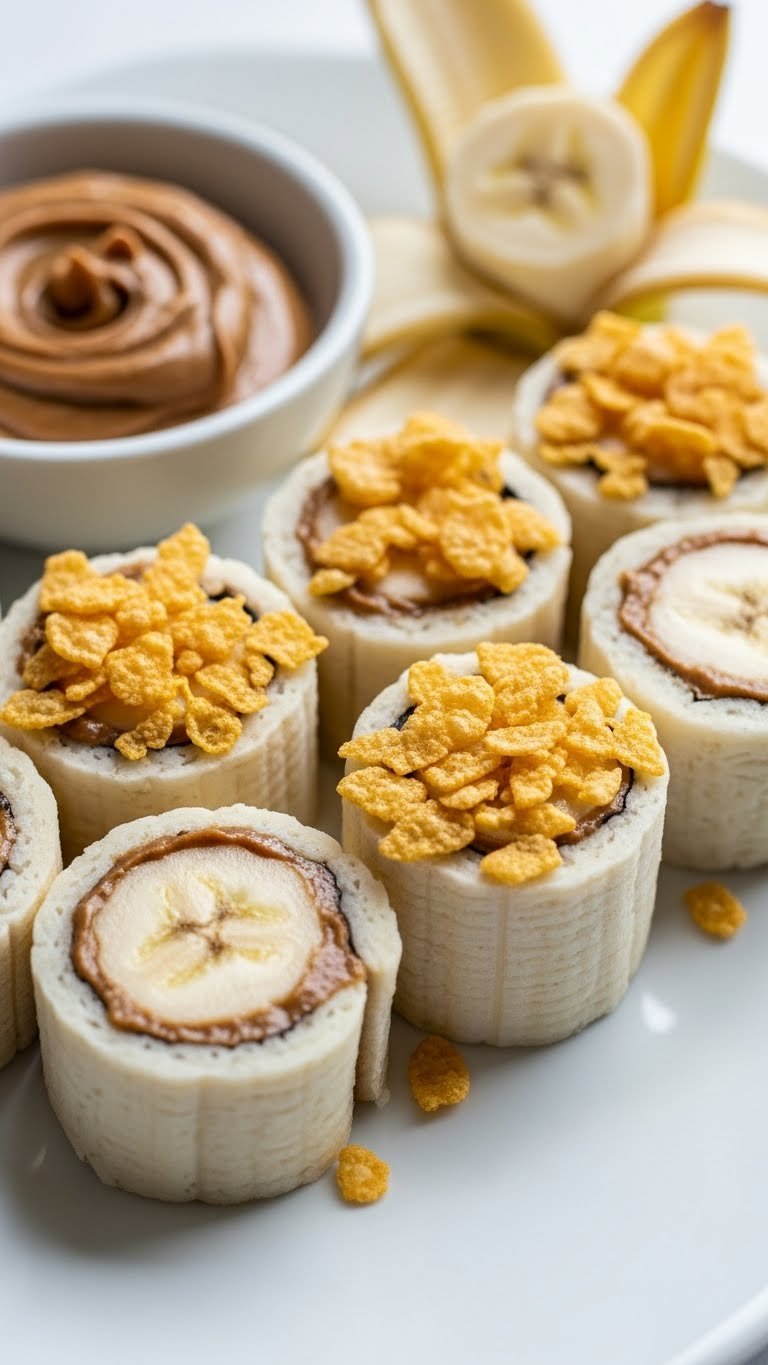
These banana "sushi" rolls are sweet, creamy, and playful. Spread sunflower butter on a tortilla, roll around a banana, and slice into rounds. The texture is soft, with nutty spread and sweet banana.
Great for park lunches because kids love the novelty. They’re quick to assemble and hold up well in a cooler.
Prep time: 10 minutes • Cook time: 0 minutes • Yields: 6 servings (about 18 pieces)
Ingredients
- 2 medium bananas, ripe but firm
- 2 whole wheat tortillas (8-inch)
- 1/2 cup sunflower seed butter
- 2 tbsp honey or maple syrup
- 1/4 cup crushed whole-grain cereal or granola
- 1 tsp cinnamon
- 1 tbsp mini chocolate chips (optional)
- Lemon juice, a light brush to prevent browning (optional)
Instructions
- Lay tortillas flat. Spread 1/4 cup sunflower butter evenly on each.
- Mix honey and cinnamon, drizzle lightly over sunflower butter.
- Place a banana near one edge and roll tortilla tightly around it.
- Repeat with second banana.
- Slice each roll into 1-inch rounds using a sharp knife.
- Roll each piece in crushed cereal or granola to coat edges.
- Store in a container with parchment and chill until serving. Add chocolate chips to some rolls for variety.
How to Serve It
Arrange sushi rolls on a colorful plate and sprinkle a few extra chocolate chips. Serve with a small container of yogurt for dipping. Store chilled for up to 12 hours. Make right before leaving to prevent banana browning.
10. No-Bake Oat & Berry Granola Bars — Sweet Picnic Snack

These no-bake granola bars are chewy, fruity, and easy to pack. Rolled oats and mixed berries bind with honey and sunflower butter for a wholesome snack. They’re soft enough for kids and not overly sweet.
They’re perfect for park lunches as a handheld energy boost. The berry pieces add color and a juicy pop.
Prep time: 15 minutes • Chill time: 1 hour • Yields: 12 bars
Ingredients
- 2 cups rolled oats
- 1 cup puffed rice cereal
- 1/2 cup sunflower seed butter
- 1/3 cup honey or maple syrup
- 1/4 cup coconut oil, melted
- 1/2 cup dried mixed berries (cranberries, blueberries)
- 1/4 cup mini chocolate chips (optional)
- 1 tsp vanilla extract
- 1/4 tsp salt
- 2 tbsp chia seeds (optional)
Instructions
- Line an 8×8-inch pan with parchment.
- In a large bowl, mix oats, puffed rice, dried berries, chia, and salt.
- Warm sunflower butter, honey, and coconut oil in a small saucepan over low heat, stirring until smooth. Remove from heat and stir in vanilla.
- Pour wet mix over dry ingredients and stir until evenly coated. Add chocolate chips last so they don’t melt.
- Press mixture firmly and evenly into the prepared pan using a spatula or back of a spoon.
- Chill in fridge for 1 hour until set.
- Lift out parchment and cut into 12 bars. Store in an airtight container.
How to Serve It
Wrap bars individually in parchment for easy picnic handouts. Pair with yogurt tubes and fresh fruit. Store chilled for up to 1 week or freeze for 1 month. Make these the night before for quick packing.
11. Mini Fruit Pitas with Honey Yogurt Dip
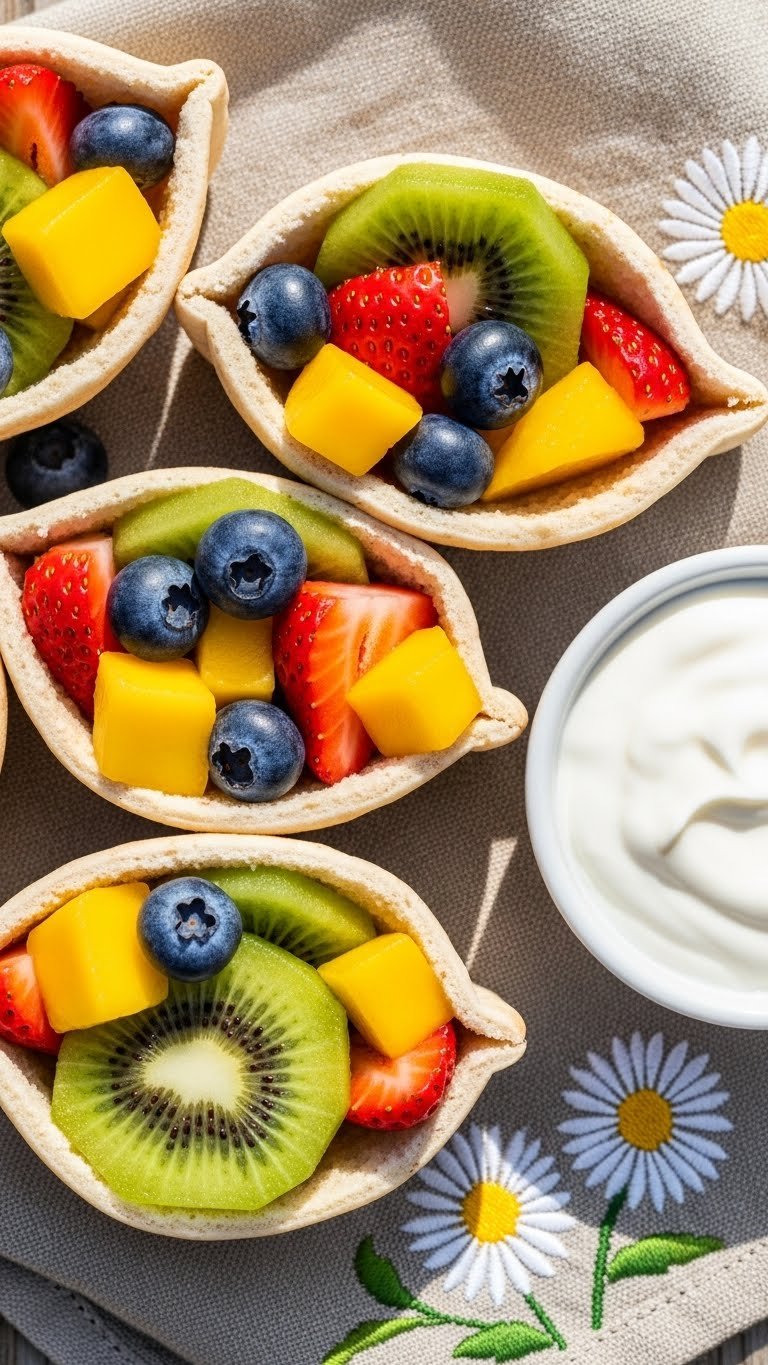
Mini fruit pitas are colorful, crunchy, and sweet without added sugar. Fill small pita rounds with mixed fruit for a handheld fruit pocket kids can easily eat. The honey yogurt dip adds creamy sweetness.
They’re picnic-perfect because fruit stays fresh and is easy to portion. Kids love the pockets and dipping action.
Prep time: 15 minutes • Cook time: 0 minutes • Yields: 6 pitas
Ingredients
- 6 mini whole wheat pita pockets
- 1 cup strawberries, quartered
- 1 cup grapes, halved
- 1 kiwi, peeled and diced
- 1/2 cup mango, diced
- 1 cup plain Greek yogurt
- 2 tbsp honey
- 1 tsp lemon zest
- 1 tbsp fresh mint, chopped
- 1 tbsp chia seeds (optional)
Instructions
- In a bowl, mix Greek yogurt, honey, and lemon zest. Stir until smooth. Chill until ready.
- Wash and cut all fruit into bite-sized pieces.
- Carefully open pita pockets and gently loosen interiors to make space.
- Fill each pita with a colorful mix of fruit, leaving room at top so fruit won’t spill.
- Sprinkle mint and chia seeds into the pockets if using.
- Place fruit-filled pitas in a shallow container lined with parchment and keep upright.
- Serve with honey yogurt dip on the side. Keep chilled until serving.
How to Serve It
Arrange pita pockets in a basket lined with napkins. Place honey yogurt dip in a small sealed container for dipping. Pair with mini frittatas or veggie cups. Keep chilled and eat within 12–18 hours. Assemble just before leaving for best texture.
These eleven park picnic lunch ideas kids love too give you a mix of savory mains, fun finger foods, healthy snacks, and sweet treats. You’ve got salads that travel, handheld sandwiches, protein bites, and easy desserts — all kid-friendly and picnic-ready. Save or pin this list for your next park day and pick two or three recipes to mix into a crowd-pleasing spread. Which recipe will you try first, or which combo will your kids ask for next? Share these with friends and pack a picnic that keeps everyone smiling.