
Summer plans often mean guests, sunshine, and the smell of something sizzling on the grill. When you’re feeding a crowd, you want simple recipes that pack bold flavor and travel well from grill to table. These Sizzling Summer BBQ Menu Ideas for Crowd-Pleasing Meals give you easy mains, vibrant sides, and a sweet finish that’ll make your backyard gathering feel effortless and joyful.
You’ll find 12 complete, tested recipes here — from skewers and sliders to grilled desserts and fresh salads. Each recipe includes a clear ingredient list, step-by-step instructions, and serving tips so you can grill with confidence. Whether you’re hosting a weekday cookout or a weekend bash, these Sizzling Summer BBQ Menu Ideas for Crowd-Pleasing Meals will help you build a menu that keeps everyone coming back for seconds. Pin this guide, pick your favorites, and let the good times roll.
1. Sizzling Summer BBQ Menu Ideas for Crowd-Pleasing Meals: Grilled Lemon-Herb Chicken Skewers
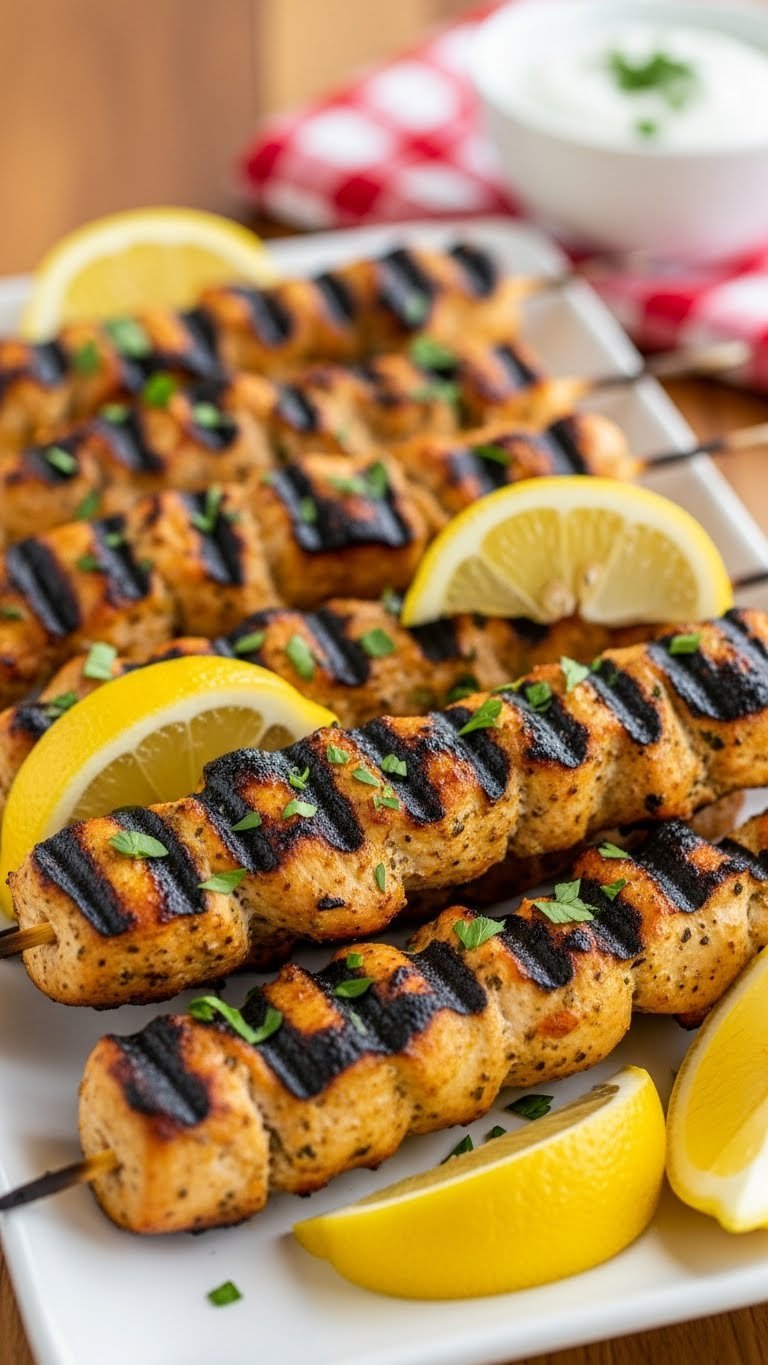
These grilled lemon-herb chicken skewers are bright, juicy, and fast to cook. The marinade blends citrus, garlic, and fresh herbs for a punchy, fragrant flavor. They grill quickly, making them perfect for feeding a crowd without standing over the fire. Folks who love tangy, herby profiles will go for these. Expect tender meat, charred edges, and a lively lemon aroma.
Ingredients
- 2 lbs boneless, skinless chicken thighs, cut into 1.5-inch pieces
- 1/3 cup extra-virgin olive oil
- 1/4 cup fresh lemon juice (about 2 lemons)
- 2 tbsp lemon zest
- 4 garlic cloves, minced
- 2 tbsp fresh parsley, chopped
- 2 tbsp fresh oregano, chopped (or 2 tsp dried)
- 1 tbsp Dijon mustard
- 1 tsp smoked paprika
- 1 tsp kosher salt
- 1/2 tsp black pepper
- Wooden or metal skewers (if wooden, soak 30 minutes)
Instructions
- Pat chicken dry. Combine olive oil, lemon juice, lemon zest, garlic, parsley, oregano, mustard, paprika, salt, and pepper in a large bowl.
- Add chicken and toss to coat. Marinate in the fridge 30–60 minutes (no longer than 2 hours).
- Preheat grill to medium-high (about 400°F). Oil grates.
- Thread chicken onto skewers, leaving small gaps between pieces for even cooking.
- Grill skewers 4–5 minutes per side, turning once, until charred edges appear.
- Check doneness with an instant-read thermometer; chicken should reach 165°F.
- Transfer to a platter and rest 5 minutes so juices redistribute.
- Squeeze extra lemon over skewers and sprinkle with chopped parsley before serving.
How to Serve It
Serve on a long platter with lemon wedges and a bowl of garlic-yogurt sauce or tzatziki. Garnish with extra chopped parsley and thinly sliced red onion. Pair with grilled corn, potato salad, and a crisp lager or iced tea. Leftovers keep in an airtight container for 3 days. You can marinate chicken a day ahead for easier grilling. These skewers fit summer parties, pool days, and picnic-style buffets.
2. Smoky Maple-Glazed Ribs

These smoky maple-glazed ribs have a crisp, sticky exterior and tender, fall-off-the-bone meat. A dry rub builds deep flavor, then a maple glaze caramelizes on the grill. The result is sweet, smoky, and slightly tangy. This dish suits slow Sunday barbecues and family gatherings. Expect rich aromas and a lacquered finish that makes everyone reach for napkins.
Ingredients
- 2 racks baby back ribs (about 4–5 lbs total)
- 1/4 cup brown sugar
- 2 tbsp smoked paprika
- 1 tbsp kosher salt
- 1 tbsp garlic powder
- 1 tsp black pepper
- 1 tsp ground cumin
- 1/2 tsp cayenne pepper (optional)
- 1/2 cup pure maple syrup
- 1/4 cup apple cider vinegar
- 2 tbsp Dijon mustard
- 2 tbsp unsalted butter
Instructions
- Remove membrane from the back of the ribs using a paper towel for grip.
- Mix brown sugar, smoked paprika, salt, garlic powder, pepper, cumin, and cayenne in a bowl.
- Rub spice mix evenly over ribs. Wrap in plastic and refrigerate at least 2 hours or overnight.
- Preheat grill for indirect heat at 275°F, or set oven to 275°F.
- Place ribs bone-side down on the grill or a foil-lined baking sheet. Cook low and slow 2.5–3 hours until meat pulls back from bones.
- Whisk maple syrup, apple cider vinegar, mustard, and butter in a small saucepan. Simmer 3–4 minutes until slightly thickened.
- Brush glaze on ribs and move to direct heat for 3–5 minutes per side to caramelize. Watch closely to prevent burning.
- Check doneness: ribs should be tender and a thermometer near the bone should read about 195–203°F for pull-apart texture.
- Rest ribs 10 minutes before slicing between bones.
How to Serve It
Slice between bones and arrange on a wooden board. Garnish with chopped parsley and extra maple glaze in a dipping bowl. Pair with coleslaw, baked beans, and a dark ale or iced tea. Store leftovers tightly wrapped for 3–4 days or freeze for up to 3 months. You can prep the rub and glaze a day ahead to streamline grilling day.
3. Grilled Corn with Chili-Lime Butter
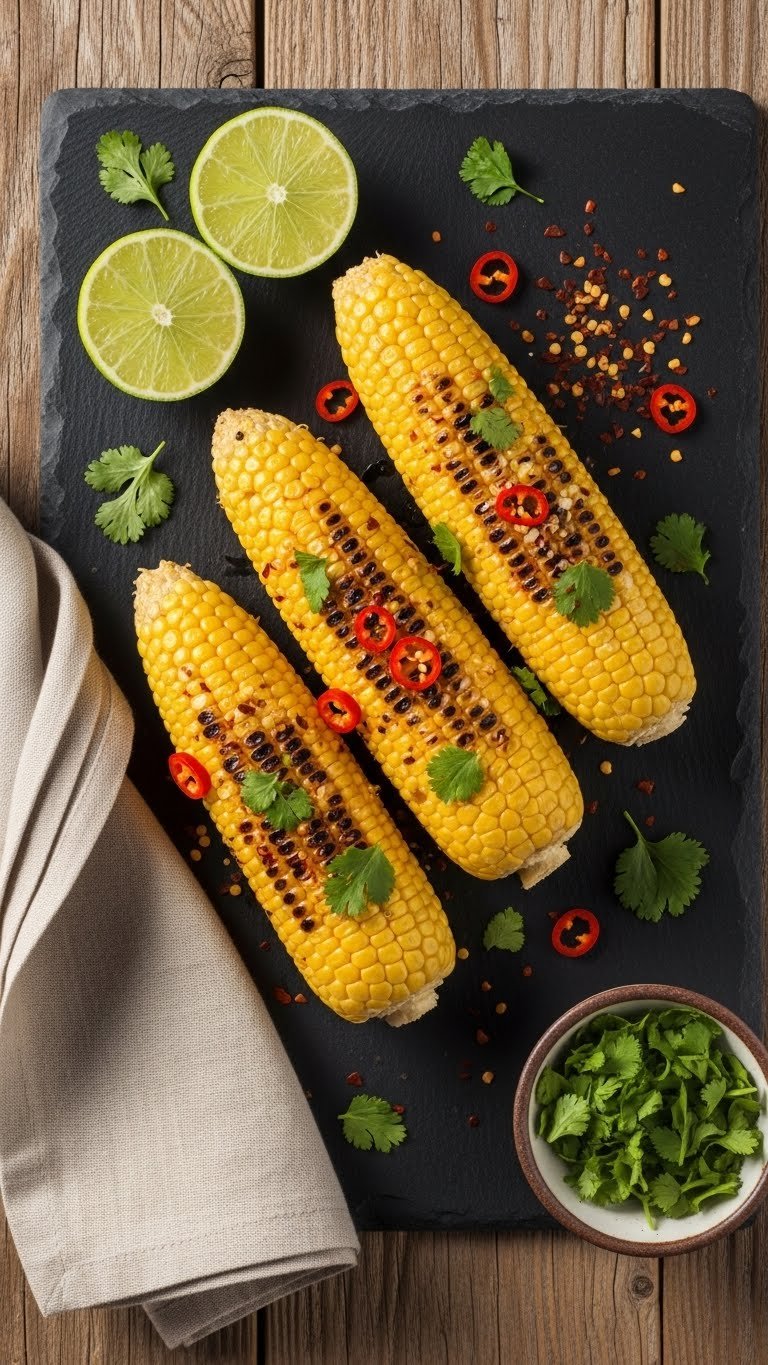
Charred corn gets zesty heat from chili-lime butter in this easy side. The butter melts into smoky kernels, creating bright, spicy-salty bites. It’s a summer staple that’s quick to grill and loved by kids and adults. Expect sweet corn flavor, pops of char, and a citrusy finish that brightens the whole plate.
Ingredients
- 6 ears fresh corn, husked
- 1/2 cup unsalted butter, softened
- 2 tbsp fresh lime juice
- 1 tbsp lime zest
- 1 tsp chili flakes (adjust to taste)
- 2 tbsp fresh cilantro, finely chopped
- 1/2 tsp smoked paprika
- 1/2 tsp kosher salt
- Freshly ground black pepper, to taste
- Lime wedges, for serving
Instructions
- Preheat grill to medium-high and oil the grates.
- In a bowl, mix butter, lime juice, lime zest, chili flakes, cilantro, smoked paprika, salt, and pepper until smooth.
- Place corn on the grill and cook 10–12 minutes, turning every 2–3 minutes for even char.
- Move corn to indirect heat or cooler part of grill if one side chars faster.
- Remove when kernels show even char and are tender when pierced with a fork.
- Immediately spread chili-lime butter over hot corn so it melts into kernels.
- Serve with lime wedges and a sprinkle of extra cilantro.
How to Serve It
Serve whole on a platter with bowls of extra butter and lime wedges. Garnish with crumbled cotija or grated Parmesan for a richer option. Pairs well with grilled chicken, fish tacos, and light white wines. Leftover corn kernels can be cut off the cob and refrigerated for 2 days for salads or salsas. Make the butter ahead and keep chilled until grilling.
4. Classic BBQ Pulled Pork Sliders
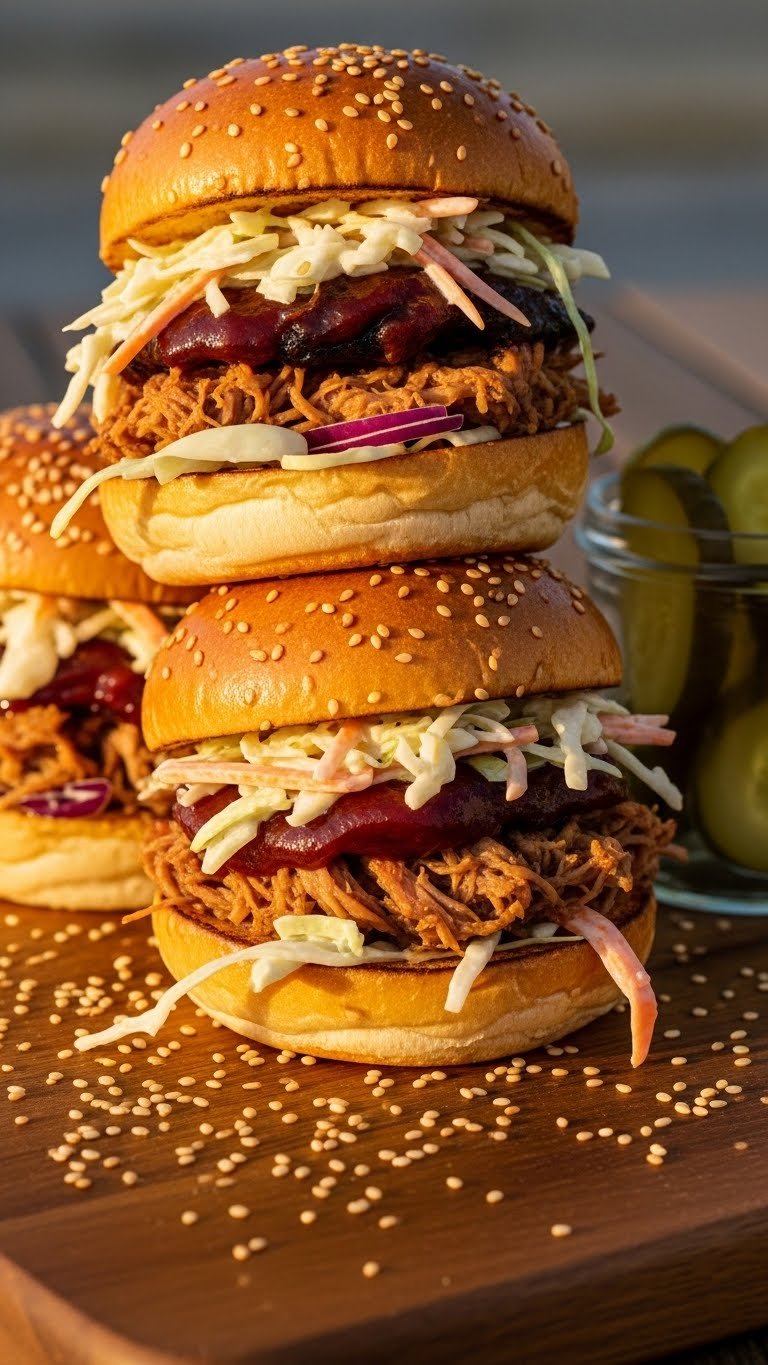
These pulled pork sliders deliver tender shredded pork with tangy barbecue sauce and crisp slaw. Slow-cooked until fork-tender, the pork soaks up smoky and sweet flavors. They’re perfect for big groups because you can make a large batch ahead. Expect rich meatiness, vinegary brightness, and hands-on sandwich fun.
Ingredients
- 4 lbs pork shoulder (Boston butt)
- 2 tbsp kosher salt
- 1 tbsp black pepper
- 2 tbsp brown sugar
- 1 tbsp smoked paprika
- 1 tsp garlic powder
- 1 tsp onion powder
- 1 cup apple cider vinegar
- 1 cup low-sodium chicken broth
- 1 1/2 cups your favorite BBQ sauce
- 12 mini brioche buns
- Quick slaw: 3 cups shredded cabbage, 1/4 cup mayo, 1 tbsp apple cider vinegar, 1 tsp sugar, salt & pepper
Instructions
- Trim excess fat from pork and pat dry.
- Mix salt, pepper, brown sugar, smoked paprika, garlic powder, and onion powder.
- Rub spice mix over pork. Let sit 30 minutes at room temperature or refrigerate overnight.
- Place pork in a slow cooker with apple cider vinegar and chicken broth. Cook on low 8–10 hours or high 5–6 hours, until pork shreds easily.
- Remove pork and shred with two forks. Skim fat from cooking liquid and return a few tablespoons to keep meat moist.
- Stir in BBQ sauce to taste; heat through.
- Mix slaw ingredients in a bowl. Chill until ready to serve.
- Assemble sliders: bun, pulled pork, slaw. Serve warm.
How to Serve It
Pile pork high on mini brioche buns and top with tangy slaw and pickle slices. Offer extra BBQ sauce on the side. Pair with potato chips, corn on the cob, and a hoppy beer or sweet iced tea. Refrigerate pulled pork for 3–4 days or freeze in portions for up to 3 months. You can cook pork the day before and reheat gently in the sauce.
5. Sizzling Summer BBQ Menu Ideas for Crowd-Pleasing Meals: Grilled Salmon with Mango Avocado Salsa
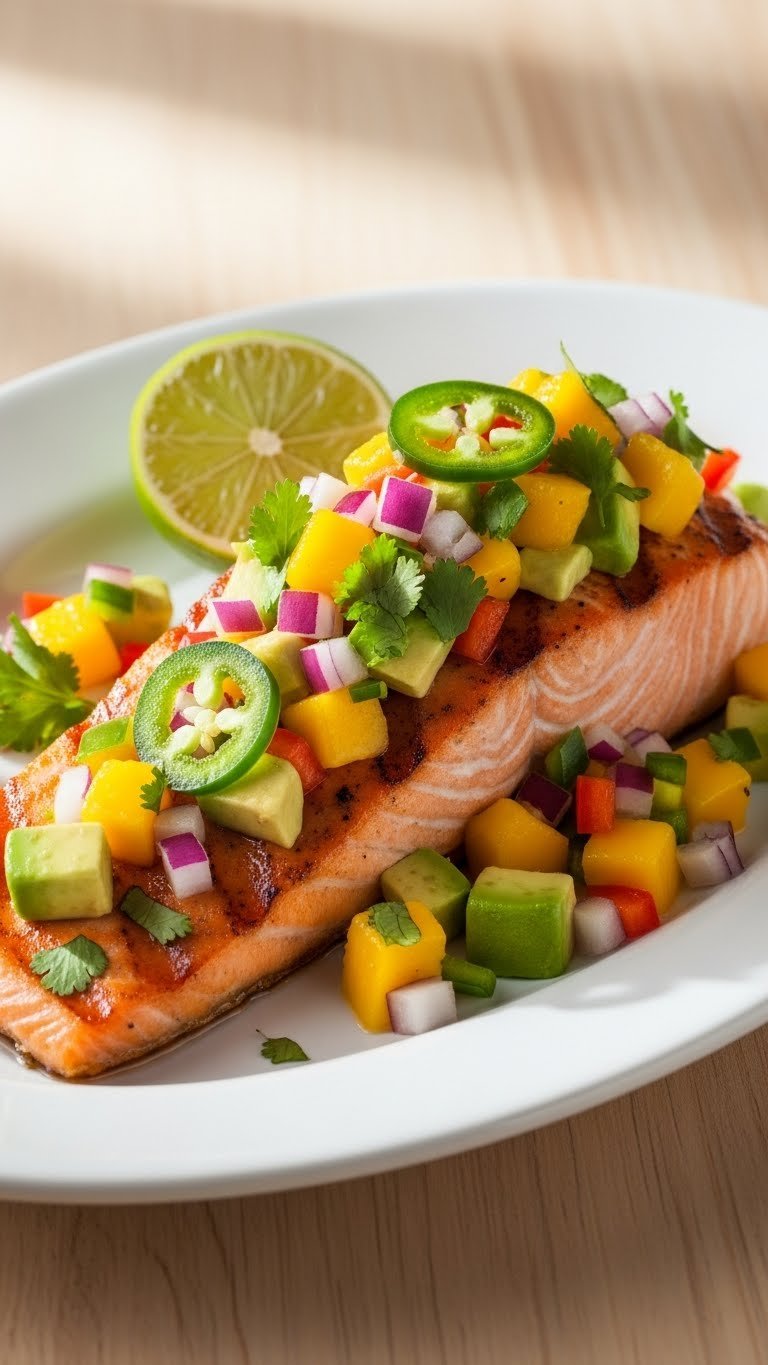
This grilled salmon pairs smoky char with a bright mango-avocado salsa. The fish stays moist with a simple oil-and-lime rub, and the salsa adds sweet, creamy contrast. It’s light but satisfying, perfect for summer evenings and poolside dinners. Expect flaky salmon, tropical sweetness, and a cool, creamy finish.
Ingredients
- 2 lbs salmon fillet, skin-on, trimmed into 4 portions
- 2 tbsp olive oil
- 1 tbsp lime juice
- 1 tsp lime zest
- 1 tsp kosher salt
- 1/2 tsp black pepper
- 1 ripe mango, diced
- 1 ripe avocado, diced
- 1/4 cup red bell pepper, finely chopped
- 2 tbsp red onion, minced
- 2 tbsp fresh cilantro, chopped
- 1 tbsp jalapeño, seeded and minced (optional)
- 1 tbsp olive oil (for salsa)
- Salt and pepper, to taste
Instructions
- Pat salmon dry and score skin lightly if thick.
- Combine olive oil, lime juice, lime zest, salt, and pepper. Brush over salmon.
- Preheat grill to medium (about 375–400°F) and oil grates.
- Mix salsa: mango, avocado, red pepper, red onion, cilantro, jalapeño, and 1 tbsp olive oil. Season with salt and pepper. Chill.
- Grill salmon 4–6 minutes skin-side down until skin releases easily.
- Flip and grill 3–4 more minutes, depending on thickness.
- Check doneness: salmon should flake easily and reach 125–130°F for medium (or 145°F per USDA if you prefer well-done).
- Remove and rest 3 minutes before topping with salsa.
How to Serve It
Serve salmon on a long platter with mango-avocado salsa spooned over each portion. Garnish with lime wedges and extra cilantro. Pair with grilled asparagus, jasmine rice, and a crisp Sauvignon Blanc. Leftover salmon keeps 2 days refrigerated. Make salsa up to 4 hours ahead, add avocado just before serving to keep it bright.
6. Vegetarian Portobello Burgers with Herbed Goat Cheese

These portobello burgers are hearty and meaty without meat. The mushrooms soak up a balsamic marinade and finish topped with creamy herbed goat cheese. They’re satisfying and colorful, great for vegetarian guests and anyone who loves big flavors. Expect savory, tangy, and creamy textures with a smoky grill note.
Ingredients
- 4 large portobello caps, stems removed
- 1/4 cup balsamic vinegar
- 2 tbsp olive oil
- 2 garlic cloves, minced
- 1 tbsp soy sauce
- 1 tsp Dijon mustard
- 1/2 tsp black pepper
- 4 oz goat cheese, softened
- 1 tbsp fresh chives, chopped
- 1 tbsp fresh thyme leaves, chopped
- 4 ciabatta or brioche buns, toasted
- Arugula, roasted red peppers, for topping
Instructions
- Whisk balsamic vinegar, olive oil, garlic, soy sauce, mustard, and pepper.
- Place portobellos gill-side down and brush marinade on both sides. Marinate 20–30 minutes.
- Mix goat cheese, chives, and thyme in a small bowl. Chill until ready.
- Preheat grill to medium-high and oil grates.
- Grill portobellos 4–5 minutes per side, brushing with leftover marinade.
- During last minute, dollop herbed goat cheese on mushrooms and close grill to melt slightly.
- Remove and rest 2 minutes.
- Assemble burgers: bun, arugula, portobello with goat cheese, roasted red peppers.
How to Serve It
Serve on toasted buns with extra arugula and roasted garlic aioli. Pair with sweet potato fries, a crisp salad, or grilled corn. Store leftover goat cheese mix 3 days refrigerated. Marinate mushrooms up to 4 hours ahead for convenience. These burgers fit summer potlucks and casual dinners.
7. Grilled Shrimp Tacos with Charred Pineapple Slaw
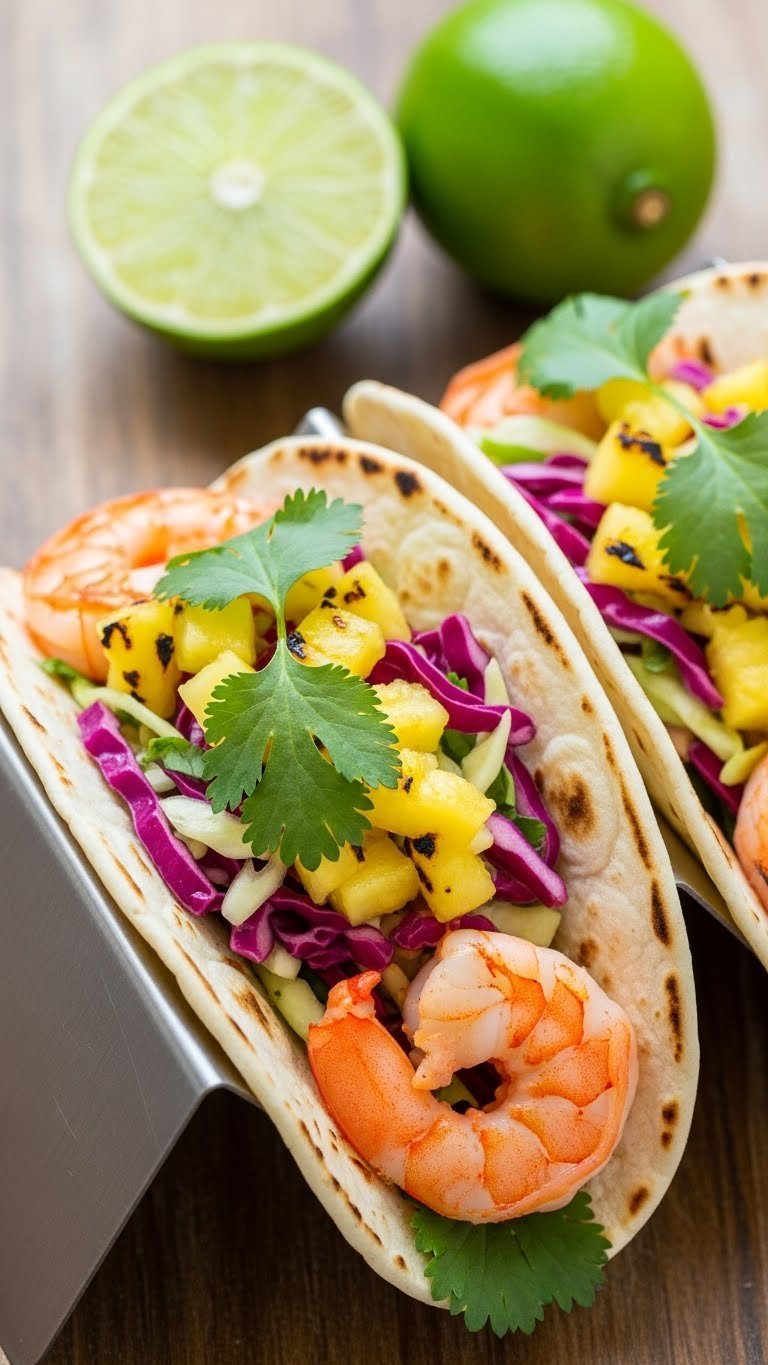
These grilled shrimp tacos are lively and tropical. Quick-cooking shrimp get smoky char, while a charred pineapple slaw adds sweet-acid balance. They’re fast to assemble and great for feeding a crowd assemble-style. Expect juicy shrimp, bright citrus, and a crunchy, caramelized slaw.
Ingredients
- 1 1/2 lbs large shrimp, peeled and deveined
- 2 tbsp olive oil
- 1 tsp chili powder
- 1/2 tsp smoked paprika
- 1/2 tsp cumin
- 1/2 tsp kosher salt
- 1/4 tsp black pepper
- 8 small corn tortillas
- 1 cup diced pineapple, charred on the grill
- 2 cups shredded cabbage
- 2 tbsp mayo
- 1 tbsp lime juice
- 2 tbsp cilantro, chopped
- 1 avocado, sliced (optional)
Instructions
- Toss shrimp with olive oil, chili powder, smoked paprika, cumin, salt, and pepper.
- Preheat grill to high and oil grates.
- For slaw, sauté or char pineapple until browned, then chop. Mix with cabbage, mayo, lime juice, cilantro, salt, and pepper. Chill.
- Grill shrimp 2–3 minutes per side until pink and opaque. Internal temp 145°F.
- Warm tortillas on the grill 30 seconds per side.
- Assemble tacos: tortilla, shrimp, charred pineapple slaw, avocado slices.
- Serve with lime wedges.
How to Serve It
Offer toppings like pickled red onion, hot sauce, and extra cilantro. Pair with a margarita or light lager and black bean salad. Store leftover shrimp and slaw separately for 2 days. You can char pineapple and prep slaw an hour ahead to save time. These tacos are ideal for casual backyard gatherings.
8. Charred Peach and Burrata Salad with Basil
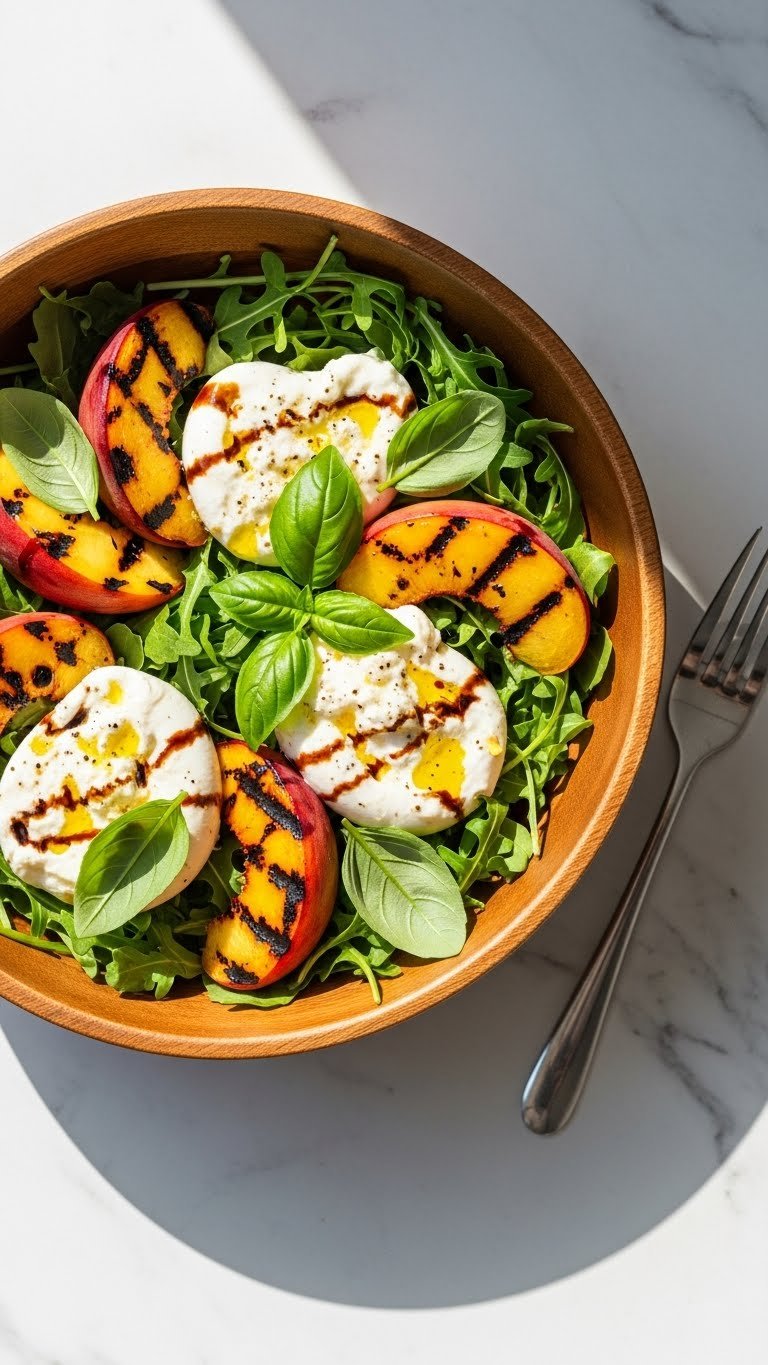
This charred peach and burrata salad balances sweet, smoky peaches with creamy cheese and peppery greens. A light balsamic drizzle ties everything together. It’s a fresh, seasonal side that brightens any BBQ plate. Expect silky cheese, caramelized fruit, and herbaceous basil aroma.
Ingredients
- 4 ripe peaches, halved and pitted
- 2 tbsp olive oil
- 1 tbsp balsamic vinegar
- 1 tbsp honey
- 4 cups arugula
- 8 oz burrata, torn into pieces
- 1/4 cup fresh basil, torn
- 1/4 cup toasted almonds, chopped
- Salt and freshly ground black pepper, to taste
Instructions
- Brush peach halves with olive oil.
- Preheat grill to high and oil grates.
- Grill peaches 2–3 minutes per side until char marks appear and fruit softens.
- Whisk balsamic vinegar and honey with a tablespoon of olive oil; season with salt and pepper.
- Toss arugula with a small amount of dressing on a large platter.
- Arrange charred peaches and torn burrata over greens.
- Drizzle remaining dressing and sprinkle basil and toasted almonds.
- Serve immediately so burrata stays creamy.
How to Serve It
Serve on a chilled platter for a bright presentation. Garnish with flaky sea salt and extra basil. Pair with grilled chicken or light fish and a chilled rosé. Leftovers are best enjoyed the same day; burrata softens after dressing. You can grill peaches earlier and assemble right before serving.
9. Sizzling Summer BBQ Menu Ideas for Crowd-Pleasing Meals: Smoky Sausage and Pepper Skillet
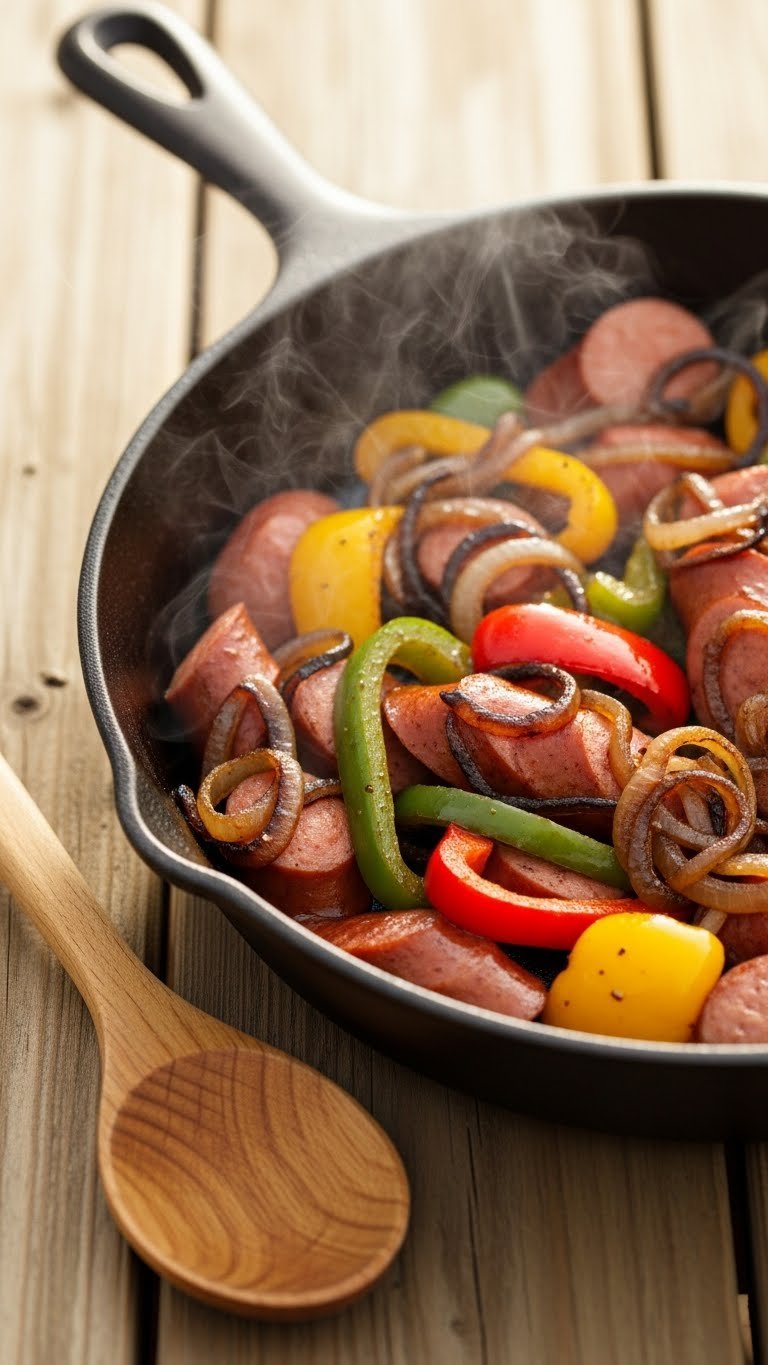
This smoky sausage and pepper skillet is robust, rustic, and built for sharing. Sliced sausages sear with sweet bell peppers and onions until edges caramelize. The dish is hearty and full of savory, smoky flavors. It’s ideal for easy family-style serving and for satisfying big appetites. Expect bold spices, tender veggies, and sizzle.
Ingredients
- 2 lbs smoked sausages (Italian or kielbasa), sliced into 1/2-inch rounds
- 2 tbsp olive oil
- 3 bell peppers (red, yellow, orange), sliced
- 1 large yellow onion, sliced
- 3 garlic cloves, minced
- 1 tsp smoked paprika
- 1/2 tsp dried oregano
- 1/2 cup chicken broth
- 2 tbsp tomato paste
- 1 tbsp Worcestershire sauce
- Salt and pepper, to taste
- 2 tbsp fresh parsley, chopped
Instructions
- Heat 1 tbsp olive oil in a large cast-iron skillet over medium-high heat.
- Add sausage slices and sear 3–4 minutes per side until browned. Remove and set aside.
- Add remaining 1 tbsp olive oil and sauté onions and peppers 6–8 minutes until softened and starting to brown.
- Stir in garlic, smoked paprika, and oregano; cook 1 minute until fragrant.
- Return sausages to the skillet. Mix chicken broth, tomato paste, and Worcestershire sauce and pour in.
- Reduce heat to medium and simmer 6–8 minutes until sauce thickens slightly and flavors meld.
- Taste and season with salt and pepper.
- Sprinkle with parsley and serve hot.
How to Serve It
Serve directly in the skillet with crusty rolls or over rice. Garnish with extra parsley and pickled peppers for brightness. Pair with a hearty red wine or amber ale. Refrigerate leftovers for 3–4 days. Reheat gently on the stovetop; add a splash of broth if dry. Make the sausage mix a day ahead and reheat on the grill for more char.
10. Grilled Halloumi and Vegetable Skewers

Halloumi grills to golden perfection and stays delightfully chewy. Paired with bright vegetables and a zesty lemon-herb drizzle, these skewers are a hit with vegetarians and cheese lovers. They’re easy to assemble and grill quickly. Expect salty, squeaky halloumi, tender veggies, and citrusy freshness.
Ingredients
- 12 oz halloumi cheese, cut into 1-inch cubes
- 2 zucchinis, sliced into thick rounds
- 1 pint cherry tomatoes
- 1 red onion, cut into wedges
- 3 tbsp olive oil
- 2 tbsp lemon juice
- 1 tsp lemon zest
- 1 tbsp fresh oregano, chopped
- 1 tsp garlic powder
- Salt and pepper, to taste
- Wooden skewers, soaked if needed
Instructions
- Preheat grill to medium-high and oil grates.
- In a bowl, whisk olive oil, lemon juice, lemon zest, oregano, garlic powder, salt, and pepper.
- Thread halloumi and vegetables onto skewers, alternating pieces.
- Brush skewers with the lemon-herb mixture.
- Grill 2–3 minutes per side until halloumi is golden and vegetables have char marks.
- Turn carefully to avoid softening halloumi too much.
- Remove and rest 2 minutes.
- Drizzle remaining lemon-herb mixture over skewers before serving.
How to Serve It
Serve with warm pita, tzatziki, and a simple green salad. Garnish with fresh mint and extra lemon wedges. Leftover skewers keep 1–2 days refrigerated; halloumi softens after reheating. These skewers work well for light summer lunches and as part of a vegetarian BBQ spread.
11. Grilled Beer Can Chicken with Herb Rub
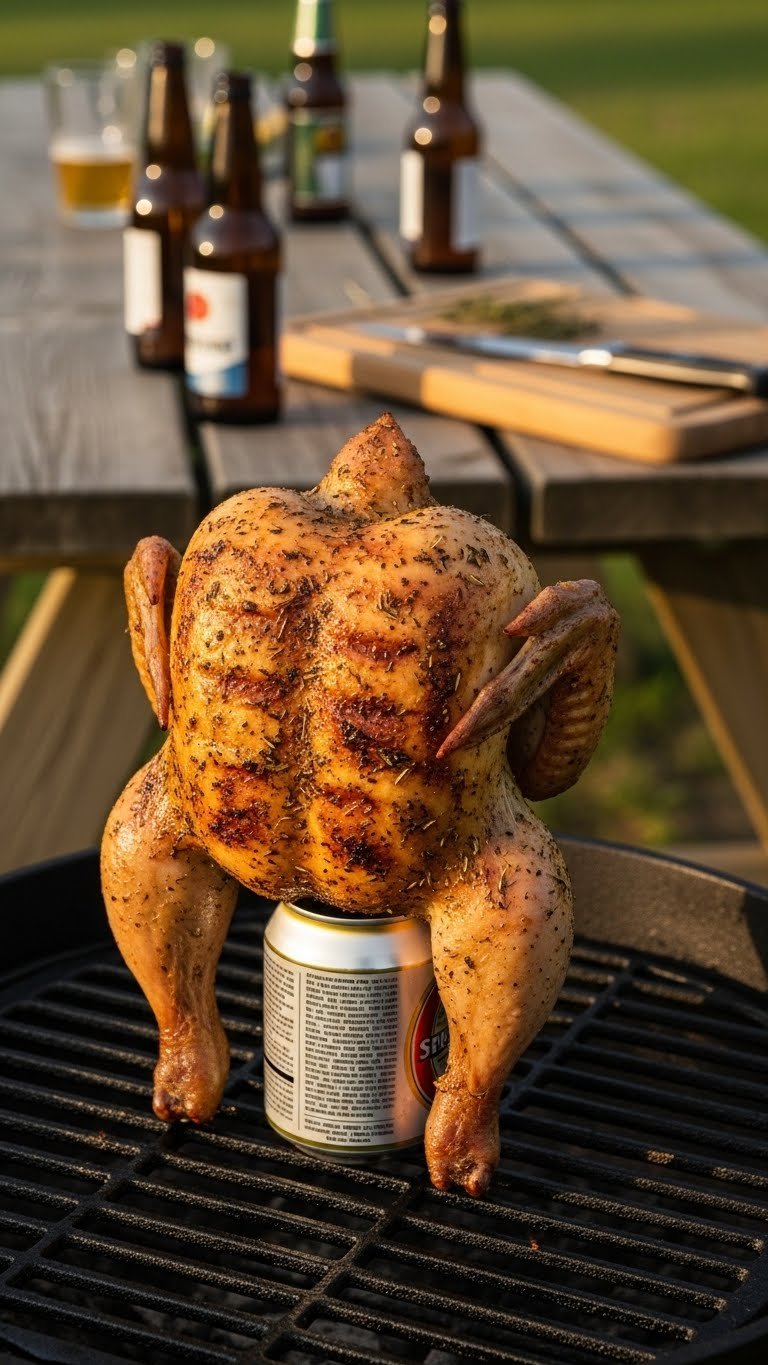
This beer can chicken yields juicy meat and deeply flavored crispy skin. The upright cooking method steams the interior while the rub crisps the skin. It’s show-stopping and feeds a crowd with minimal fuss. Expect rich, herb-scented poultry, crackly skin, and an aromatic beer-steamed finish.
Ingredients
- 1 whole chicken (4–5 lbs), giblets removed
- 2 tbsp olive oil
- 1 tbsp kosher salt
- 1 tsp black pepper
- 1 tbsp paprika
- 1 tsp garlic powder
- 1 tsp onion powder
- 1 tbsp fresh thyme, chopped
- 1 tbsp fresh rosemary, chopped
- 1 can light beer (12 oz), half-full
- 1 lemon, halved
Instructions
- Pat chicken dry and rub with olive oil.
- Combine salt, pepper, paprika, garlic powder, onion powder, thyme, and rosemary. Rub all over chicken, including under the skin where possible.
- Open beer can and pour out (or drink) about 1/3. Add lemon halves to the can for added aroma.
- Slide the beer can into the chicken cavity and set the chicken upright on a grill rack that fits.
- Preheat grill for indirect medium heat (375°F). Place chicken over indirect heat.
- Cook about 1 hour to 1 hour 15 minutes, until an instant-read thermometer in the thickest part of the thigh reads 165°F and juices run clear.
- Carefully remove chicken and let rest 10–15 minutes before lifting off the beer can. Carve and serve.
How to Serve It
Carve on a large board and garnish with extra thyme and lemon wedges. Pair with grilled vegetables, potato salad, and a cold pilsner. Refrigerate leftovers for 3–4 days. You can prepare the rub a day ahead. Exercise caution removing the beer can; it will be hot and steamy.
12. Grilled Blueberry Peach Cobbler (Skillet)
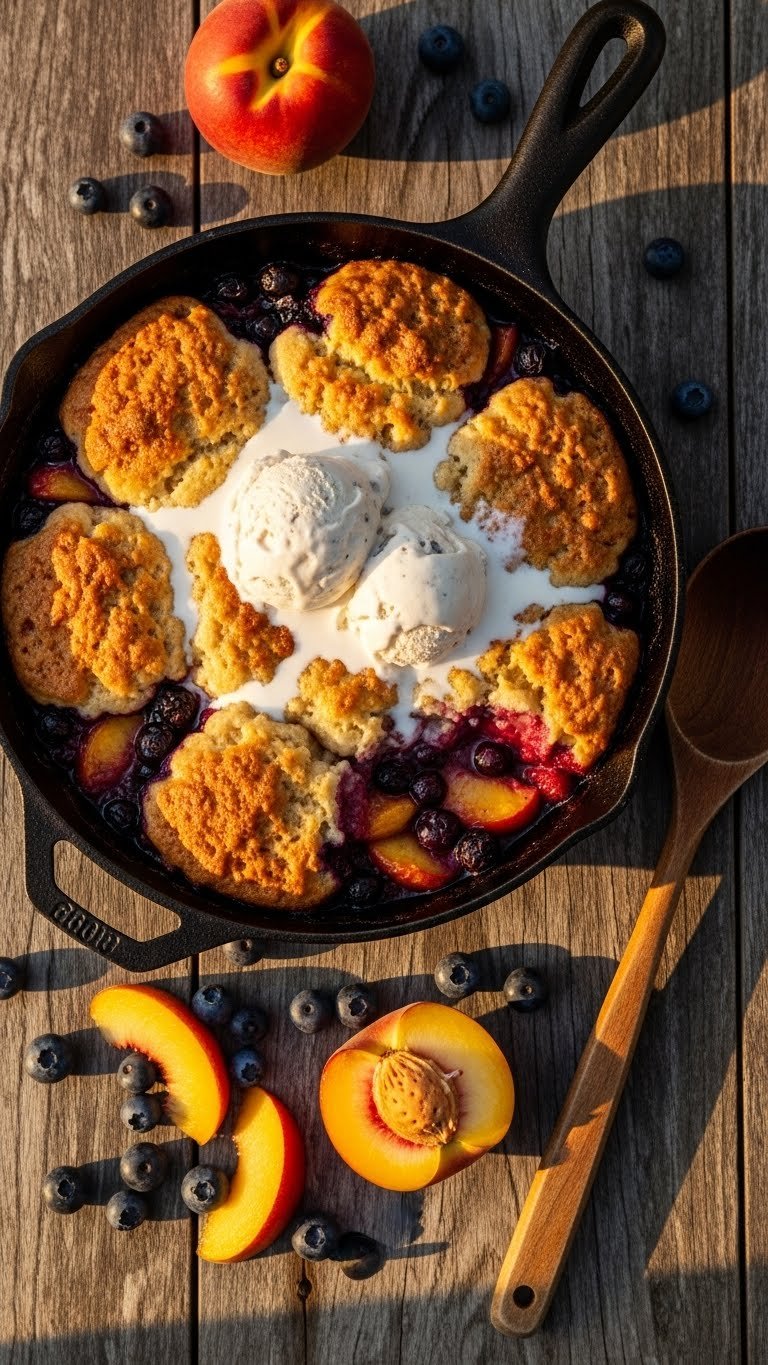
This grilled skillet cobbler combines charred peaches with juicy blueberries and a biscuit topping. Cooking in a cast-iron skillet on the grill adds a hint of smoke and creates a bubbly, caramelized fruit base. It’s warm, comforting, and perfect for finishing a BBQ. Expect sweet-tart fruit, crisp edges, and a buttery topping.
Ingredients
- 4 ripe peaches, peeled and sliced
- 2 cups fresh blueberries
- 3/4 cup granulated sugar
- 2 tbsp cornstarch
- 1 tbsp lemon juice
- 1 tsp vanilla extract
- 1/2 tsp cinnamon
- 1/4 tsp salt
- 1 1/4 cups all-purpose flour
- 2 tsp baking powder
- 1/4 cup granulated sugar (for topping)
- 1/2 cup unsalted butter, cold and cubed
- 1/2 cup milk
- Vanilla ice cream, for serving
Instructions
- Preheat grill to medium (around 375°F) and set up for indirect heat.
- In a large bowl, toss peaches, blueberries, 3/4 cup sugar, cornstarch, lemon juice, vanilla, cinnamon, and salt. Let sit 10 minutes.
- In a separate bowl, whisk flour, baking powder, and 1/4 cup sugar. Cut in cold butter until mixture resembles coarse crumbs. Stir in milk to form a soft dough.
- Pour fruit mixture into a well-seasoned 10-inch cast-iron skillet.
- Drop spoonfuls of biscuit dough over the fruit, leaving small gaps for steam.
- Place skillet on the grill’s cool side and close lid. Bake 25–30 minutes until fruit bubbles and biscuits are golden.
- For a crispier top, move skillet to direct heat for 1–2 minutes while watching closely.
- Check doneness by ensuring biscuit centers are set and fruit is thickened.
- Remove and let rest 10 minutes before serving with vanilla ice cream.
How to Serve It
Scoop warm cobbler into bowls with a generous scoop of vanilla ice cream. Garnish with mint if desired. Leftovers can be reheated in a 350°F oven for 10 minutes or microwaved briefly. You can prep the fruit filling a day ahead; keep refrigerated. This dessert is perfect for summer nights and backyard celebrations.
You’ve got a full summer-ready lineup now — bright salads, hearty mains, grill-ready veggies, and a warm, fruity dessert. These Sizzling Summer BBQ Menu Ideas for Crowd-Pleasing Meals give you options to mix and match based on the size of your gathering and the time you have. Try one recipe or build a full spread; save or pin this guide so you can revisit it before your next cookout. Which recipe are you trying first, and who will you invite to taste-test with you? Share these with friends and family so everyone can enjoy a sizzling summer together.