
You’ve planned the dress, the flowers, and the playlist. Now the cupcakes need to match the moment. Wedding themed cupcake toppers tie dessert to the aisle. They make bite-sized treats feel bridal and memorable.
This list gives you 15 creative topper recipes. Each one is designed for home bakers. You’ll find fondant roses, edible lace crowns, chocolate disks, stained-glass sugar hearts, and more. Every recipe includes full ingredients, step-by-step instructions, and tips for serving.
Whether you’ll pipe buttercream rosettes or shape marzipan sprays, these wedding themed cupcake toppers help your cupcakes look polished. You’ll get prep and cook times, storage tips, and make-ahead ideas. Save the pinnable images, try a few variations, and pick toppers that match your color story.
1. Wedding Themed Cupcake Toppers: Classic Fondant Rose Bouquet
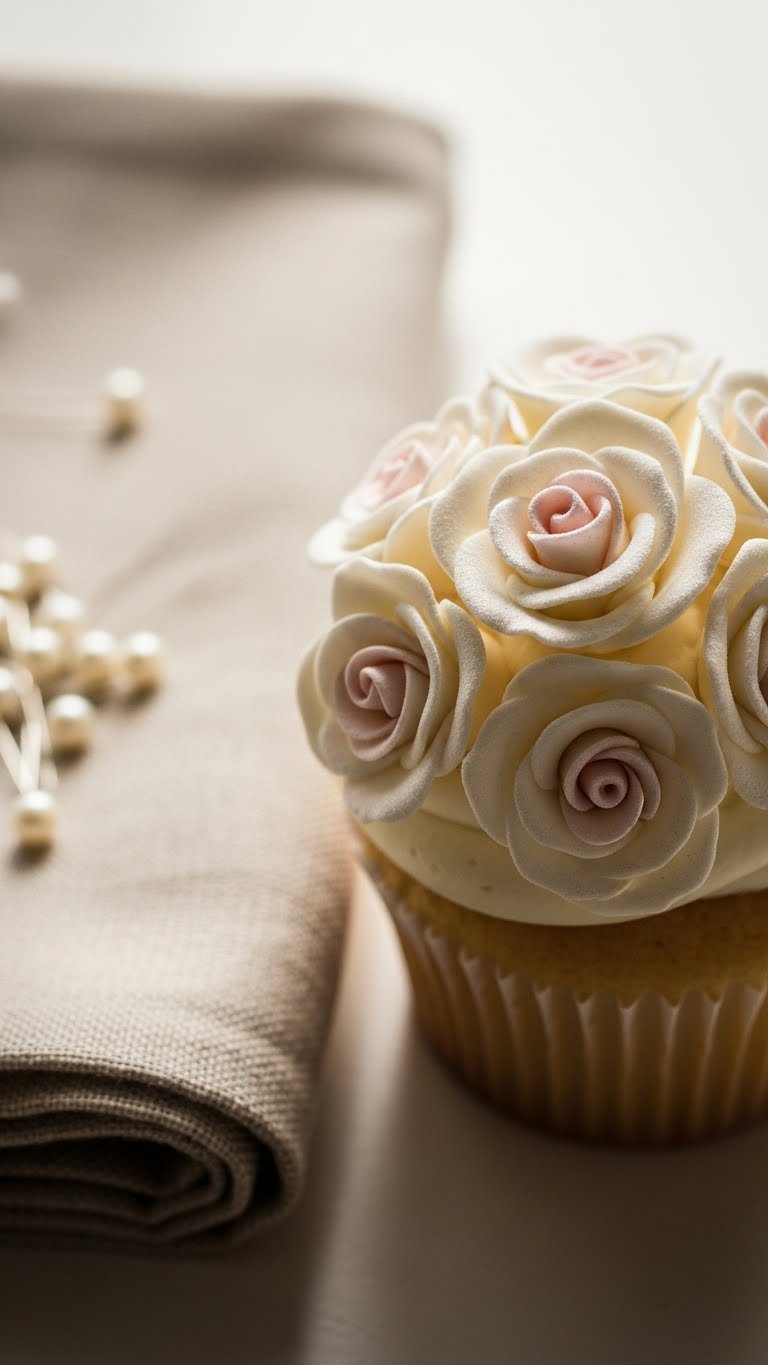
This topper is timeless and refined. The fondant roses are soft and slightly matte. They add subtle sweetness and a romantic silhouette to cupcakes. The flavor is neutral fondant with a hint of clear vanilla. It suits classic, vintage, and garden weddings. You’ll love how the petals catch light and how the rose scent mixes with buttercream.
Prep time: 30 minutes (plus drying) | Work time: 1 hour | Makes: 12 small roses
Ingredients
- 3 cups ready-to-roll white fondant
- 1/4 tsp tylose powder (for quicker-setting fondant)
- 2 tbsp powdered sugar (for dusting and kneading)
- 1 tsp clear vanilla extract
- Gel color: a drop of soft pink
- 1/4 tsp cornstarch (prevent sticking)
- 1 tsp edible rose petal dust (optional, for shading)
- 1 tbsp water (to thin edible glue)
- 1/2 tsp clear corn syrup (for sheen)
- 12 toothpicks or floral wires (food-safe)
Instructions
- Knead the fondant until soft and pliable. Add tylose powder and knead for 2 minutes.
- Add clear vanilla and a tiny drop of gel color. Knead until color is even.
- Dust work surface with powdered sugar. Roll fondant to 2–3 mm thickness.
- Cut small circles (about 1.25 in / 3 cm). You’ll need 5–7 petals per rose.
- Shape one circle into a tight cone for the rose center.
- Lightly brush edge of each petal with water + corn syrup mix. Wrap petals around center, slightly overlapping.
- Thin the outer edges with a ball tool to make them delicate. Curve petals outward.
- Insert a toothpick or wired stem into the base. Let roses dry upright for 4–6 hours or overnight.
- Dust with rose petal dust for depth if desired. Test dryness by gently pressing — petals should hold shape.
How to Serve It
- Place one mini rose per buttercream-topped cupcake. Trim toothpicks to fit.
- Garnish with a scattering of edible pearls and a tiny mint leaf.
- Pair with a light tea or champagne.
- Store fondant roses in an airtight container at room temperature for up to 1 week.
- Make roses 2–3 days ahead. Keep them dry and away from humidity.
2. Pearl-Dusted Buttercream Rosettes
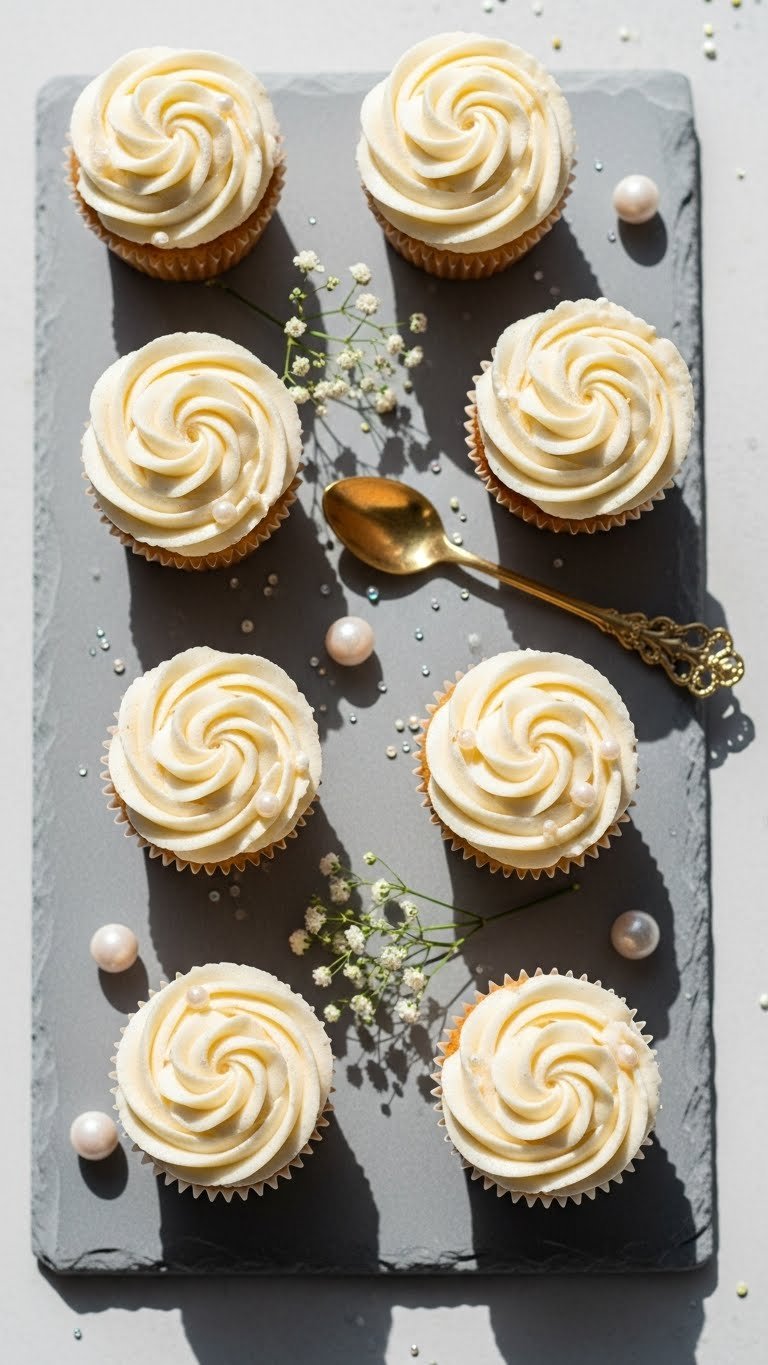
This topper uses buttercream piped into classic rosettes. The texture is silky and airy. The pearl dust adds luxe shimmer without being heavy. It’s a crowd-pleaser and pairs well with light cake flavors. You’ll love the soft vanilla aroma and the creaminess against a moist cupcake.
Prep time: 15 minutes | Chill time: 15 minutes | Makes: 12 rosettes
Ingredients
- 1 cup (227g) unsalted butter, softened to room temperature
- 3 cups (360g) powdered sugar, sifted
- 2 tbsp heavy cream, chilled
- 1 tsp clear vanilla extract
- Pinch fine sea salt
- White gel color (optional, a drop)
- 1 tsp shimmer dust (edible, pearl)
- 2 tbsp sanding sugar or silver dragees (for sprinkling)
- Piping bag fitted with a large 1M star tip
- 12 cupcakes, cooled
Instructions
- Beat butter on medium speed until fluffy, about 2 minutes.
- Gradually add powdered sugar one cup at a time. Beat on low to combine.
- Add heavy cream, vanilla, and salt. Increase speed and beat 1–2 minutes.
- Scrape bowl and beat until light and spreadable. If too stiff, add 1 tsp cream.
- Fit piping bag with 1M tip. Fill bag and hold at a 45-degree angle.
- Pipe rosettes starting at center, spiraling outward until you reach the edge.
- Dust lightly with shimmer dust and sprinkle sanding sugar or a few dragees.
- Chill cupcakes 10–15 minutes to set buttercream before transport.
How to Serve It
- Arrange rosettes on a tiered stand for a classic bridal look.
- Add a single edible pearl at the center for extra polish.
- Pair with champagne or Earl Grey tea.
- Store in a cool place or refrigerator up to 3 days. Bring to room temperature before serving.
- Make buttercream up to 3 days ahead; re-whip before piping.
3. Mini Macaron Ring Cupcake Toppers
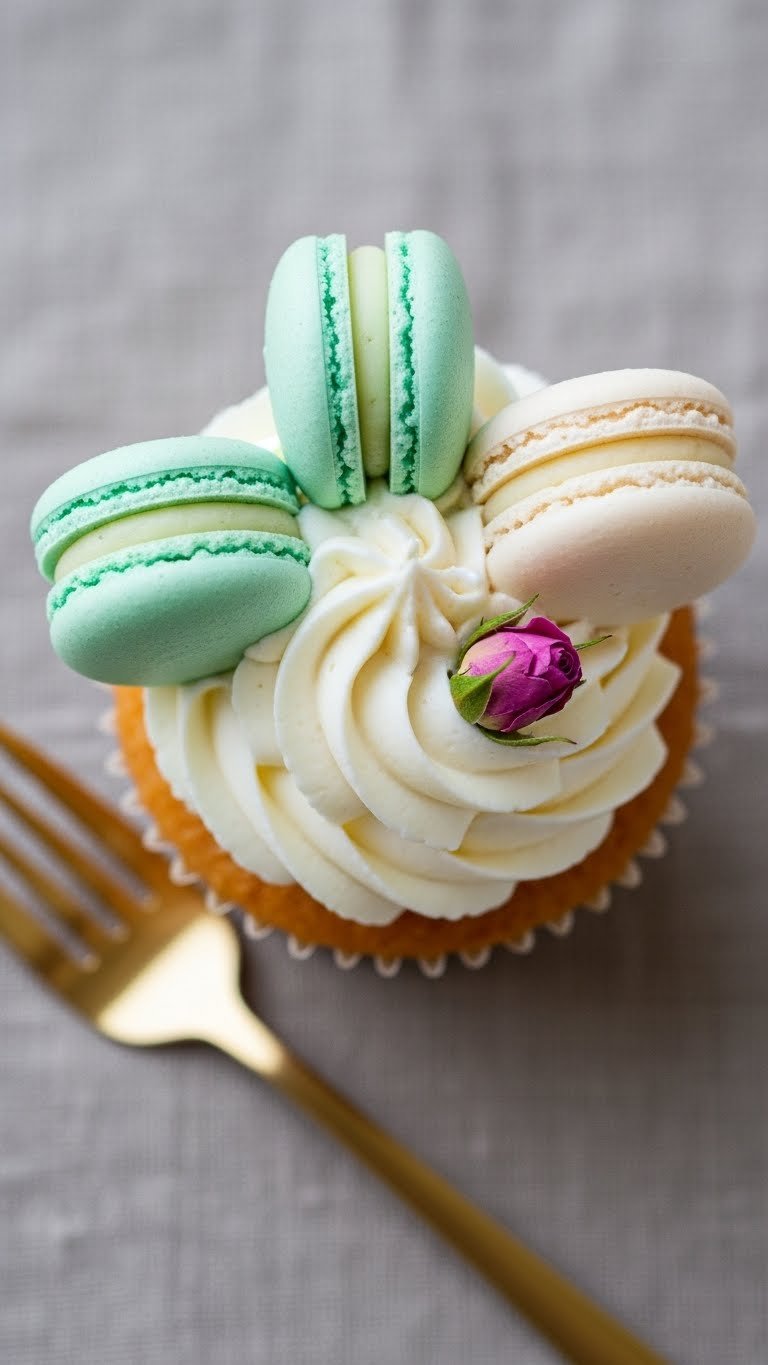
A mini macaron ring adds French flair and crunch. Texture is crisp shell and chewy interior. Flavors can be vanilla-almond or rose. It fits romantic, elegant weddings or Paris-themed events. You’ll enjoy the sweet almond aroma and the delicate snap.
Prep time: 30 minutes | Cook time: 12 minutes | Makes: 24 mini macarons (12 rings)
Ingredients
- 2 cups (200g) almond flour, sifted
- 1 3/4 cups (200g) powdered sugar
- 3 large egg whites, room temperature
- 1/4 cup (50g) granulated sugar
- 1/2 tsp cream of tartar
- 1 tsp clear vanilla extract
- Gel color (soft mint or blush)
- 1 cup (120g) buttercream or buttercream ganache for filling
- 2 tsp light corn syrup (optional for sheen)
- Coarse sanding sugar for garnish (optional)
Instructions
- Line baking sheet with parchment and draw small 1.5 in circles.
- Pulse almond flour and powdered sugar in a food processor for 10 seconds. Sift.
- Whip egg whites until foamy. Add cream of tartar, then gradually add granulated sugar. Beat to stiff glossy peaks.
- Fold dry mix into whites in two batches. Add vanilla and a drop of gel color. Rest batter 15 minutes (forms a skin).
- Pipe rounds onto drawn circles. Tap pan to remove air bubbles.
- Let shells sit at room temperature 30–60 minutes until a skin forms.
- Bake at 300°F (150°C) for 12–14 minutes until shells lift easily and bottoms are firm.
- Cool fully. Match shells by size. Pipe buttercream around the edge and sandwich. For rings, cut each macaron in half and arrange halves to form a ring on a cupcake.
How to Serve It
- Place a macaron ring around a dollop of buttercream.
- Garnish with a tiny rose petal or edible gold leaf.
- Pair with champagne or an almond biscotti.
- Store in an airtight container in a cool place up to 48 hours. Avoid humidity.
- Make macarons 1–2 days ahead; fill on the day of service.
4. Gold Leaf Chocolate Disks
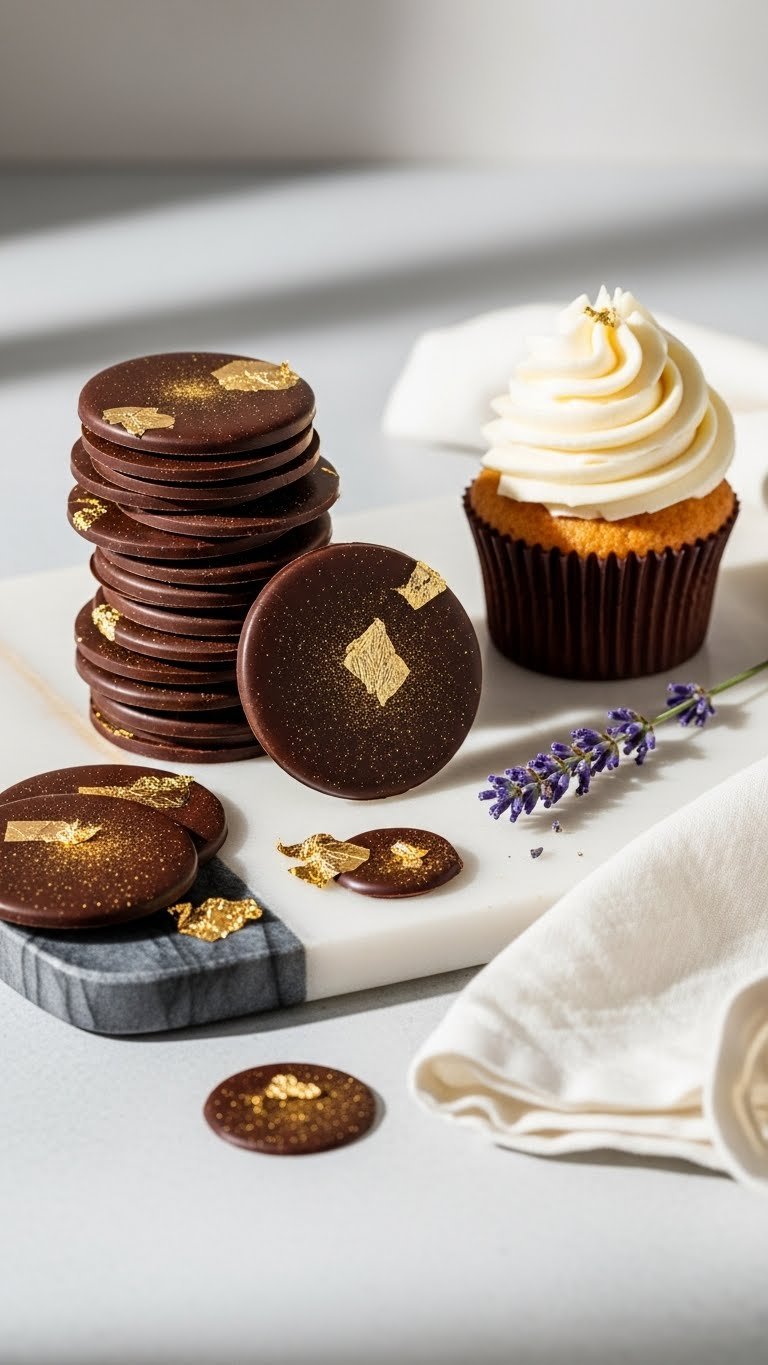
These chocolate disks are sleek and modern. The chocolate gives a firm, glossy snap. Gold leaf adds luxe metallic shine. They’re perfect for black-tie and modern weddings. You’ll like the contrast of rich chocolate and delicate metallic shimmer.
Prep time: 10 minutes | Chill time: 20 minutes | Makes: 12 disks
Ingredients
- 8 oz (225g) high-quality dark chocolate (60–70% cacao), chopped
- 1 tbsp neutral oil (like grapeseed), optional for shine
- 12 edible gold leaf squares
- 1/4 tsp fleur de sel (optional)
- 1 tsp vanilla extract
- Parchment paper
- Small offset spatula
- Round cookie cutter (2 in / 5 cm)
- Disposable gloves (to handle gold leaf)
Instructions
- Chop chocolate finely for even melting. Line a tray with parchment.
- Melt chocolate using a double boiler or microwave in 30-second bursts, stirring. Heat to 115°F (46°C), then cool to 88–90°F (31–32°C) for temper if tempering.
- Stir in oil and vanilla for sheen and aroma.
- Pour tempered chocolate to ~3 mm thickness on parchment. Smooth with an offset spatula.
- Allow top to set slightly, then cut 2 in circles using the cookie cutter.
- While chocolate is still slightly tacky, apply gold leaf with a dry brush or gloved finger.
- Chill 10–20 minutes until firm. Test by tapping edge — it should snap cleanly.
How to Serve It
- Insert a disk slightly into buttercream for a floating look.
- Sprinkle a light pinch of fleur de sel if using.
- Pair with red wine or espresso for contrast.
- Store in a cool, dry place in an airtight container for up to 2 weeks.
- Make disks up to 1 week ahead; keep cool and layered with parchment.
5. Wedding Themed Cupcake Toppers: Edible Lace Fondant Crowns
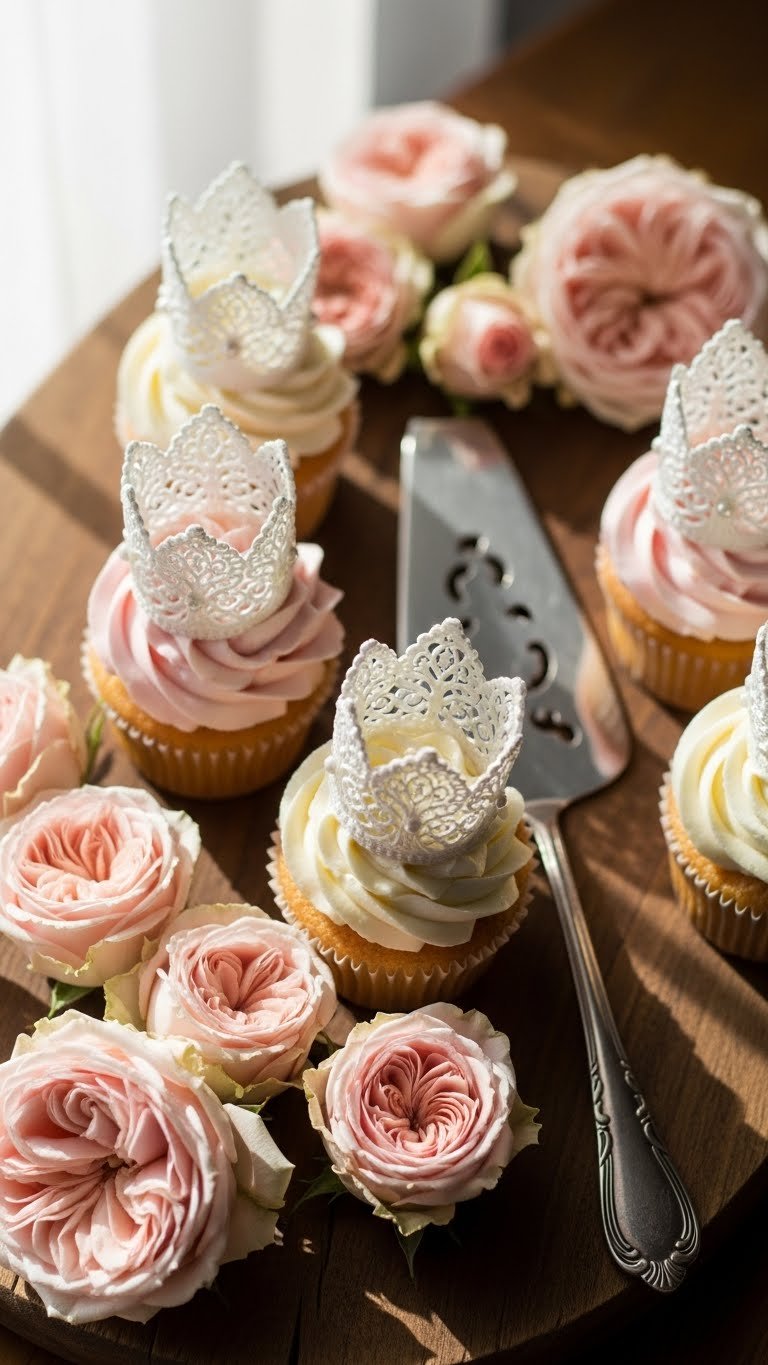
These delicate lace crowns look regal on mini cupcakes. The lace is light and flexible with a subtle vanilla taste. Texture is thin and slightly crisp once dry. They work for princess or vintage weddings. You’ll love their shadowed filigree and the way they catch light.
Prep time: 25 minutes | Drying time: 4–6 hours | Makes: 12 crowns
Ingredients
- 1 cup fondant or gum paste, softened
- 1/4 cup ready-made sugar lace mix or lace mat dusting powder
- 1 tsp tylose powder (for gum paste firmness)
- 1 tsp clear vanilla extract
- 2 tsp confectioners’ sugar for dusting
- 1 tsp edible glue (or water)
- 12 small edible pearls
- Fine paintbrush
- Silicone lace mat (flower vine pattern)
- Cornstarch for dusting
Instructions
- Mix fondant with tylose and vanilla. Knead until smooth.
- Lightly dust the lace mat with cornstarch. Roll fondant thin to 1.5–2 mm.
- Press fondant firmly into the lace mat. Use a rolling pin to push into details.
- Remove excess fondant and flip mat gently to release the lace.
- Trim lace into small crown shapes. Form around a small cone or dowel to create crown curve.
- Attach edible pearls with edible glue at tip points.
- Let crowns dry upright for 4–6 hours until firm. Test by bending gently — it should hold shape.
How to Serve It
- Set one crown on a tall buttercream swirl for drama.
- Dust with a whisper of pearl shimmer or a speck of gold leaf.
- Pair with champagne or jasmine tea.
- Store lace crowns in a dry airtight box for up to 1 week.
- Make crowns 2–3 days ahead to ensure full drying.
6. Pressed Flower Gelée Medallions
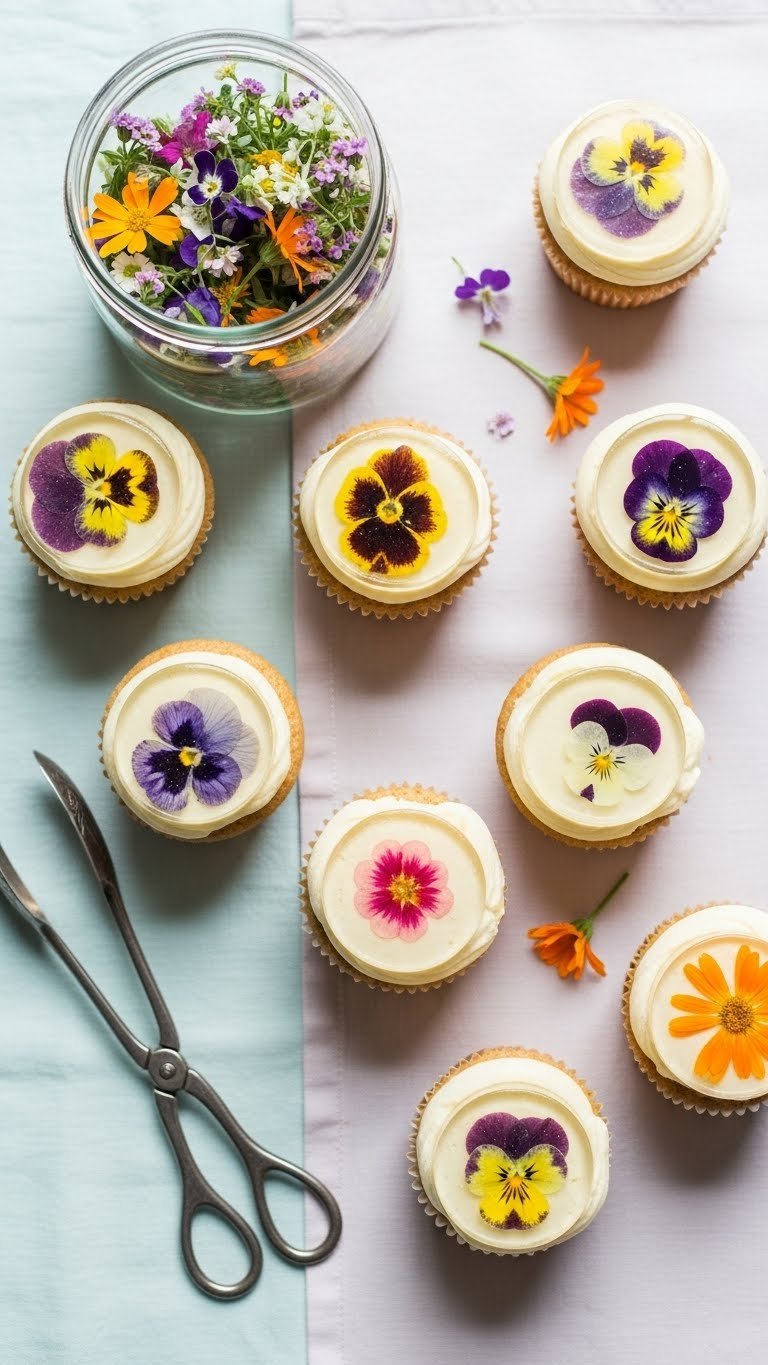
These clear gelée medallions showcase pressed edible flowers. They’re light, glossy, and slightly chewy. The effect is ethereal and botanical. They pair perfectly with garden weddings or boho events. You’ll notice delicate floral scent and a jewel-like sparkle.
Prep time: 15 minutes | Chill time: 2 hours | Makes: 12 medallions
Ingredients
- 2 cups (480 ml) white grape juice or clear apple juice
- 2 tbsp granulated sugar (adjust to taste)
- 2 tbsp powdered gelatin (or agar for vegan)
- 2 tbsp cold water (to bloom gelatin)
- 12 small pressed edible flowers (violets, pansies)
- 1 tsp lemon juice
- 1/4 tsp vanilla extract
- Round silicone mold (1.5 in)
- Edible glitter (optional)
Instructions
- Bloom gelatin in 2 tbsp cold water for 5 minutes.
- Warm juice and sugar in a saucepan until hot but not boiling.
- Remove from heat. Stir in bloomed gelatin until fully dissolved. Add lemon and vanilla.
- Cool slightly to warm but not set. Pour a thin layer into silicone molds.
- Place a pressed edible flower onto each layer. Pour remaining gel to cover gently.
- Chill in the fridge for 1.5–2 hours until fully set.
- Unmold gently. Dust with edible glitter if desired. Test set by pressing center — it should be firm.
How to Serve It
- Float a medallion on a light lemon or vanilla buttercream swirl.
- Garnish with a tiny mint sprig or a dusting of powdered sugar.
- Pair with herbal tea or sparkling water.
- Store refrigerated in a sealed container up to 3 days.
- Make medallions 1–2 days ahead and refrigerate until serving.
7. Hand-Piped Royal Icing Monograms

Hand-piped royal icing monograms give a personalized touch. Texture is crisp and slightly chalky. The flavor is sweet with a hint of lemon. They suit formal receptions and personalized favors. You’ll enjoy the crisp snap and elegant silhouette.
Prep time: 20 minutes | Dry time: 12 hours | Makes: 12 monograms
Ingredients
- 2 cups (240g) powdered sugar, sifted
- 2 tbsp meringue powder
- 4–6 tbsp warm water (adjust for consistency)
- 1 tsp lemon juice
- Gel color (ivory or soft gray)
- Edible gold dust for accents
- Piping bags fitted with #1 round tips
- 12 small round cookie bases (or royal icing piped directly on parchment)
- Small paintbrush
Instructions
- Combine powdered sugar and meringue powder in a bowl.
- Add water gradually and whisk until stiff peak consistency forms. Add lemon juice and color.
- Transfer to a piping bag with #1 tip. Keep covered to prevent drying.
- Pipe monogram letters onto prepared cookie bases or parchment. Maintain steady hand and consistent pressure.
- Allow piped monograms to dry 8–12 hours at room temperature.
- Once dry, brush edges with edible gold dust lightly for shimmer.
- Test dryness by gently pressing the back; it should feel hard and dry.
How to Serve It
- Sit one monogram atop buttercream or place leaning into frosting.
- Use matching printed place cards for a cohesive look.
- Pair with black coffee or a citrus spritzer.
- Store monograms in an airtight container away from humidity for 1–2 weeks.
- Pipe monograms a few days ahead to allow full drying.
8. Marzipan Mini Fruit & Flower Sprays

Marzipan sprays bring almond sweetness and molded charm. Texture is soft and slightly dense. Tiny fruit and flowers look hand-made and quaint. Great for rustic, vintage, or Mediterranean weddings. You’ll savor the almond perfume and soft chew.
Prep time: 25 minutes | Chill time: 30 minutes | Makes: 12 sprays (3 shapes per spray)
Ingredients
- 1 1/2 cups (210g) almond paste
- 1/2 cup (60g) powdered sugar, sifted
- 1 tbsp light corn syrup
- 1/2 tsp almond extract
- Gel colors: red, green, blush
- 1 tsp water or rosewater (if needed)
- Cornstarch for dusting
- Small modeling tools or toothpicks
- 12 toothpicks for stems
- Edible glaze (optional)
Instructions
- Crumble almond paste into a bowl. Add powdered sugar, corn syrup, and almond extract. Knead until smooth.
- Divide and color small portions with gel colors. Add water only if too stiff.
- Form tiny strawberries, buds, and leaf shapes with modeling tools or fingers.
- Insert a toothpick into each piece for handling. Chill 10 minutes to firm.
- Brush lightly with edible glaze if you want shine.
- Arrange 2–3 mini fruits/flowers into a tiny spray on the cupcake top.
- Test firmness by pressing lightly — they should retain shape but give slightly.
How to Serve It
- Tuck a marzipan spray beside a piped rosette.
- Dust with powdered sugar for a soft finish.
- Pair with almond biscotti or a light Moscato.
- Store marzipan pieces in a cool airtight container up to 1 week.
- Make marzipan pieces 1–3 days ahead and assemble on service day.
9. Wedding Themed Cupcake Toppers: Champagne Sugar Shards

These champagne sugar shards are glossy and delicate. They give a candy-crack texture and a sparkling look. Slightly sweet and flavored with real champagne or prosecco. Ideal for celebrations and New Year wedding receptions. You’ll love the glossy sheen and the fizzy aroma.
Prep time: 10 minutes | Cook time: 15 minutes | Makes: 20 shards
Ingredients
- 1 1/2 cups (300g) granulated sugar
- 1/2 cup (120 ml) champagne or prosecco
- 1/4 cup (60 ml) light corn syrup
- 1 tbsp lemon juice
- Pinch cream of tartar
- Edible gold luster dust (optional)
- Nonstick spray or silpat
- Candy thermometer
- Parchment-lined baking sheet
Instructions
- Combine sugar, champagne, corn syrup, lemon, and cream of tartar in a saucepan. Stir over medium heat until sugar dissolves.
- Bring mixture to a boil without stirring and clip candy thermometer. Cook to 300°F (hard crack). Watch for amber color.
- Remove from heat and pour carefully onto a parchment-lined sheet, spreading thin using an offset spatula.
- Sprinkle with gold luster dust while still warm for shimmer.
- Let cool completely until brittle, about 20–30 minutes.
- Break into irregular shards using the back of a spoon or by hand (wear gloves).
- Test shatter by tapping a shard — it should snap cleanly.
How to Serve It
- Insert one or two shards into tall buttercream swirls.
- Add a few edible pearls at the base for contrast.
- Pair with a glass of bubbly for the full effect.
- Store shards in an airtight container away from humidity for up to 2 weeks.
- Make sugar shards day-of to avoid humidity softening them.
10. Tiny Chocolate Dipped Strawberries
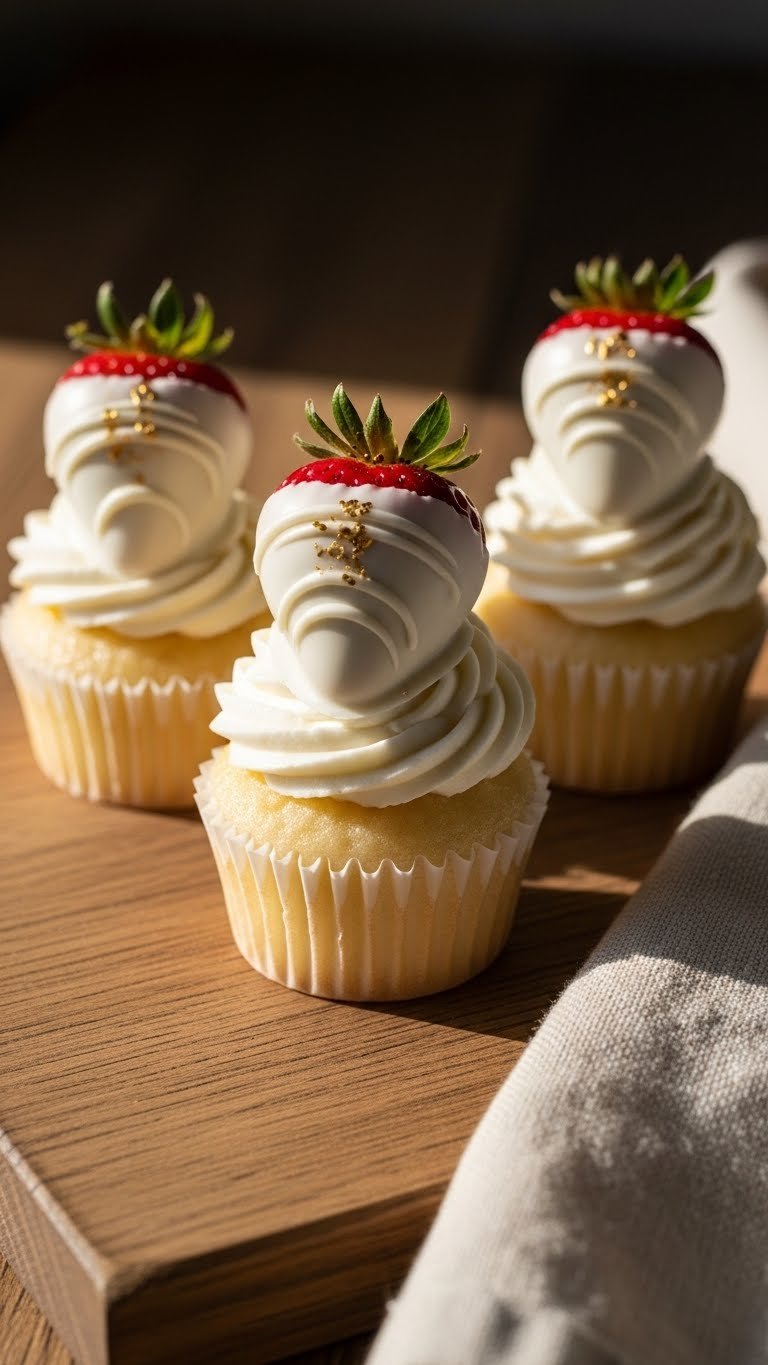
Mini chocolate-dipped strawberries are elegant and fresh. You get juicy fruit with a crisp chocolate shell. They suit romantic, garden, or summer weddings. You’ll notice the sweet berry aroma and the satisfying contrast of textures.
Prep time: 15 minutes | Chill time: 15 minutes | Makes: 12 minis
Ingredients
- 12 mini strawberries, washed and patted dry
- 6 oz (170g) white chocolate, finely chopped
- 1 tsp coconut oil or vegetable oil (for shine)
- Edible gold flakes or gold dust
- 2 tbsp freeze-dried strawberry powder (optional for dusting)
- Parchment paper
- Toothpicks or small skewers
- Cooling rack
Instructions
- Ensure strawberries are completely dry. Any water will seize chocolate.
- Melt white chocolate with oil in short bursts or double boiler until smooth.
- Dip each mini strawberry about two-thirds into chocolate. Allow excess to drip off.
- Place dipped strawberries on parchment and chill 10–15 minutes to set.
- Brush tiny gold flakes or dust lightly with strawberry powder.
- Test set by gently tapping chocolate — it should be firm.
How to Serve It
- Sit a mini dipped strawberry atop a swirl of vanilla buttercream.
- Add a small mint leaf or tiny edible flower for color.
- Pair with rosé or a light dessert wine.
- Store refrigerated up to 24–48 hours (best eaten soon).
- Dip strawberries the morning of service for optimum freshness.
11. Miniature Meringue Kisses
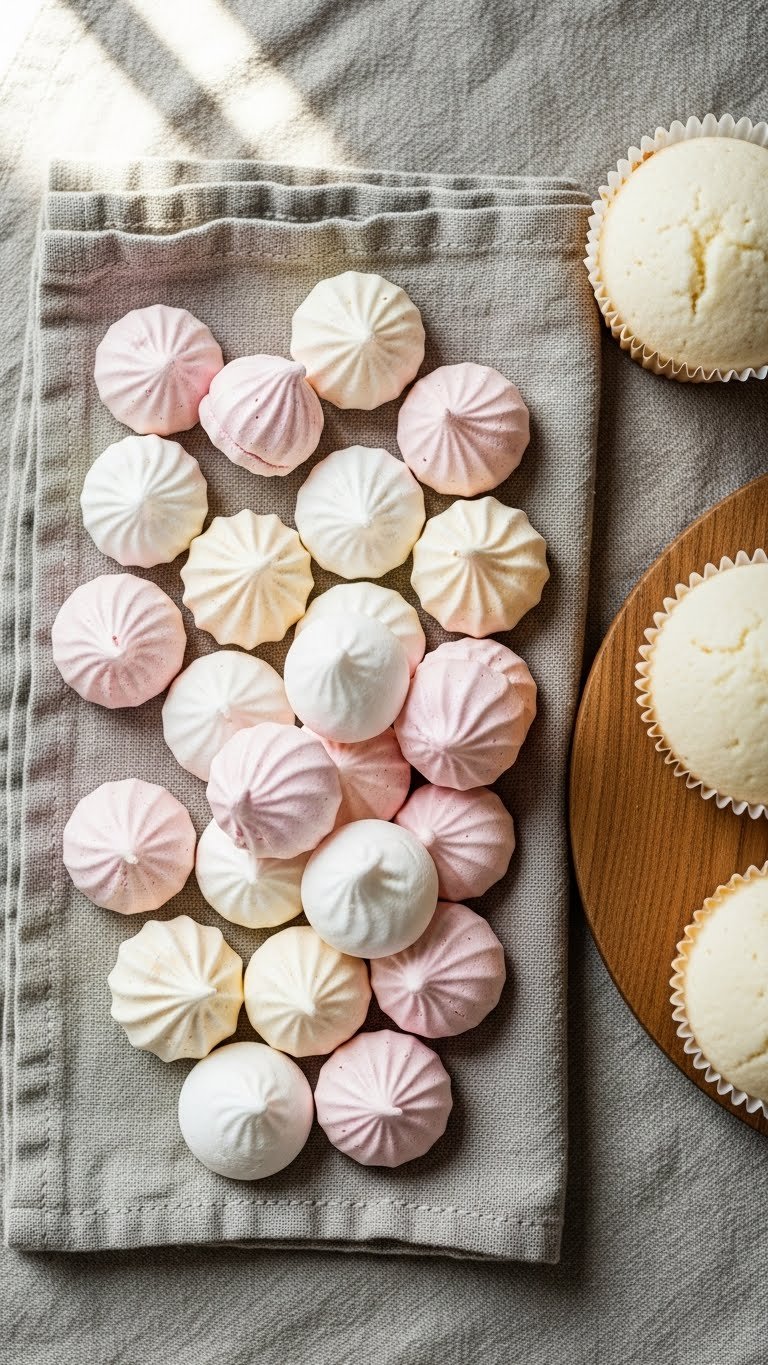
These tiny meringue kisses are crisp, light, and melt-in-your-mouth. They bring sweet, airy crunch and a little height to cupcakes. Flavor is vanilla or citrus. Perfect for vintage or shabby-chic weddings. You’ll enjoy a whispery crunch and subtle sweetness.
Prep time: 15 minutes | Bake time: 1 hour 15 minutes | Makes: 60 mini kisses
Ingredients
- 3 large egg whites, room temperature
- 3/4 cup (150g) granulated sugar
- 1/4 tsp cream of tartar
- 1/2 tsp clear vanilla extract
- Pinch fine sea salt
- Gel colors (pastel shades)
- 1 tsp cornstarch (optional, for stability)
- Piping bag with small round or star tip
- Parchment-lined baking sheet
Instructions
- Preheat oven to 200°F (95°C). Line baking sheets with parchment.
- Whip egg whites with cream of tartar until foamy. Gradually add sugar one tablespoon at a time.
- Beat to stiff, glossy peaks. Add vanilla and cornstarch, then color as desired.
- Pipe small kisses about 3/4 in across. Keep space between.
- Bake at 200°F (95°C) for 1–1.5 hours until dry and crisp. Turn off oven and leave meringues inside to cool completely for 30 minutes.
- Test doneness by tapping — they should be dry inside and out.
- Store in airtight container to keep crisp.
How to Serve It
- Place 2–3 meringue kisses atop a lightly piped buttercream.
- Add a drizzle of raspberry coulis around the base for color.
- Pair with coffee or dessert wine.
- Store in a cool, dry place up to 2 weeks in airtight container.
- Make meringues 1–2 weeks ahead; keep dry.
12. Edible Stained Glass Sugar Hearts
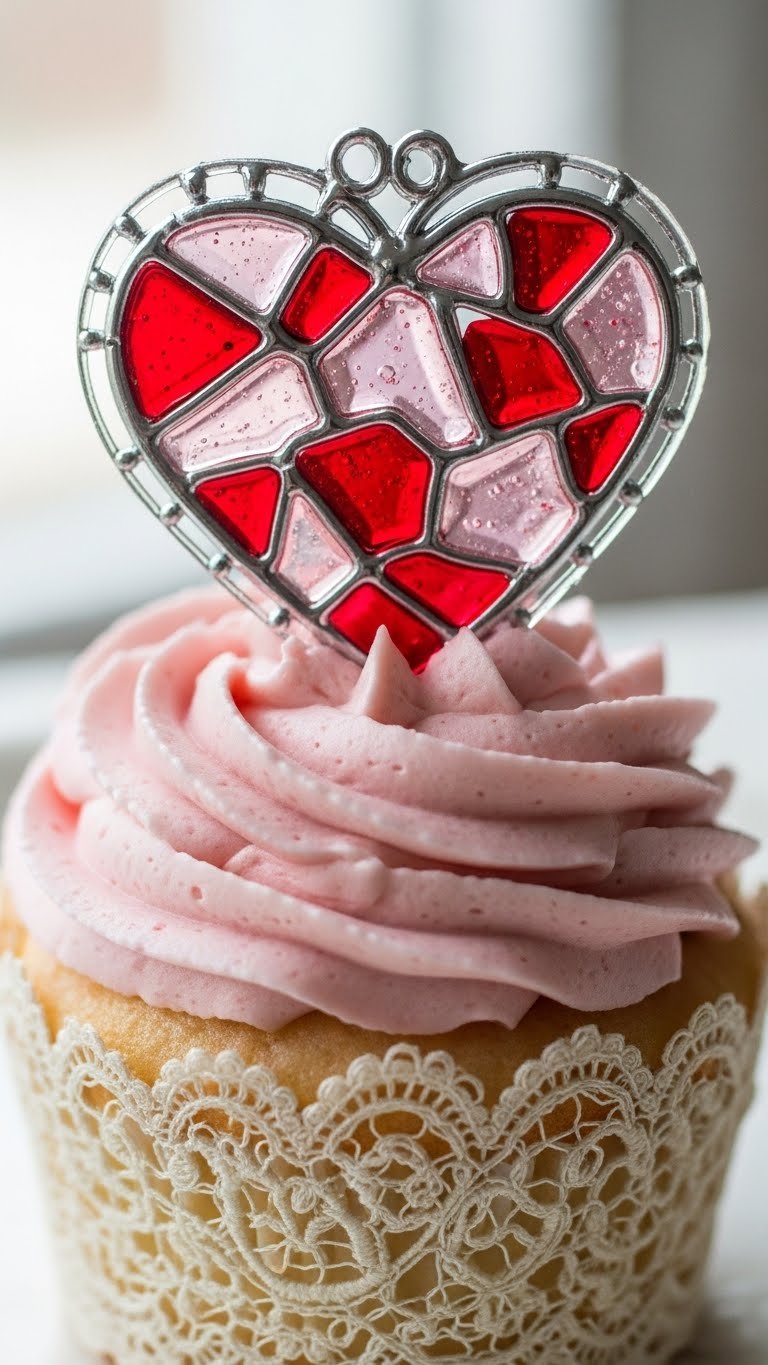
Stained glass sugar hearts are jewel-like and decorative. They have crunchy, glassy texture and bold color. Perfect for whimsical or romantic themes. You’ll notice bright sweet notes and glossy shine.
Prep time: 15 minutes | Cook time: 15 minutes | Makes: 12 hearts
Ingredients
- 1 1/2 cups (300g) granulated sugar
- 1/2 cup (120 ml) water
- 1/2 cup (120 ml) light corn syrup
- Food coloring (red and pink)
- Rose or raspberry extract (optional, 1/2 tsp)
- Candy thermometer
- Heart-shaped cookie cutter
- Parchment-lined baking sheet
- Small pot
Instructions
- Combine sugar, water, and corn syrup in a saucepan. Heat until dissolved.
- Boil without stirring and monitor with candy thermometer. Cook to 300°F (hard crack).
- Remove from heat and divide into two pots for two colors. Add color and flavor quickly.
- Pour thin layers onto parchment and let cool slightly. Use cutters to press heart outlines while still warm.
- Carefully add a few drops of contrasting color inside the hearts to create the stained effect.
- Allow to cool and harden completely. Break away excess sugar and clean edges.
- Test by tapping — it should snap cleanly.
How to Serve It
- Insert one stained-glass heart into a buttercream peak.
- Pair with rose tea or a berry mocktail.
- Keep in airtight container away from humidity for up to 2 weeks.
- Make sugar shapes on the day-of to prevent stickiness.
- Store individually on parchment sheets.
13. Salted Caramel Tuile Fans

These tuile fans are thin, crisp, and caramel-forward. Texture is lacy and brittle. They add elegance and crunch. They’re great for autumn or chic barn weddings. You’ll taste buttery caramel and a savory hint from the salt.
Prep time: 10 minutes | Bake time: 8–10 minutes | Makes: 12 tuiles
Ingredients
- 1/2 cup (60g) all-purpose flour
- 1/2 cup (100g) granulated sugar
- 3 tbsp unsalted butter, melted and cooled
- 2 tbsp heavy cream
- 1 tbsp corn syrup
- 1/2 tsp vanilla extract
- 1/4 tsp fine sea salt
- Cooking spray
- Parchment-lined baking sheet
Instructions
- Preheat oven to 350°F (175°C). Line baking sheet with parchment.
- Whisk flour and sugar in a bowl. Add melted butter, cream, corn syrup, vanilla, and salt to make a smooth batter.
- Drop 1 tbsp portions spaced widely. Spread thin into small ovals with an offset spatula.
- Bake 8–10 minutes until edges are golden brown. Rotate pan halfway.
- Remove and immediately shape over a rolling pin into fans while pliable.
- Cool fully until crisp. Test by bending gently — should crack cleanly.
How to Serve It
- Tuck a fan partially into buttercream for dramatic height.
- Drizzle with extra salted caramel for extra flavor.
- Pair with hot coffee or a salted caramel latte.
- Store in an airtight container at room temperature for 3–5 days.
- Make tuiles the day before; shape and store carefully.
14. Painted White Chocolate Plaques
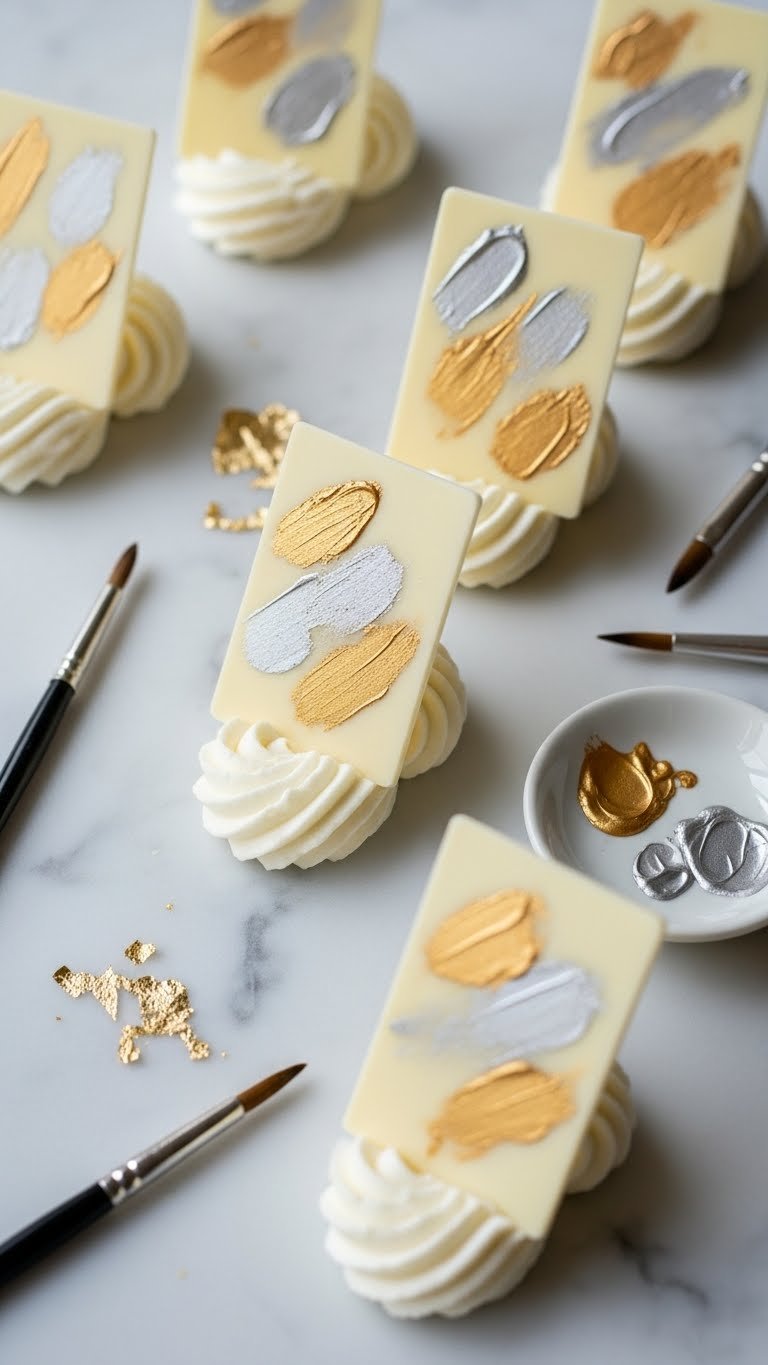
These white chocolate plaques are a small canvas for hand-painted designs. Texture is creamy and melt-in-the-mouth. Paint them with metallics or monograms. They suit artistic, modern, or minimalist weddings. You’ll enjoy the creamy chocolate and the handcrafted look.
Prep time: 15 minutes | Chill time: 20 minutes | Makes: 12 plaques
Ingredients
- 8 oz (225g) white chocolate, chopped
- 1 tsp coconut oil (for shine)
- Edible metallic paints (gold, rose gold)
- Gel colors (optional)
- Small paintbrushes (food-safe)
- Parchment paper
- Rectangular silicone mold (2 in)
- Edible varnish (optional for shine)
Instructions
- Melt white chocolate with coconut oil until smooth. Temper if desired for snap.
- Pour into rectangular molds to about 3–4 mm thickness. Tap to remove air bubbles.
- Chill in fridge 10–20 minutes until firm. Demold carefully.
- Use edible metallic paints and fine brushes to paint designs or initials. Allow paint to dry.
- If desired, coat lightly with edible varnish for extra sheen. Test dry by touch — should be set and non-tacky.
How to Serve It
- Lean a painted plaque against a tall swirl of frosting.
- Coordinate paint colors with wedding palette.
- Pair with champagne or fruity tea.
- Store plaques in a cool, dry place, layered with parchment for up to 2 weeks.
- Paint plaques up to 3 days ahead; store in airtight container.
15. Mini Cookie Layers with Royal Icing Flags
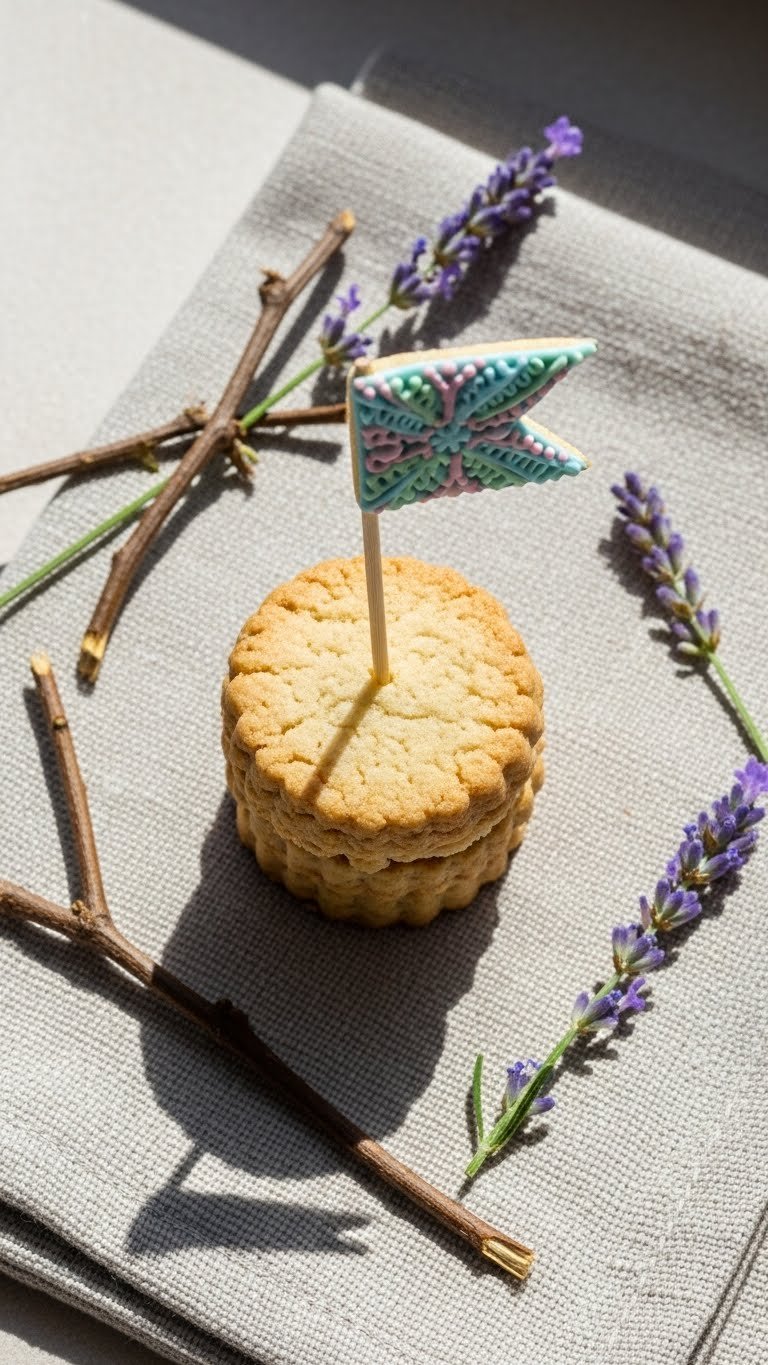
These stacked mini cookies create a charming, nostalgic topper. Texture combines crisp cookie and smooth royal-iced flag. Flavors can be buttery vanilla or lemon. Perfect for country, rustic, or DIY weddings. You’ll love the hand-made charm and crisp bite.
Prep time: 30 minutes | Bake time: 10 minutes | Makes: 24 stacked cookie toppers (12 stacks)
Ingredients
- 2 1/2 cups (312g) all-purpose flour
- 1 tsp baking powder
- 1/2 tsp fine sea salt
- 3/4 cup (170g) unsalted butter, softened
- 3/4 cup (150g) granulated sugar
- 1 large egg, room temperature
- 1 tsp clear vanilla extract
- 1 tbsp lemon zest (optional)
- Royal icing (see recipe: 2 cups powdered sugar, 1 tbsp meringue powder, 3–4 tbsp water)
- Food coloring for flags
- Toothpicks for flag assembly
Instructions
- Whisk flour, baking powder, and salt. Set aside.
- Beat butter and sugar until pale and fluffy, about 2–3 minutes. Add egg, vanilla, and lemon zest.
- Gradually add dry mix and combine into a dough. Chill 30 minutes.
- Roll dough to 1/8 in thickness and cut small rounds (1.5 in). Bake at 350°F (175°C) for 8–10 minutes until pale golden at edges. Cool.
- Mix royal icing to stiff consistency. Divide and color for flags. Pipe a thin layer onto half the cookies to act as flags; allow to set 4–6 hours.
- Stack two cookies with a dab of buttercream between. Insert a toothpick topped with a small royal-iced flag (pipe rectangle on parchment, let set, then attach).
- Test by handling stack gently — it should be stable and the icing set.
How to Serve It
- Place a stacked cookie topper on mini cupcakes for a nostalgic finish.
- Add a sprig of rosemary or a tiny tag with the couple’s initials.
- Pair with tea or a dessert coffee.
- Store cookies in an airtight container for 3–5 days. Keep flags away from humidity.
- Bake cookies 2–3 days ahead; assemble the day before.
You now have 15 distinct ideas for wedding themed cupcake toppers that cover many styles. From delicate fondant roses to glossy sugar shards, there’s a topper to match your venue, palette, and taste. Try a couple of styles during a tasting to see what photographs best and what guests love.
Save or pin this list so you can revisit the recipes while planning. Which topper are you trying first: the lace crowns, the champagne shards, or the marzipan sprays? Share your picks with friends or your wedding planner and pass on the recipes. Enjoy making cupcakes that look as special as the day feels.